Applying Database Settings for all Users
CUSTADMIN access only
Database settings enable settings to be applied for all users using the current database that your are logged into.
Some settings are not applied until the next time you log into the software. We therefore recommend logging out and back in again after any settings are changed.
- Select Home, then select Settings from the menu.
- The Settings window is displayed. Select Database settings for all users from the left-hand panel, then select EDIT to enable all editable fields.
The following options are available:
Defining Document Status Colours
Defining Result Limits for Enquiries
Applying System Settings
Select the System tab. The following settings can be applied:
The number of days entered in Days Old Warning determines when a warning is displayed indicating that the document is older than the number of days specified. It does not prevent the document from being posted in IRIS Financials but does prevent documents from being posted in IRIS Purchasing.
This value determines the default number of decimal places to be used in applicable value fields. The default is 2, which can be amended as required.
When allocating documents an 'as at' date is set for audit reporting purposes. Select one of the following options from the Allocation Write off Date drop-down list:
-
Use Highest Allocation Date - uses the later of the two document dates as the date they were allocated. For example, if an invoice was dated 1st December, and was allocated to a payment for the invoice dated the 7th December, the allocation date taken would be the 7th December.
-
Use Today's Date - uses the date of the day you are allocating the documents.
(If your establishment/organisation processes transactions in a foreign currency, a conversion mode can be set to correctly convert foreign currency values entered. Select one of the following options from the Currency Conversion Mode drop-down list:
-
Foreign Units Per Home Unit (Multiply) - Uses the transaction value entered in a foreign currency to multiply against by the sterling (GBP) conversion value set within the software.
-
Home Unites Per Foreign Unit (Divide) - Uses the transaction value entered in a foreign currency to divide against a reciprocal sterling (GBP) values set within the software.
Security role settings can be applied to documents, ledgers, and nominals, that determine what functionality can be used by users. The facility to set security roles is enabled by default but can be switched off by deselecting the applicable check box from the options shown in the following graphic. Select SAVE to confirm your changes.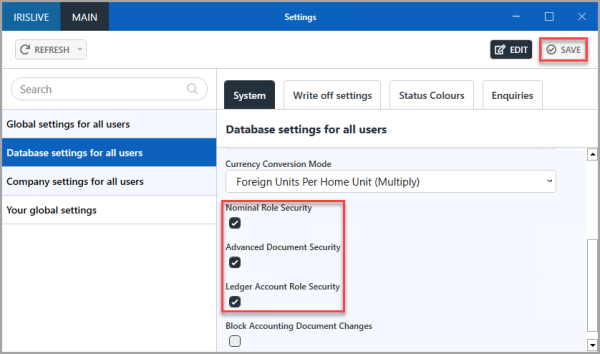
By default, any document can be edited in IRIS Financials. If you want to prevent this from happening, select Block Accounting Document Changes.
Applying Write off Settings
When allocating documents that do not balance perfectly, it is possible to define settings to automatically write off the difference. This can be useful where the VAT on a document differs by a few pence. The settings determine the document input form used, together with the maximum amount that can be automatically written off using this method.
- Select the Write-off Settings tab, then select Drill (...) in Nominal Write off Document Type.
To set a write-off document for foreign currency transactions, select Drill (...) in Nominal Currency Write off Document Type. - Double-select to select ALWO - Allocation Write Off.
- Finally, define the maximum amount that can be automatically written off, e.g. 1 (do not include any currency symbols i.e. £, $, etc.). Select SAVE.
Defining Document Status Colours
By default, a standard set of colours are used to identify the status of documents when viewed in enquiries. It is possible to change the colours to best suit your requirements, or determine not to use colour at all.
We recommend leaving the colours at their default as the use of different colours can cause confusion when referring to our online help and/or when contacting our Service Desk, as the colours many not be the same.
- Select the Status Colours tab, then select EDIT.
- Select the area of the software the colour is used from the Status Colour Mode drop-down list. The following options are available:
Row - displays the full document line on the enquiry in the status colour.
Indicator Column - displays the document status colour in a single column of the document line on the enquiry.
None - does not display any status colour for the document line on the enquiry. - To add a border to or remove a border from the document lines on an enquiry, select or deselect Add Darkened Border.
- To change the status colour, select the required colour from the drop-down colour picker.
- When any Status Colour settings have been selected, select SAVE to apply the changes.
Defining Result Limits for Enquiries
When the software is installed, default limits are set for enquiry results. You can change the limits for the results you want displayed. Enter the required value for each limit option, then select SAVE.