Producing a Supplier Report
In IRIS Financials, to view the spend for a supplier account (if required), a report can be produced. There are two methods that can be used to create a supplier spend report. A report is created manually by running a Detail Enquiry and the Detail Enquiry results can be exported to Microsoft Excel for further formatting. Alternatively, if you have the Reporting Suite module, the Supplier Spend Report can be run.
Creating a Supplier Spend Report consists of the following:
Running a Detail Enquiry to Create a Gross (including VAT) Supplier Spend Report
Running a Detail Enquiry to Create a Net (excluding VAT) Supplier Spend Report
Printing and Exporting the Detail Enquiry Results
Accessing a Detail Enquiry
-
Select Enquiries, then select Detail Enquiry from the menu.
-
The Detail Enquiry Criteria dialog is displayed. Complete the criteria for the type of supplier spend report required. For more information, please see Running a Detail Enquiry to Create a Gross (including VAT) Supplier Spend Report, or Running a Detail Enquiry to Create a Net (excluding VAT) Supplier Spend Report.
Running a Detail Enquiry to Create a Gross (including VAT) Supplier Spend Report
-
On the Detail Enquiry Criteria dialog, the Nominals and Accounts tab is automatically selected. Select Equals from the Ledger drop-down list. To select the required ledger, select Drill (...) in Value 1, then double-select to select PURCHASE - Purchase Accounts from the Select a ledger dialog.
-
Next, select the Periods tab. To set the range of periods to be included in the report, select Between from the Period Range drop-down list. To select the range of accounting periods select Drill (...) in Value 1 to select the first period, then Value 2 to select the last period. Double-select to select the required period from the Select a period dialog.
-
Next, to select the document types to include in the report, select the General tab. Select Not One Of from the Document Type drop-down list. To select the payment document types, select Drill (...) in Value 1, then double-select to select the required document from the Select a document type dialog.For example, ASB1- BACS Payment (where AS represents the location code of the document).
To add additional document types to the criteria for the report, on the Detail Enquiry Criteria dialog, in the Document Type panel, select ADD to display an additional value field, then select Drill (...) in Value to select a document type as detailed in step 3.
To break down the spend by location(s), select the Nominal Analysis tab, then select ADD CRITERIA.
The Criteria 1 panel is displayed. Select Location from the Analysis Field drop-down list, then select Equals in the second field. Select Drill (...) in Value 1, then double-select to select the required location from the Select LOCATIONS key dialog. Only documents relating to the specified location(s) are displayed in the Detail Enquiry.
To add additional locations, select ADD in the Criteria 1 panel to display an additional value field, then select Drill (...) in Value to select a location. -
On the Detail Enquiry Criteria dialog, select OK to confirm the selections.
-
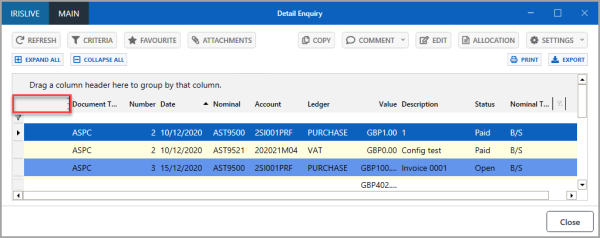
The Detail Enquiry window is displayed. To group the results by supplier account, select, hold, and drag the Account column heading up to Drag a column header here to group by that column.
-
The Detail Enquiry window then displays the documents by supplier account. Select Expand (+) adjacent to the supplier account code to view the documents related to each supplier. If you want to review the search criteria further, you can print the Detail Enquiry or export it to Microsoft Excel. For more information, please see Printing and Exporting the Detail Enquiry Results.
Running a Detail Enquiry to Create a Net (excluding VAT) Supplier Spend Report
-
On the Detail Enquiry Criteria dialog, select the Periods tab. To set the range of periods to be included in the report, select Between from the Period Range drop-down list. To select the range of accounting periods select Drill (...) in Value 1 to select the first period, then Value 2 to select the last period. Double-select to select the required period from the Select a period dialog.
-
Next, to select the document types to include in the report, select the General tab. Select One Of from the Document Type drop-down list. To select the document types, select Drill (...) in Value 1, then double-select to select the required document type from the Select a document type dialog. For example ASPC - Purchase Credit Note (where AS represents the location code of the document).
To add additional document types to the criteria for the report, on the Detail Enquiry Criteria dialog, in the Document Type panel, select ADD to display an additional value field, then select Drill (...) in Value to select a document type as detailed in step 2.
-
Next, select the Nominal Indices tab, then select ADD CRITERIA.
-
The Criteria 1 panel is displayed. Select Nominal Type from the Index drop-down list.
To break down the spend by location(s), select the Nominal Analysis tab, then select ADD CRITERIA.
The Criteria 1 panel is displayed. Select Location from the Analysis Field drop-down list, then select Equals, select Drill (...) in Value 1, then double-select to select the required location from the Select LOCATIONS key dialog.Only documents relating to the specified location(s) are then displayed in the detail enquiry.
To add additional locations, select ADD in the Criteria 1 panel to display an additional value field, then select Drill (...) in Value to select a location.
-
On the Detail Enquiry Criteria dialog, select OK to confirm the selections.
-
The Detail Enquiry window is displayed. To filter the results to exclude document VAT lines, select the blank right-hand side space adjacent to the Nominal Type column heading, then select B/S from the drop-down list.
-
To group the results by supplier account, right-select the blank space adjacent to the columns headings bar, then select X Account and X Account Title from the pop-up menu, then select anywhere on the screen to return to the Detail Enquiry window.
-
Next, select, hold and drag the X Account or X Account Title column heading up to Drag a column header here to group by that column.
-
The Detail Enquiry window then displays the documents by supplier account. Select Expand (+) adjacent to the supplier account code to view the documents related to each supplier. If you want to review the search criteria further, you can print the DetailEnquiry or export it to Microsoft Excel. For more information, please see Printing and Exporting the Detail Enquiry Results.
Printing and Exporting the Detail Enquiry Results
If you want to review the search criteria further, the Detail Enquiry can be printed or exported to Microsoft Excel.
Please follow the instructions for the applicable process:
Printing Detail Enquiry Results
Exporting Detail Enquiry Results
Printing Detail Enquiry Results
-
To print the Detail Enquiry, select PRINT.
-
The Print Preview window is displayed, select your printer details in the Printer panel, then select Print.
Exporting Detail Enquiry Results
-
To export the Detail Enquiry to Microsoft Excel, select EXPORT. The Save As dialog is displayed, select a location to save the file to, then select Save.
Saving Detail Enquiry Reports
The Detail Enquiry report can be saved, so that you do not have to follow the steps to set the Detail Enquiry criteria each time you want to find the supplier spend information.
-
On the Detail Enquiry window displaying the search criteria for the report, select FAVOURITE.
-
The Add Favourite dialog is displayed. Enter a name for the report settings, for example, Supplier Spend Net in Name, then select OK.
You do not need to select Save as a global Favourite, unless you want to make the report available to other users. -
To access the saved report, select Enquires, then select Favourites from the menu.
-
The Favourites window is displayed. Select the required report from the left-hand panel, e.g. Supplier Spend Net, then select RUN.
-
The Detail Enquiry window is displayed with the results for the original criteria selected. If the criteria needs to be amended, select CRITERIA to display the Detail Enquiry Criteria dialog.