Search for and manage documents
Over time, you can store many documents in IRIS Financials Purchasing. There may be occasions when you need to search for, then open, edit, or copy a document. A variety of search criteria are available to refine searches and filter the results displayed. You can then save any search criteria you enter as favourites for future use.
Entering search criteria
Over time, the number of documents stored in your system can be high and it is therefore useful to use a variety of search criteria to filter results.
For maximum system efficiency, many of the search windows load 20 results at a time (for example, when you are searching for suppliers, nominals, or accounts) As you scroll through the list, a further 20 are loaded. A slight delay might be noticeable on slower internet connections.
-
From the Home screen, select the Document Search icon.
- The Search Criteria window opens. Enter the search criteria in the top section, and the system shows the results in the lower section.
-
The following search criteria are available. Select Search to apply them. You can clear the search criteria at any point by pressing F5 to refresh your internet browser.
 Document Type
Select the required document type from the list or leave the default option of All Documents set. The available options are as this graphic shows:
If available (depending on your access levels), All Registered Documents (REG) are documents in IRIS Financials awaiting authorisation.
Document Number
Use the Number section to search for a document with a specific number (such as invoice number or GRN number) or to search for documents within a particular document number range.
Enter a specific document number in the first field or, to search for a range of documents, enter the first and last number within the required range, as the earlier graphic shows.
Last Modified/Document Date
You can also search for a document based on the date it was Last Modified (refers to the date the document was added to the system, or later amended), or the date of the document itself (such as the date on an invoice or GRN) in Document Date. This may well be the same date but often differs, especially for documents such as invoices where a physical invoice is received but not entered onto the system on the same day.
When you select in either field, a popup window with various date options appears.
Document Creator
Refers to the person who entered the document onto the system. Point to Creator, then select the magnifying glass icon. The Select window opens. Search for, then select the required user name.
Supplier
Restricts documents to those relating to a particular supplier. Point to Supplier, select the magnifying glass icon, then select the required supplier from the Selectwindow.
Refers to the person who authorised the document. Point to Authoriser, then select the magnifying glass icon. The Select window opens. Search for, then select the required authoriser (this functionality is not available to anyone on a standard workflow).
Location
Restricts the documents to those relating to a particular location for example, the location the items are being delivered to. Point to Location , then select the magnifying glass icon. The Select window opens. Search for, then select the required location.
Current Status
Refers to the current status of the document. The options available are those shown in this graphic:
Mixed approval is where a document has more than one status, such as approved, cancelled, or rejected.
Reference
Typically holds the invoice number for INV's.
You need to enter the exact invoice number to find a match. The system does not find partial matches.
Search results
Once a Search has been run, the search results appear in the Search Results window.
You can change the order of the results by selecting the individual column headings. Each time you select a heading the order is changed from ascending to descending.
You can also order on multiple columns in turn. For example, this graphic shows a search that has been ordered by Document Date, then by Status then by Creator. The numbers indicate the priority order of the search.
Saving search criteria as a favourite
If you frequently search using the same or similar criteria, you can save the search as a favourite for future use. For example, this can be useful if you want to list unauthorised purchase orders or check for missing GRNs on a regular basis.
-
Set the filter criteria as described in the previous section, then select Save Favourite.
-
The Favourites window opens. From the favourites window, enter a name for the favourite, then select Save.
A message then appears indicating the favourite has been successfully saved.
-
To run the favourite search, select the Favourites down-arrow and select the required favourite. The results automatically appear.
Managing search criteria favourites
-
Select Favourites to display the Favourites window.
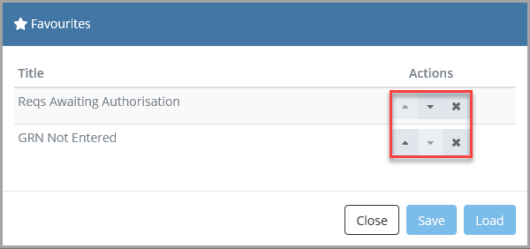
- Select the Cross icon (delete) adjacent to an unwanted favourite.
- Use the up and down arrows to change the order in the list.
- To edit a favourite, select the name, then select Load. Make any required changes, then select Save.