Applying Budget Checking Settings for Purchasing Documents
This guidance is only for IRIS Financials Version 7.0.2103 or earlier. If using version 7.0.2223 or later, go to Access to IRIS Financials Purchasing Documents.
When requisition or purchases orders are posted in IRIS Financials Purchasing, it is possible to determine whether a budget is checked to see if the amount being posted is within budget, and what to do if the amount posted exceeds the budget. The required settings are applied in the Distribution module. You can also set up how budget information is displayed and managed in IRIS Purchasing. For more information, refer to Applying Budget Settings in IRIS Purchasing.
- From the Windows Start menu, select PS Financials, then select Distribution.
- Log in using your IRIS Financials administrator login details.
- Select Masters > Workflow > Document Types from the top menu bar.
- Select Purchase Order or Requisition from the list on the left-hand side (depending on which document you are applying the budget settings to), then select Workflow....
- Select the required user group from the left-hand panel, e.g. PSFADMIN, then select Edit Status....
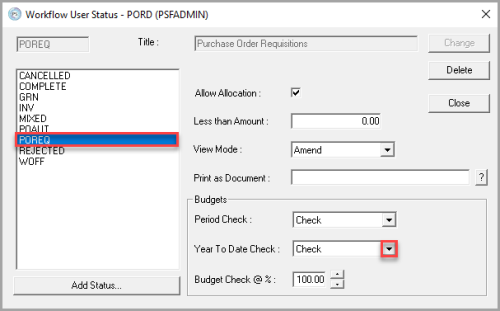
You need to repeat the process for each user group that needs the budget settings applied. - Select POREQ for requisitions or POAUT for purchase orders from the left-hand panel.

- The budget information is set in the Budgets section on the right-hand side. The Period Check field has been removed from IRIS Purchasing and can be ignored. From the Year to date drop-down list, select one of the following options:
No Check– allows all documents to be posted, regardless of whether they are within specified budget limits.
Check – displays a warning if the document being posted goes over the specified budget limits.
Enforce – prevents any documents above the specified budget requirements from being posted. - Once the required settings have been applied, select Change to save your changes, then select Close.