Importing Approvers
Approvers are set in the account user fields. It can be time consuming to update all of these individually, but it is possible to import the approvers via IRIS Financials.
For more information about how the approval process operates in IRIS Financials, refer to How the Purchasing Authorisation Process Works .
This topic will demonstrate how to import purchase order approvers into the user fields in IRIS Financials. The article also contains the relevant sqf import file and Excel data file, both of which can be found at the end. You can use this to also import requisition approvers.
The import process consists of:
Setting up and checking the users on the USERS ledger in IRIS Financials
Prior to importing or updating any authoriser, it is important to check that their authorisation limits have been set up correctly.
The USERS ledger holds the information and authorisation limits for the approvers. There is a rule within the system that automatically adds the users to the USERS ledger when they have been set up in IRIS Financials, so there is no need to add the accounts manually. To view the USERS ledger:
- Go to Masters > Accounts > USERS
-
Select the required user and click on the User fields tab.
The following fields are displayed:
- PO Approval User Limit - The maximum value of a purchase order the user can authorise.
- Full User ID - Full user name for the user.
- User Default Location Code - Main location for the user if they work at multiple locations.
- User on Holiday - Setting to show if the user is on holiday to divert the authorisation.
- User Holiday Approver - User who approves documents if 'User on Holiday' setting is 'Yes'.
- Req User Approval Limit - The maximum value of a requisition the user can authorise.
The PO Approval User Limit and Req User Approval Limit fields determine the maximum value of each purchasing document type. If the User is set an one of the approvers for an account, the system will look up the values in these fields to determine if this user should be set as the approver for a posted document.
User on Holiday must be set to Yes or No. If it is blank, the workflow will not work.
Once the accounts have been set up with their required limits, you can now import the approvers.
Importing approvers
The Excel 'Approvers' template attached to the bottom of this topic will allow you to import the approvers against specified accounts. This section will guide you through the use of the Excel and import process.
Information about the import spreadsheet
-
Download and save both attachments that can be found at the bottom of this article.
-
Open the Approvers Excel file. You will need to ensure you are on the Data tab with the green background.
The template is set up to import up to approvers for up to 100 accounts. This is covered by the green area on the spreadsheet. If your data exceeds the green space, then you will need to extend the formulas on the 'To Import' tab to ensure this additional data is picked up.
About the data on the spreadsheet
There are two ways of entering the data:
Creating a ledger list in IRIS Financials method
As the import data needs to be exactly as it appears in Accounting, using a ledger list to retrieve the account information can reduce the risk of an error occurring during the import. To create a ledger list:
-
Go to Options > Ledger List and select the relevant ledgers that contain approvers you wish to import.
Select Like from the drop down list and enter %COSTCTR you will see all cost centre ledgers that you have access to view.
- Go to the Account User Fields tab and tick the required PO Approval Level boxes and click OK.
This will give you a list of all cost centres with the approval fields you have selected. - Remove all non-required fields by dragging the headings off the screen, so that you are just left with Account, Ledger, PO Approval Level 1, PO Approval Level 2 and PO Approval Level 3.
- Click Send to Excel - save and open the file.
- In the relevant approver fields, you can enter the account names of the new approvers as they appear on the USERS ledger. You can overtype any existing approvers with the new approvers.
-
Once the list has been completed, copy and paste the data without the headings into cell A2 on the Approvers spreadsheet downloaded earlier.
If you scroll down to the bottom of the data and can still see some of the green background, then you will not need to adjust any of the formulas on the next page.
- Click on the To Import tab and you will see the data has automatically pulled through in the required format for the import.
- Delete any rows which have zero values in them as these are not required.
-
If you need extend the formulas to include any data that has not pulled through you can do so on row 299 onwards.
Look at the formulas for the existing data for an indication of how they work in order to add additional lines in if required. Or simply just type the rest of the data in yourself if you are not sure how to insert additional formulas.
-
Once you are happy with the data, click File Save as Give the file a name and save as a CSV Comma Delimited file.
Now you are ready to import the file.The import process cannot be reversed, so it is recommended copying live to test before this process is attempted, so you have a backup of the original data. Refer to Copying a Live to a Test Database .
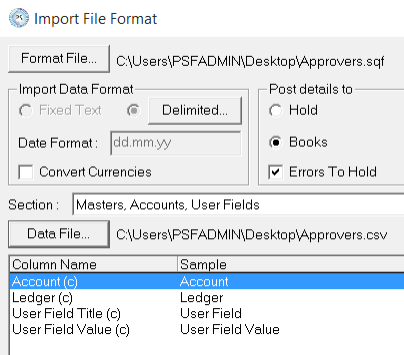
- In IRIS Financials go to Options > Import. Click the Format File button and select the Approvers.sqf file that can be found at the bottom of this topic.
- Click on the Data File button and select the csv file with the new approvers.
- You will then see a preview of the import in the window below. Ensure the headings match up and click Import.
 You will see a report which will show you if each line has been successfully imported (The first line will always error as it cannot import the headings). Please refer to the common issues section at the bottom of this guide for troubleshooting errors.
Manually entering the data onto the spreadsheet method
- Download and open the Approvers Excel file, then go to the To Import Tab.
-
Using the demonstration data, enter the information in under the required headings.
All data needs to be completed exactly as it appears in IRIS Financialsor the import will fail. This includes case sensitivity.
The Account names can be found under Masters > Ledgers > Double Click on the required ledger to the see the account codes.
The Ledger can be found under Masters > Ledgers.
The User Field column will already be populated.
The User Field Value column will be the Users Account name. This can be found by going to Masters > AccountsUSERS. - Delete any rows which have zero values in them as these are not required.
-
When you are happy with the data, click File > Save as then give the file a name and save as a CSVComma Delimited file.
Now you are ready to import the file.The import process cannot be reversed, so it is recommended copying live to test before this process is attempted, so you have a backup of the original data. Refer to Copying a Live to a Test Database .
- In IRIS Financials go to Options > Import. Click the Format File button and select the Approvers.sqf file that can be found at the bottom of this topic.
- Click on the Data File and select the csv file with the new approvers.
- You will then see a preview of the import in the window below. Ensure the headings match up and click Import.You will see a report which will show you if each line has been successfully imported (The first line will always error as it cannot import the headings). Please refer to the common issues section at the bottom of this guide for troubleshooting errors.
Common issues
XXXX is not a valid Ledger, therefore the information cannot be added to the system
This indicates the Ledger code you have entered does not match that exactly as it appears in IRIS Financials. The Account names can be found by going to Masters > Ledgers.

XXXX is not a valid Account, therefore the information cannot be added to the system
This indicates the Account code you have entered does not match that exactly as it appears in IRIS Financials. The Account names can be found by going to Masters > Ledgers, then double-click on the required ledger to the see the account codes.

'0' is not a valid Account, therefore the information cannot be added to the system
This indicates that you have not deleted the zero lines on the csv file. Open the csv file, delete the rows and re-import.

'0' is not a valid Ledger, therefore the information cannot be added to the system
This indicates that you have not deleted the zero lines on the csv file. Open the csv file, delete the rows and re-import.
