Backup SQL Database
A back up of the database should be taken prior to any work taking place involving large amounts of data e.g. year end, SQL scripts, amendments directly to database tables in SQL.
This back up can be taken from within SQL Server Management Studio (found on the SQL server).
- Select Start and search for Microsoft SQL Server Management Studio.
- Log in using the applicable Login and Password and click the Connect button.
- SQL Server Management Studio is displayed. Right-click on the applicable database you want to back up - e.g, PSFLIVE and select Tasks > Back Up.
-
Select the Copy-only backup check box. Selecting this will not disrupt the SQL backup sequence.
-
A default backup location is automatically populated, within the Destination section. However if you do require to save the backup to an alternative location, click on the Remove button to delete the default backup location.
-
Click the Add button to setup a new location backup, if required.
- The Select Backup Destination window is displayed. To select an alternative save location, click the ... button.
-
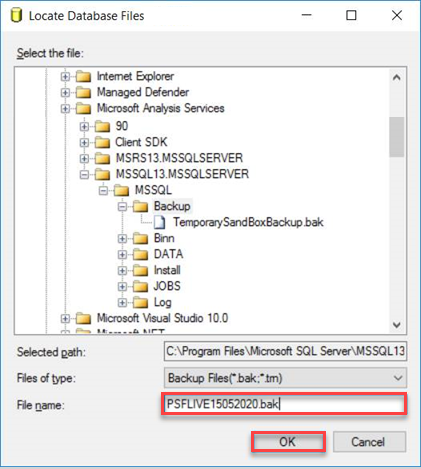
The Locate Database Files window is displayed. You can navigate to the desired folder for your backup and specify a filename.
When specifying the filename always suffix the name with the SQL backup extension (.bak).

When specifying a File name, choose a naming convention so it can be easily identified if required. A suitable naming convention should be in the following format: DATABASE DATE.bak. - Once the backup location and file name has been selected click the OK button to return the main back up window.
- Click the OK button to begin the back up.
- The back up progress is displayed in the Progress pane.
- A message will display when the back up has been completed successfully. Click the OK button.
Your database back up is complete.