Installing My Portal
MyPortal needs to be installed on your IRIS Financials server.
Prior to starting the installation for MyPortal, an Application Pool needs to be created in Internet Information Services (IIS) Manager.
-
In IIS manager, browse to the Application Pools section, then select Add Application Pool.
-
Enter a Name for the new application pool. E.g. MyPortal. The other settings will need completing as below:

-
Select OK.
When installing MyPortal on the server, you need to install the ASP personalisation tables on the PSFSYSTEM database. This is done by using the ASP.Net utility program. To run the utility:
-
Open the command prompt window and enter c:\Windows\Microsoft.NET\Framework\v4.0.30319\aspnet_regsql.exe.
-
Press Enter.
-
The ASP.NET SQL server setup wizard displays. Select Next to continue.
-
Select Configure SQL Server for application services and select Next.
-
Enter the Server Name along with your system administrator Username and Password.
-
Change the Database to PSFSYSTEM.

MyPortal can be installed.
-
Find and run MyPortalSetup.exe.
-
Select Next on the first dialog.
-
The Checking Prerequisites dialog displays. If any of these options are not selected, they will need adding via Control Panel > Add/Remove Window Features.
If they are all selected, click Next.
-
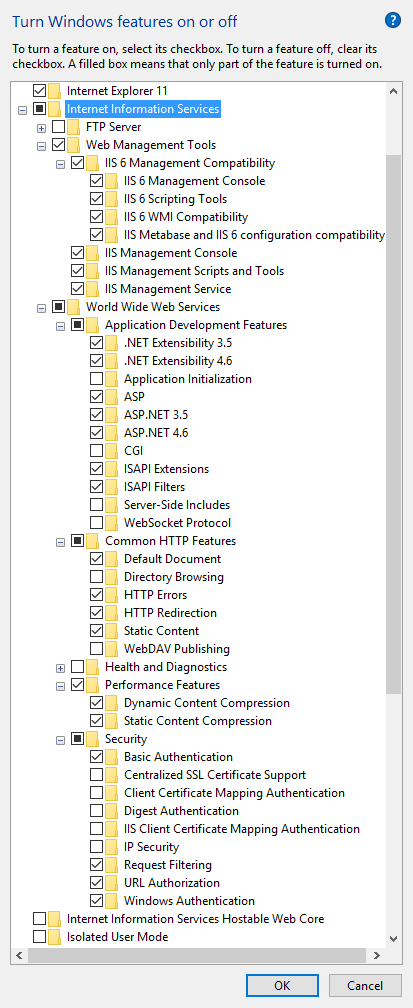
The Turn Windows features on or off dialog displays. The following features must be selected. Select OK when you have selected the applicable features.
-
Enter the following settings:
-
Server name or IP: including any instance
-
Username: SQL Administrator username
-
Password: SQL Administrator password
-
Personalization Database: Typically PSFSYSTEM
-
-
The Server and Port for the Licence Service are required on the next screen.
-
Choose the Site and App Pool from the drop down lists. The Virtual Directory can be set to a relevant title e.g. MyPortal.
-
The SMTP details (if known) can be added in on the next screen.
-
The following dialog is the Report Viewer settings.
-
The Report Viewer Server is the address set within Reporting Services Configuration Manager, it will need to be in the format http://<SERVERNAME>/ReportServer.
If there is an instance on the SQL server then this will need to be added to the format http://<SERVERNAME>/ReportServer_<INSTANCENAME>.
-
Enter the Report Viewer Username and Report Viewer Password. This user must have access to Reporting Services.
-
Enter the Report Viewer Domain (the domain the end users are in) and select Verify.
-
Select Install. Once this has completed select the Finish button.
-
The installation SQL script will now need running, this can be found in c:\inetpub\wwwroot\MyPortal.
The installation of MyPortal is now complete.