Investigating Intercompany / Location Differences (Using IRIS Tool)
Intracompany variances can occur due to the following:
1) Intracompany Rule is turned off meaning no automatic INTR document is posted
2) A document which was originally posted across two or more locations has been changed and is now only one location. This would leave an INTR document due to the original posting that would need to be reversed.
3) A document has been changed which is posted across multiple locations, but the INTR documents have not been updated to reflect the changes made.
This guide will show you how to use a tool developed by the Support Team at PS Financials to assist in finding these variances. The tool is a spreadsheet which requires at least intermediate knowledge Excel to use. If you do not wish to use this, we have provided a manual process which can be found Investigating Intercompany / Location Differences (Manual Method).
The Support Team at PS Financials have developed a tool which may help assist in finding some of the documents causing the imbalances across the locations.
The tool is an Excel spreadsheet which cross references where INTR documents exist and compares these to the source documents to identify whether these are still needed. In addition it checks where there are value differences between the INTR documents and the source documents where amendments have been made by end-users.
The Tool provided in the guide is not official PS Financials Software. It has been developed and tested by the PS Financials Support Team and providing the instructions are followed carefully, it identifies documents that will cause an unbalanced Trial Balance per location.
PS Financials will not provide any additional support or guidance in the use of this tool or fix the tool in relation to attempted amendments by the end-user. It is recommended that any results from the tool are sense checked in Accounting before any attempted corrections are made. PS Financials will not will not be held accountable for any mis-postings arising from use of this tool.
Use of the tool requires an Intermediate knowledge of Excel as you may need to add in extra columns and copy formulas. Due to the number of formulas and dependant on the size of the data being imported, you may find that some calculations can take some time. If this is the case, we would recommend turning off the automatic calculation of formulas. An internet search will be able to advise you on how to do this. This tool will allow analysis for up to 14 locations at a time.
If you require any further locations, you will need to copy the formulas in the hidden columns on the relevant tabs. We would recommend someone with Advanced Excel knowledge complete this as any errors will lead to incorrect results.
Exporting the Data from Accounting
-
Log into Accounting as CUSTADMIN or PSFADMIN.
-
Please check the Hold Database to ensure any CHAR or INTR documents are not saved here. To do this, please follow the guidance Move Documents from the Hold Database .
-
First you will need to identify which locations do not balance to zero. Go to Options > Trial Balance and select the period you want to check for imbalances:
It is recommended that you use the Tool to check one period at a time, rather than attempt multiple periods at once due to the amount of data being returned.
-
When the Trial Balance has been run, select Columns option and ensure the Location tick box is selected.
-
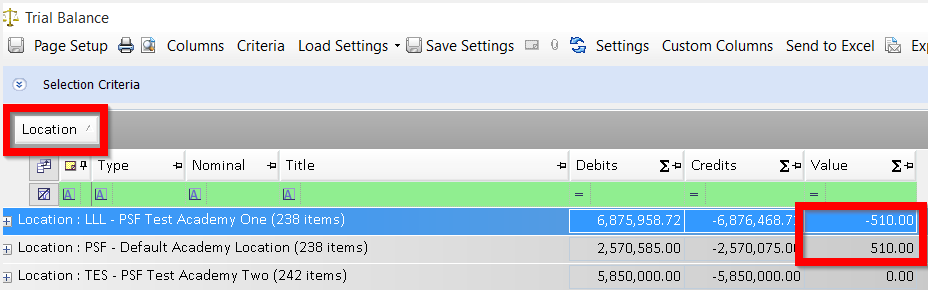
Close the selection window and drag the Location header to the top to group by this header. As you can see, two of the locations do not balance. We will need to investigate these locations to find out why there is a balance.
You will need to run two separate Account Enquiries.
-
In Accounting, go to Options > Account Enquiry. Click on the Criteria tab and select the relevant period that you are checking the variances.
-
In Types, select 'Not one of' and then enter the Intracompany - INTR and Central Charge - CHAR Document types.
-
Select OK to load the report.
You must ensure you note the correct order of the columns and remove any which appear on the Account Enquiry, but are not listed below. Failure to do this will cause the Tool not to work.
-
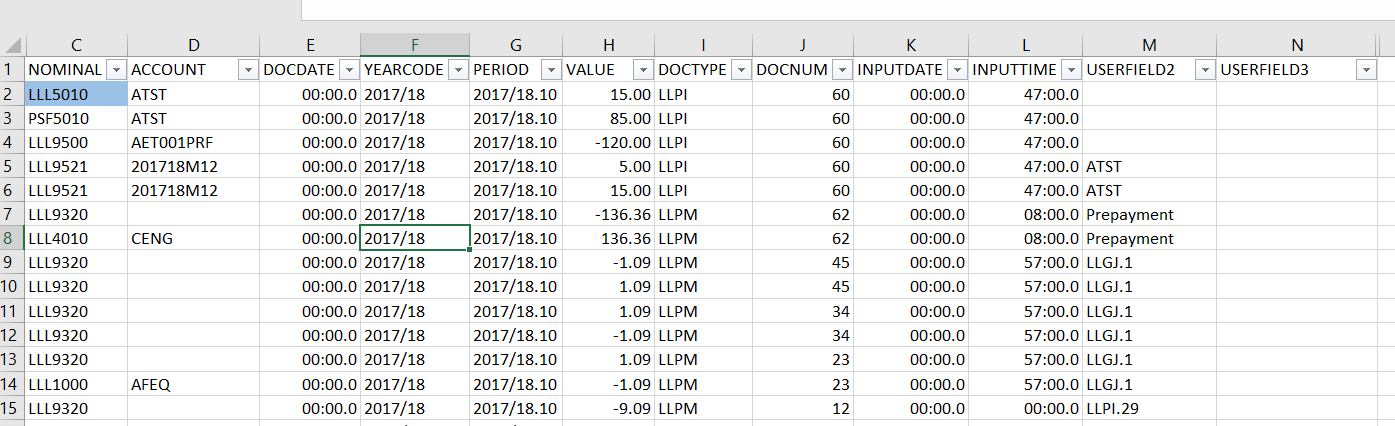
You will need to move/re-arrange the Columns to be in the following order:
-
Nominal
-
Account
-
Doc Date
-
Yearcode
-
Period
-
Value
-
Doctype
-
Docnum
-
Input Date
-
Input Time
-
Userfield 2
-
Userfield 3
You can remove unwanted columns by dragging them upwards off the enquiry
-
-
Once the columns are in the correct order, click the Send to Excel button.
-
Save this file.
-
Open a new Account Enquiry from the Options Menu.
-
This time run for the same period, but select 'One of' Intracompany - INTR and CHAR document types as shown below:
-
The columns will need to be in the order as shown below (Please note this is slightly different to the first Account Enquiry):
-
Nominal
-
Account
-
Doc Date
-
Yearcode
-
Period
-
Value
-
Doctype
-
Docnum
-
Input Date
-
Input Time
-
Userfield 2
-
-
Use the same method as before to re-arrange and remove any unrequired columns and save to Excel.
Using the Tool
-
Open the tool which can be found at the bottom of this guide along with the first Account Enquiry that was exported.
-
On the Tool, select the Red D_DETAILS tab at the bottom. Copy and paste the data into the Blue cell - C2 as indicated below - please do not copy the Headers or 'Grand total' at the bottom of the spreadsheet:

-
Once the data has been pasted, it should look something like the below:
-
Repeat this with the second CHAR/INTR export from Accounting but paste onto the orange INTR_CHAR tab in column B2.

-
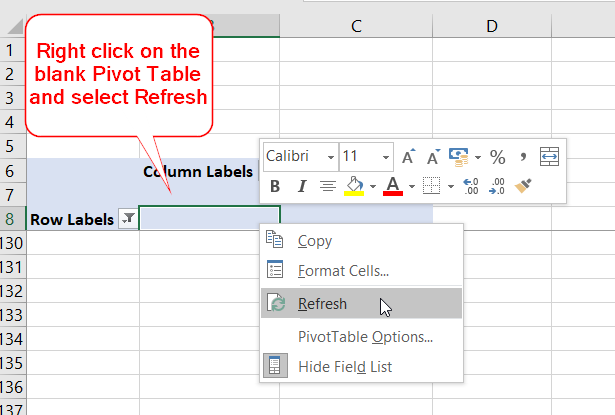
Once this has been pasted, click on the green Pivot tab, right-click on the blank pivot table and select 'Refresh'.
-
Remove any (Blanks), Full Stops or other erroneous data from both the Column and Row filters as shown below.
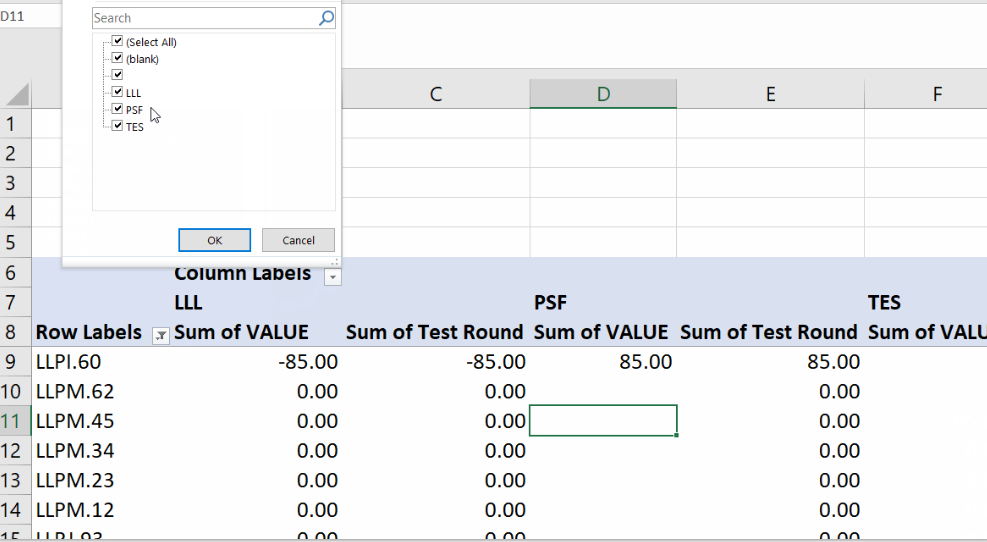
If locations are not showing across the pivot table, check the filters to ensure you have not unselected them.
-
Go back to the orange INTR_CHAR tab and copy the data from column 'L' (not the header) and paste into column A2 on the blue Amended Documents tab.
-
The next step is to remove the duplicates from the tab. To do this, highlight column A, go to the Data section on the ribbon and select the Remove Duplicates icon.
-
When prompted, select 'Expand the Current Selection' and then select only the 'Document' header and click OK.
Investigating Potential Issues
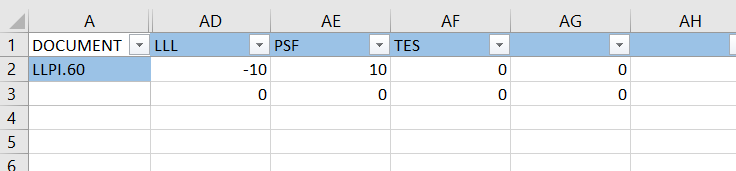
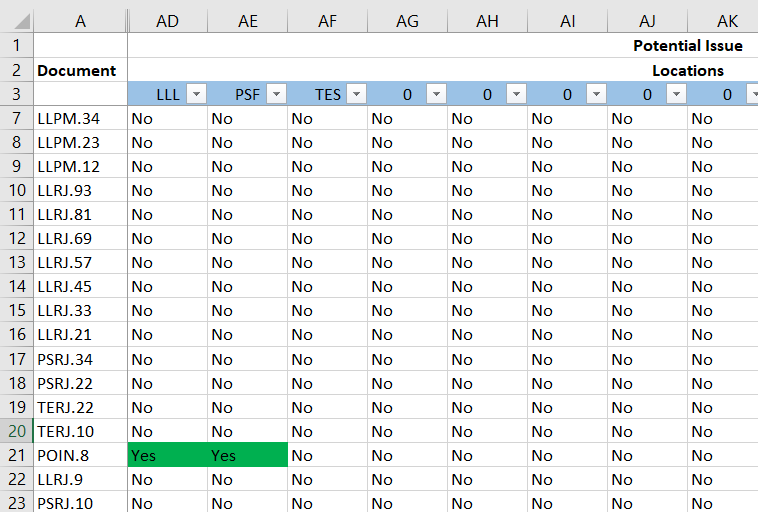
After removing the duplicates, any entries shown in columns AD to AQ are potential issues. In the example below, we can se document LLPI.60 has a variance of -10 on Location LLL and 10 on Location PSF.
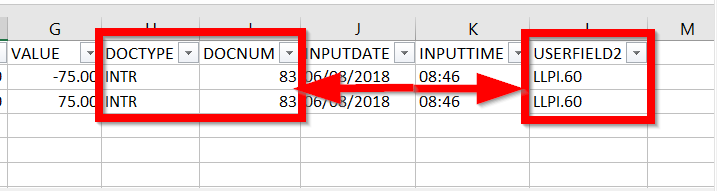
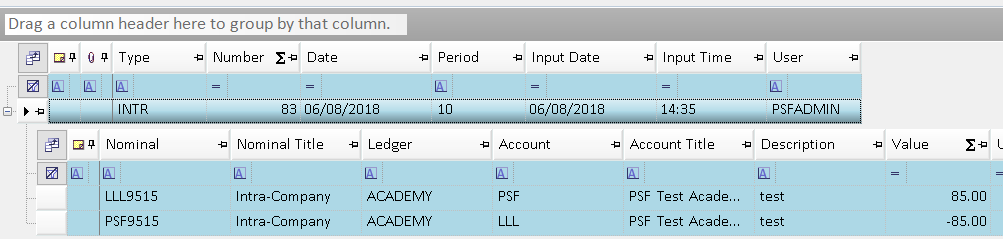
If you check on the orange INTR_CHAR tab, you will be able to see which INTR document relates to the potential issue. In this example INTR83 is linked to LLPI60:
If you do a Document Enquiry in PS Accounting on both documents, you will be able to see the issue.
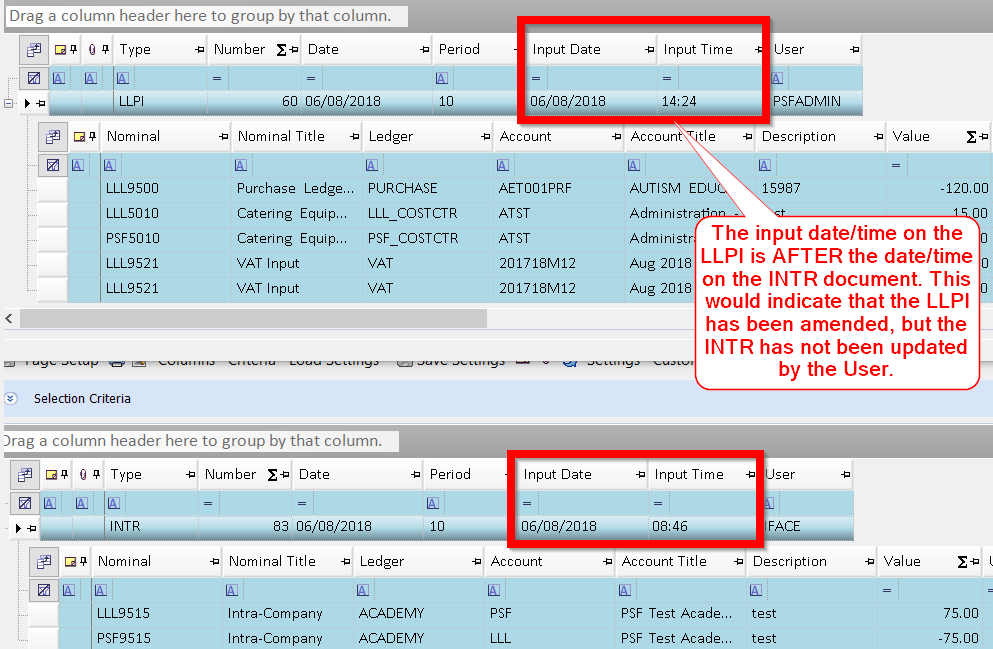
LLPI60 is an LLPI relating to Location 'LLL' for -120.00. On this document 85.00 relates to location 'PSF'. The INTR for this should also be for 85.00 to ensure the Trial Balance balances.
If you look at the INTR document, this is only for 75.00, which is causing the 10.00 variance as shown on the Excel Tool.
In this example the LLPI has an Input Date of 06/08/2018 and an Input Time of 14:24, which is after the Date/Time on the INTR. This would indicate that the LLPI has been changed, but the User has not also amended the INTR. The INTR documents do not update when the source document has been changed.
The INTR83 document will need to be amended to 85.00 so that it matches the source document.
Once you have worked through all of the required corrections on the orange INTR_CHAR tab, click on thepurple INTR Check tab. This tab will indicate any documents that may be missing an INTR document.
In the example below, we can see there may be an issue with POIN8.
If you check on the orange INTR_CHAR tab in column 'L', you can see there is no POIN.8 which would indicate there is no INTR document for POIN 8.
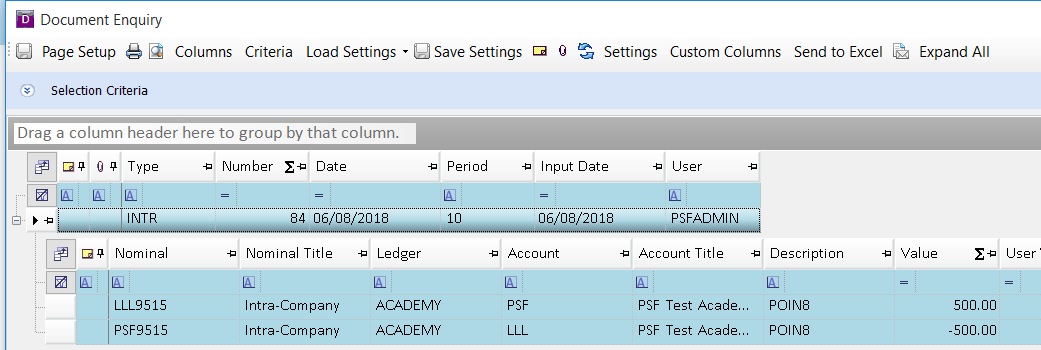
If you do a Document Enquiry for POIN 8, you can see it is an 'LLL' Location document but also has a detail line for the 'PSF' location for 500.00.
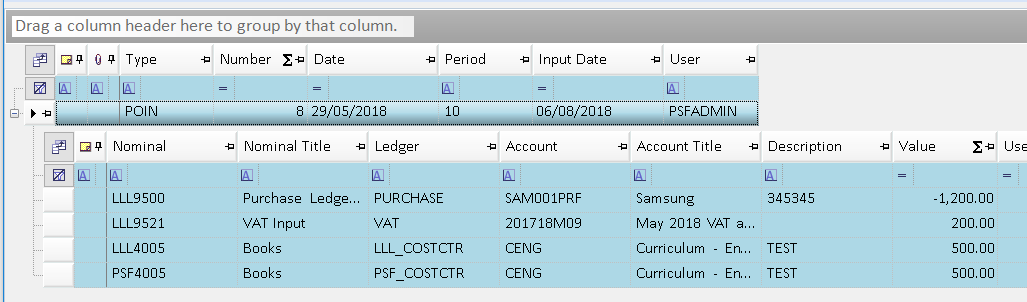
There should be an INTR document for this POIN, but as per the spreadsheet, there isn't one. To correct this an INTR can be added manually form the document input screen.
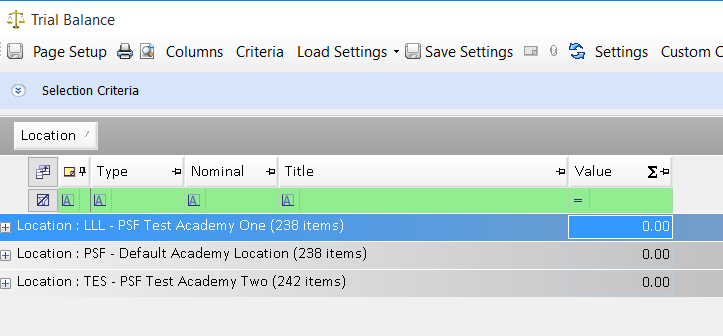
Once all of the other documents on the purple INTR Check tabhave been investigated and corrected, you can re-run the Trial Balance.
As you can see in our example, our Trial Balance now balances.
The examples above are generated from a Test environment where the different scenarios have been created in order to show how the Tool should be used. You may find that you have a greater number of documents that require investigation. This tool may not capture all variances, but our own testing has 100% success rate at the time of publishing.