Importing Fixed Assets
If you have a large number of fixed assets to add to IRIS Financials, you can use the IRIS Financials import function to import them.
This topic is based on a standard Version 6 Education Database and as such will not support any additional userfields or bespoke fixed asset set-ups.
You will need to import two different csv files - one for the Asset Accounts and another for the User Fields. Please download the following 4 attachments in order to complete the import.
Before you can use the sqf files, you must unzip the downloaded file.
1. Fixed Asset Import Accounts.sqf
2. Fixed Asset User Fields.csv
2. Fixed Asset Import User Fields.sqf
Completing the fixed asset templates
This section will advise on how to complete the fixed asset templates. The templates contain your fixed asset data that will be imported into IRIS Financials.
There are two templates that need to be completed and imported separately - Fixed Asset Accounts and Fixed Asset User Fields.
Please do not attempt to open or modify the two .sqf files as these are already in the required format to import the asset templates.
Fixed Asset Accounts
-
Download all four attachments from the top of this topic (1.Fixed Asset Accounts.csv; 1.Fixed Asset Import Accounts.sqf; 2.Fixed Asset User Fields.csv and 2.Fixed Asset User Fields.sqf).
These can be renamed. The numbering on the current filenames is to assist with the order the files need to be imported.
- Open 1.Fixed Asset Accounts.csv file. This contains rows for the asset Account, Title and Ledger.
- The file contains example data which you will need to over type or delete prior to import. Please complete the fields as follows:
Account: The Account Code of the asset. It can only be a maximum of 12 characters and should not contain any spaces.
Title: The full title of the asset.
Ledger: Ledger where the asset is associated. - When you have completed the data, save the file which is now ready to import.
Fixed Asset User Fields
The fixed asset User Fields contain the references and parameters for an asset. These are used in reporting and for calculating depreciation.
- Open the 2. Fixed Asset User Fields file. This contains the information required to import the User Fields associated with each asset you created in the Fixed Asset Accounts template.
- The file contains example data based on the example assets that are in the Fixed Asset Accounts template.
Account: Account code of the asset the User Field will be associated with.
Ledger: Ledger where the asset is associated.
User Field: The name of the User Field. The standard ones are displayed on the following graphic.
User Field Value: Value of the applicable User Field.
You will notice that each User Field item has to be entered on a separate line. The following graphic shows how these correspond to the fixed asset User Fields.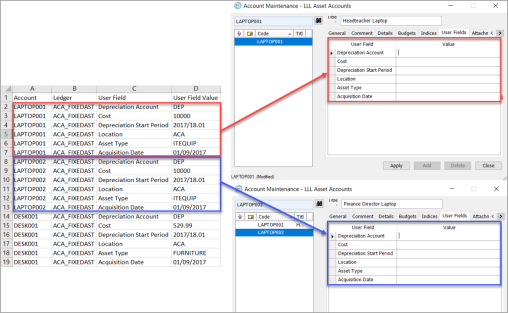
- The User Fields must contain the following:
Depreciation Account: Account where the in-year depreciation is posted. The account you enter on the spreadsheet may be different to the one in our example and must match the account code set up in your IRIS Financials system. As standard, the depreciation account can be found on your Capital Ledger.
Cost: Original full cost of your asset. Please do not use the current net book value as this may cause the asset to be incorrectly depreciated if you are using the in-built depreciation rule.
Depreciation Start Period: The period which the asset started or starts to depreciate. Please note, this period can be set to a year/period before you started using IRIS Financials. Must match the year and period format used in IRIS Financials. To see these, select Masters > Periods from the IRIS Financials main menu bar.
Location: Location within your trust where the asset can be found.
Asset Type: Category of the asset. This will determine the useful life of the asset. Please refer to your ASSETTYPE ledger (Masters > Accounts > ASSETTYPES) for the applicable Asset Type. For more information on Asset Types, see Add/Edit Fixed Asset Types.
Acquisition Date: Date the asset was acquired. - Complete the spreadsheet for all required assets and save. Both files are now ready to import.
Importing the fixed asset templates
Before importing the fixed asset templates, please ensure the files are in a location that can be accessed via IRIS Financials.
To import the templates in IRIS Financials:
- Select Options > Import from the main menu bar.
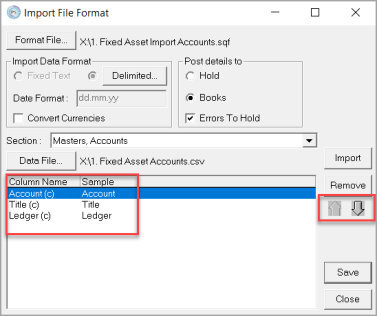
- Click the Format File button and select the 1.Fixed Asset Import Accounts.sqf file.
- Click the Open button. The Account(c), Title(c) and Ledger(c) fields will appear in the sample window.
- Click the Data File button and select your template containing your asset accounts. In our example it is 1. Fixed Asset Accounts.
- Click the Open button.
- The Sample field in the Sample window should match the Column Name field. You can use the Up and Down arrows to re-arrange the columns if required.
- Click the Import button to start the import. The Do you want to save the changes? prompt appears. Click the Yes button.
-
When the import is complete, the Import Report window displays as shown in the following graphic. This will indicate if the import has been successful.
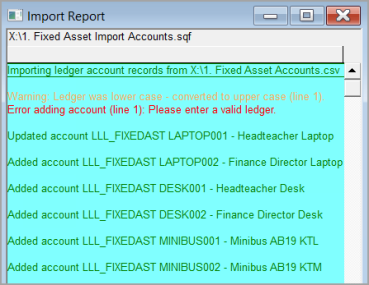
Line 1 will typically display an error as the CSV header row will not import into IRIS Financials. This will not cause any issues with the rest of the data.
- Close the Import Report window and select Options > Import from the IRIS Financials menu.
- Click the Data File button and select your template containing your asset User Fields. In our example it is 2. Fixed Asset import User Fields.sqf.
- Click the Open button. The Account(c), Ledger(c), User Field Title(c) and User Field Value(c) fields will appear in the sample window.
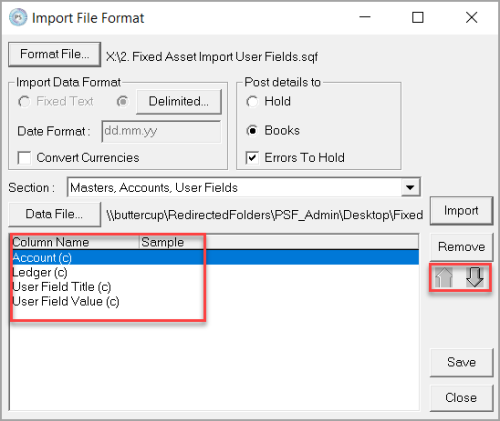
- Click the Data File button and select your template containing your asset User Field data. In our example it is 2. Fixed Asset import User Fields.sqf.
- Click the Open button.
- The Sample field in the Sample window should match the Column Name field. You can use the Up and Down arrows to re-arrange the columns if required.
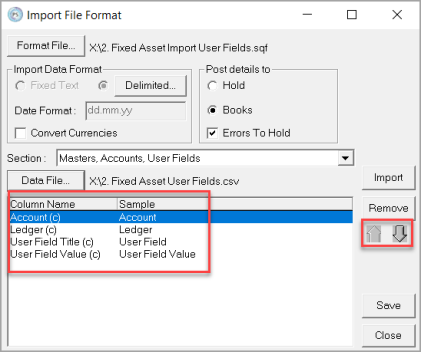
- Click the Import button to start the import. The Do you want to save the changes? dialog is displayed. Click the Yes button.
-
When the import is complete, the Import Report window displays as shown in the following graphic. This will indicate if the import has been successful.
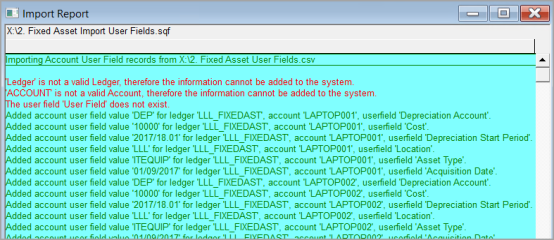
Lines 1 to 3 will error as the headings will not import into IRIS Financials. This will not cause any issues with the rest of the data.
- The Import Report window can be closed.