Posting Direct Debit Transactions
The nominals and ledgers used in this topic may be different to those in your chart of accounts.
There are two types of direct debit posting in IRIS Financials.
- Purchase Payment against the supplier account to clear off an invoice.
- Miscellaneous Payment which will post the payment directly to the expense nominal where a there is no invoice involved.
This topic describes how both postings work. There is also a frequently asked questions section which will cover issues such as changing the supplier account on a direct debit posting and amending the amount of a direct debit payment.
Direct debit posting to a supplier account to clear off an invoice
This option is to be used for when a direct debit has been taken which is paying off an invoice against a supplier account.
To post this type of direct debit:
- In Accounting go to Options > Document Input. Alternatively, click on the short cut icon as shown below.
-
From the Document Type drop down list, select Direct Debit or Standing Order for the relevant location.
- From the Input Form drop-down list, ensure Purchase Payment is selected.
-
Enter the Date to post the document. This must be the date the direct debit has left your bank account.
If the date on the bank statement is different to the posting date, the bank reconcilation report may not balance.
- Enter the Period that the direct debit relates to and click OK. This will open the document input form.
-
The Bank Account will automatically populate with the default bank account for the specified location.
- Double click in the Account field and select the supplier account.
- In the Value field, enter the amount of the direct debit that was taken.
-
The Description field should be a description of what the direct debit is for.
The Account Summary on the right hand side will show the Creditor Balance across all locations. So even if the balance does not match that of your own location, it will also include balances from other locations within the organisation even if a user does not have access to them.
- Once complete hold SHIFT and F5 to post and allocate the document. Alternatively click on Post(UDI) from the top menu and click on Post & Allocate. This will take you to the Supplier’s account where the Direct Debit document you have just created will be highlighted in green.
-
Click in the grey box against each line you wish to allocate with the direct debit payment and click the Confirm button.
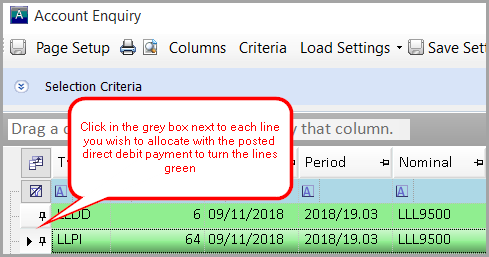
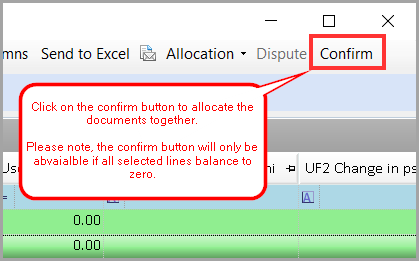
The confirm button will only be available if all lines balance to zero. The nominal and account must be the same on all documents being allocated together. If they are not, the confirm button will not be available to select.
Miscellaneous Direct Debit which will post the payment directly to the expense nominal where a there is no invoice involved
If a direct debit has been taken but there will not be an invoice to allocate the payment against, it can be recorded directly to the expense account.
To post this type of direct debit:
- In Accounting go to Options > Document Input. Alternatively, click on the short cut icon as shown below.
- From the Document Type drop down list, select Direct Debit or Standing Order for the relevant location.
- From the Input Form drop down list, ensure Miscellaneous Payment is selected.
-
Enter the Date to post the document. This must be the date the direct debit has left your bank account.
If the date on the bank statement is different to the posting date, the bank reconciliation report may not balance.
- Enter the Period that the direct debit relates to and click OK. This will open the document input form.
- The Bank Account will automatically populate with the default bank account for the specified location. You can change the default bank account for each location.
- In the Amount field, enter the total amount of the direct debit payment.
- The Description field should be the description of what the direct debit is for.
- In the Nominal field, enter the expense nominal to show what the direct debit is for: e.g. Rates, Electricity etc.
- The Account field is to show which department the expense should be coded to.
- The Gross is the total amount of the direct debit including any VAT.
- VAT Rate is for any VAT.
- The Net field will automatically populate based on the Gross and VAT rate entered.
- The Supplier VAT Number field must be completed if the Direct Debit is to be shown on the VAT 126 report.
- The Prepayment Start Date and Prepayment End Date fields can be completed if you wish to prepay the direct debit. The format of the date needs to be dd/mm/yyyy.
- Press F5 to post the document once all of the information has been entered.