Importing Accruals
Accruals are typically entered using the AC - Accrued Income / Expense document input form. It is possible to import accruals as one off transactions or as part of a monthly schedule.
This topic describes how to import accruals which then generate the automatic reversal documents in the specified accounting period, together with any common issues that may occur.
The required CSV template and sqf file can be found at the bottom of this topic.
Completing the Import Template
The import file can be found at the bottom of this article. Please download and open this file if you do not already have it.
You will need to complete all fields required as follows:
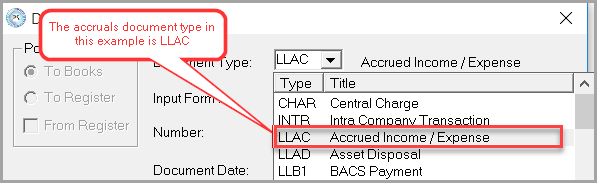
Doctype: This will be the accruals document type prefixed by any location or company code. To check the accruals document type, go to Options > Document Input and find the document type for the accruals document.
Important: Please choose a different document type for each location required. This will ensure no Intracompany documents are posted after the import has been completed.
Row number: This indicates which row number on a document the detail line is for. Each time a row starts with 1 the system recognises that it is a new document. Each location will require the document row to start with 1.
Tip: The row numbers can be used to import the accruals in two different ways - Individual documents with differing dates, or single document if all accruals are reversing on the same date and period. The two examples below will show how these can be set up.
The following example shows four lines. However, there are actually two separate documents each consisting of two lines. This is because the third line starts with a 1 indicating a new document.
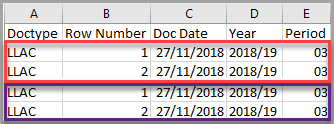
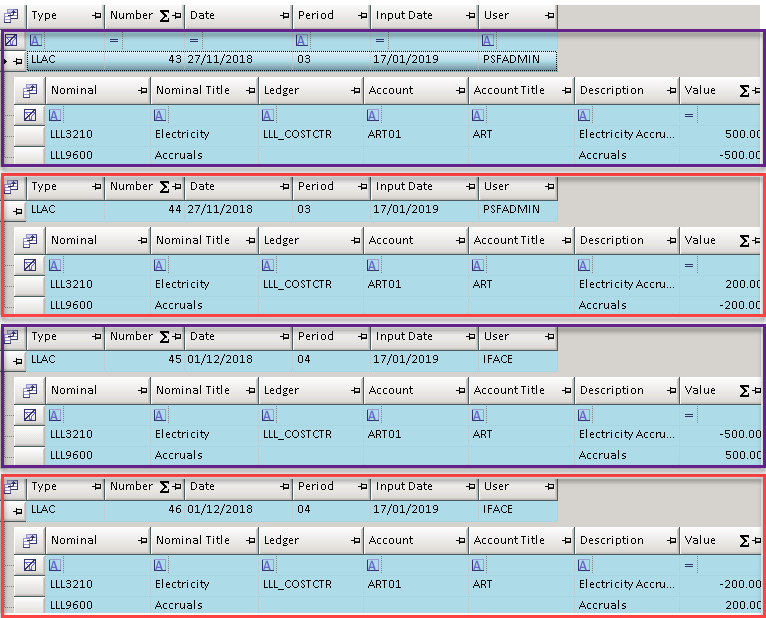
The result will look like the following when imported. The two different documents are highlighted with their corresponding colour:
Doc date: This is the date of the source accrual document. It must be entered in a dd/mm/yyyy format.
Year: This is the financial year that the source document is posted into. This is usually in yyyy/yy format - e.g. '2018/19'. You can double check this in Masters > Periods.
Period: This is the accounting period that the source document is being posted into. This must be in two digits - e.g. 01, 02 and so on. When the CSV file attached in this article has been opened, it will only show in single digits and error if imported.
Nominal: This should contain the detail lines where the income or expenditure should be coded to. It should also contain the accruals nominal to balance off the income or expenditure lines on each individual document.
Account: The account is where you will apportion the income or expenditure detail lines to. Please note the accruals nominal line does not typically require an account.
Description: This is a description of the accrual.
Value: This will be the value of each detail line of the accrual. Please note that any credits will need to be entered with as a minus figure.
Reversal date: This is the document posting date the accrual will reverse with. This must be entered in a dd/mm/yyyy format.
Reversal year/period: This is the year and period that the accrual will reverse into and must be entered in a yyyy/yy.mm format. For example '2018/19.04' will reverse into period 04 of 2018/19.
Type of accrual: This should be entered as ACC_EXP for accrued expenditure or ACC_INC for accrued income.
Once all fields have been completed, save the spreadsheet.
Importing the Accruals Template
Before you import the Accruals template, you must ensure the accounting periods
- Log in to IRIS Financials and select Options > Import from the top menu.
-
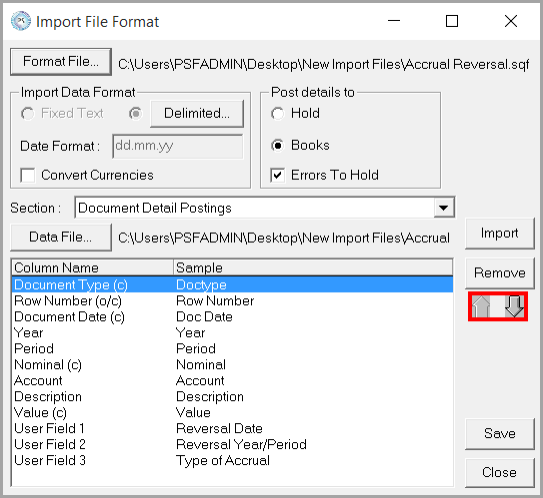
The Import File Format dialog is displayed. Select the Format File button and select the SQF file that you downloaded from the bottom of this topic.
-
Select the Data File button and select the CSV file that contains the accruals data.
-
Check the headings match up as shown the previous graphic. If they don't, use the arrow buttons to re-arrange the headings as required.
-
Click the Import button. A report will be generated once the import has been completed to show if the data has been imported successfully or requires any corrections. The document number of the initial accrual(s) is displayed on the report.
Note: The first line of the import will always display an error as this is the headings on the CSV template.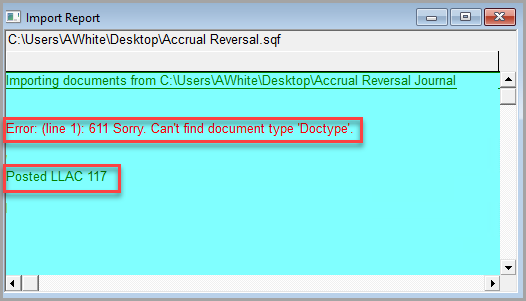
-
When the accrual has posted, it can take a few minutes for the automatic accrual reversal document to post. You can check to see if the automatic reversing document has posted by doing an Account Enquiry on the Accruals nominal.
Attachments