Cancelling Incorrect Prepayments
If a prepayment has been posted incorrectly, you can correct the error.
If prepayment documents have posted to the REG.REG (Register) period , these can be moved out by producing a Change Document.
If you need to reverse or cancel prepayments:
- If prepayment dates are wrong and need to be changed — Reverse the source document (the invoice) to post PB and PM documents reversing the original posted documents.
- If the prepayment document is being removed — Reverse the relevant Prepayment Transfer to Balance Sheet (PB) document only using another Prepayment Transfer to Balance Sheet document.
Reversing the Source Document
The original document, typically a non-order-invoice, can be reversed to generate a reversal of the original prepayment at the same time.
Before reversing the original invoice document, to enter the invoice again with the correct prepayment dates, you must make sure the periods in the original prepayment posting are still at Access Level 8 or less.
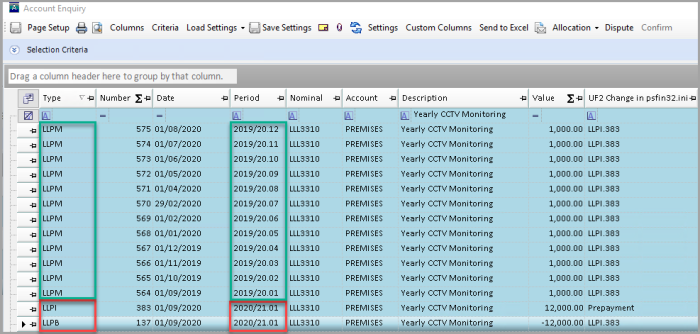
Example: Invoice LLPI383 has been entered for £12,000 for yearly CCTV monitoring. The date of the invoice is 01/09/2020 and the service covers 12 months. The invoice should have been prepaid between 01/09/2020 and 31/08/2021. However it has been mistakenly entered with prepayment dates of 01/09/2019 and 31/08/2020 as shown in the following graphic.
To resolve the issue, reverse the original document LLPI383, to reverse the incorrect prepayments.
To reverse the original document:
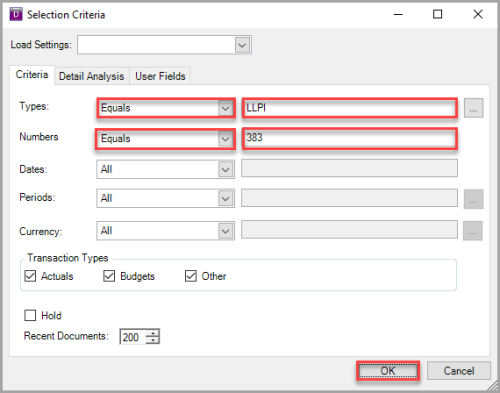
- Go to Options, then select Document Enquiry.
-
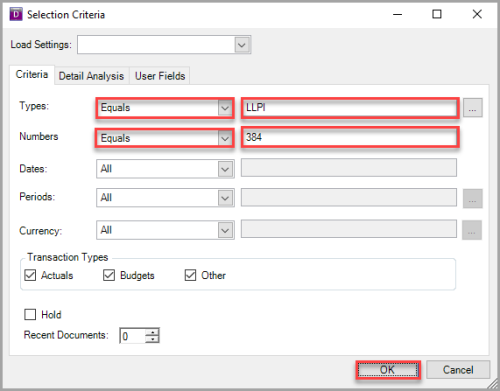
Enter the relevant criteria to find the source document
-
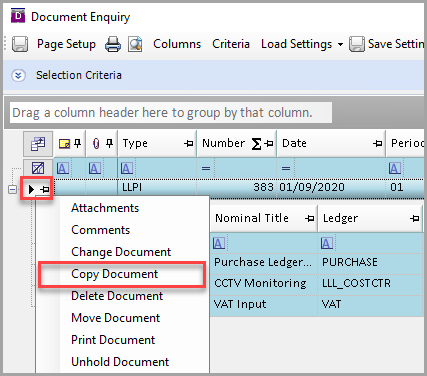
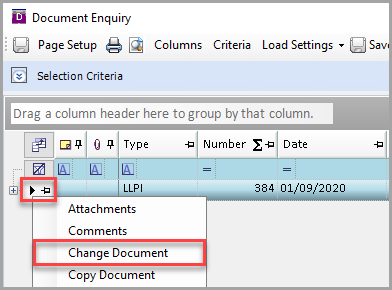
Right-click on the grey box next to the
-
From the Destination document options, select Reverse Values.
- Select the relevant Journal document type from Document Type.
- Select the same Document Date and Document Period as the original non-order invoice, then select OK.
-
The System Journal Input form is displayed. Do not change any of the fields or the reversal document will post incorrectly. However, the Description can be updated if needed.
-
Press F5 to post the document.
-
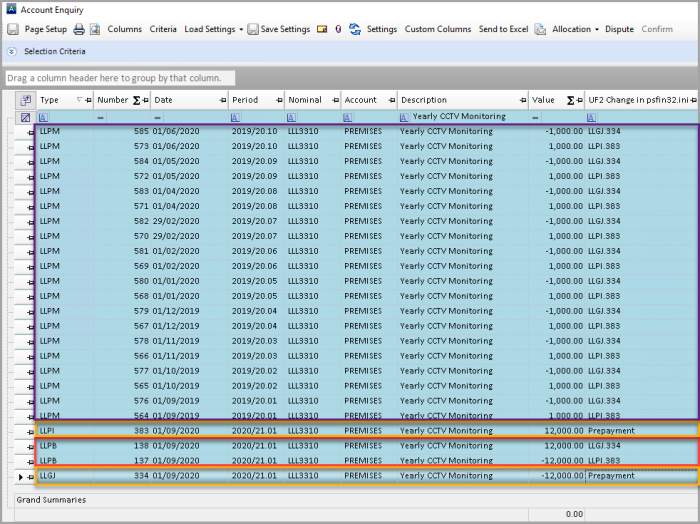
The following Account Enquiry displays the result of the reversal.
- The Journal document LLGJ383 cancels the original invoice - LLPI383.
- Document LLPB138 is generated as a result of the journal that has been posted. This cancels out the original LLPB137 document that was created when the original invoice was posted.
- Subsequent LLPM documents have been posted reversing out the original prepayment.
- You can now enter the original invoice again with the correct prepayment dates.
Reversing the Prepayment Transfer to Balance Sheet (PB) Document
You can reverse the original Prepayment Transfer to Balance Sheet (PB) document. This generates a reversal of the original prepayment at the same time.
Before reversing the original Prepayment Transfer to Balance Sheet (PB) document, to enter the prepayment document again with the correct dates, you must make sure the periods in the original prepayment posting are still at Access Level 8 or less.
Example: Invoice LLPI384 has been entered for £1,200 for a yearly cleaning contract. The date of the invoice is 01/09/2020 and the service covers 12 months. The invoice should have been prepaid between 01/09/2020 and 31/08/2021. However it has been mistakenly entered with prepayment dates of 01/09/2019 and 31/08/2020 as shown in the following graphic.

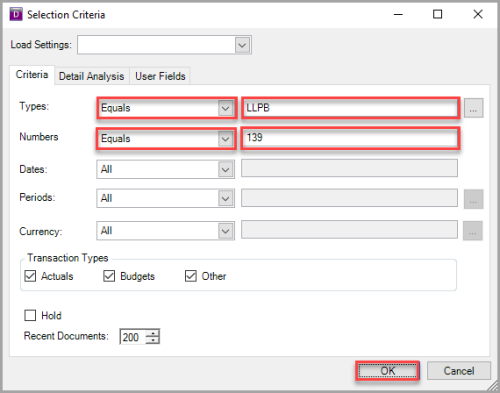
To resolve the issue, you can reverse the original LLPB - Prepayment Transfer to Balance Sheet document (LLPB139) , which reverses the incorrect prepayments. This means you do not need to reverse the original invoice.
To reverse the original Prepayment Transfer to Balance Sheet (PB) document:
- Go to Options, then select Document Enquiry.
-
Enter the relevant criteria to find the source document
-
Right-click on the grey box next to the
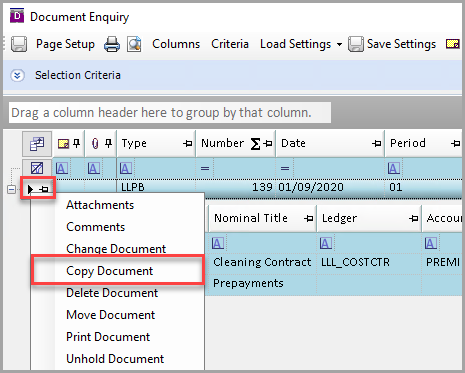
-
From the Destination document options, select Reverse Values.
- Select the applicable Prepayment to Balance Sheet document type from Document Type.
- Select the same Document Date and Document Period as the original Prepayment to Balance Sheet document, then select OK.
-
The System Journal Input form is displayed. You must delete the brackets after the date in Userfield 1
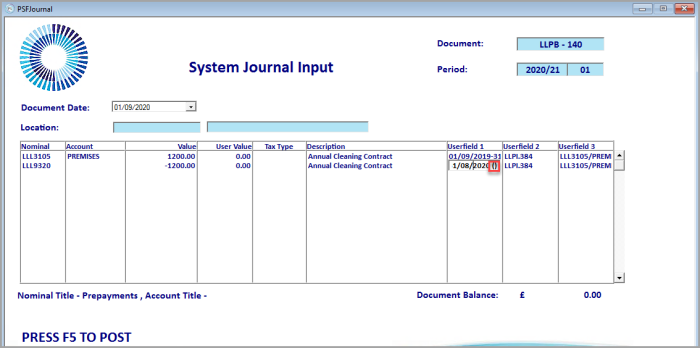
- When you have removed the brackets, press Tab or select another field. Then update the Description fields if required and press F5 to post.
-
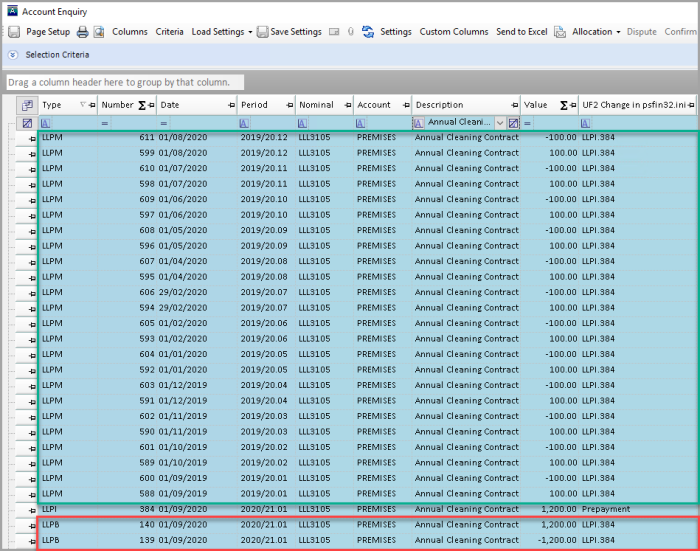
The following graphic displays the result of the reversal:
- The LLPB document LLPB140 cancels the original LLPB document - LLPB139.
- Subsequent LLPM documents have been posted reversing out the original prepayment.
- The original invoice LLPI384 is no longer prepaid. You will need to do a Change Document on the LLPI document to prepay it with the correct dates.
- Go to Options, then select Document Enquiry.
-
Enter the relevant criteria to find the invoice document
-
Right-click on the grey box next to the
-
The System Journal Input form is displayed. Overtype the incorrect prepayment date range in Userfield 1 with the correct prepayment date range. The date range must be in dd/mm/yyyy-dd/mm/yyyy format, for example 01/09/2020-31/08/2021 (no spaces).
- Press F5 to post the document.