Security for viewing and authorising documents
CUSTADMIN access only
This guidance is only for IRIS Financials Version 7.0.2103 or earlier. If using version 7.0.2223 or later, go to Check security for viewing and authorising non-order documents.
If a user cannot access a non-order invoice document that they need to action, this topic outlines which areas to check to make sure the security settings are correct.
- Document security
- Access to the ledger, supplier account, and nominal
- Nominal, ledger, and account security
This article advises how to consider each of the previous elements within the document. Then assign the relevant security to the user group.
Document security
The user needs access to the Accounting documents for IRIS Financials. Typically they may not be IRIS Financials users, but they can still be given access to the documents.
- Select Admin Modules, then select Administrator from the menu.
- The PSF Administration Logon dialog opens. Enter your CUSTADMIN login details, then select OK.
- The PSF Administration dialog opens. Select Expand (+) adjacent to Databases, then select
- Select the Security tab, scroll to the bottom of the User Group column, then select the required usergroup from the list. Select Accounting from the Application list, then enter an Access Level of 3.
Do not close the Administration dialog as you need to remove their Accounting access again after the next step.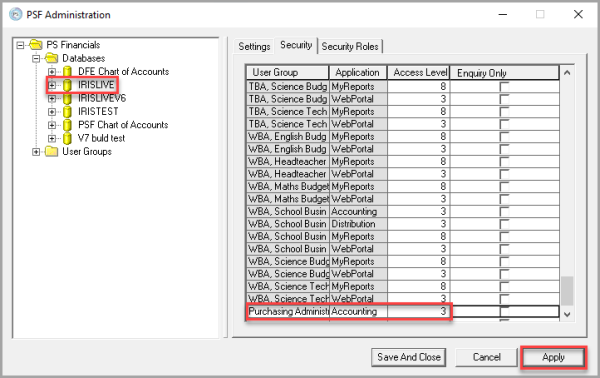
- Log in to IRIS Financials as CUSTADMIN. Select Documents, then select UDI Settings from the menu.
- The UDI Settings window opens. Select the required document from the left-hand panel, for example, ASPI - Non Order Purchase Invoices (where AS represents the location code of the document type), select the Input Forms tab, then select EDIT.
In order for users to be able to create INV - invoice documents in IRIS Purchasing they must be given access to the Non-Order Purchase Invoices (PI or POIN) document type in IRIS Financials. - Select the document input form from the Title panel, then select the user group that you want to give access to from the right-hand panel. When you have selected the required groups, select SAVE.
You need to select the user group for each input form type for which you want them to have access.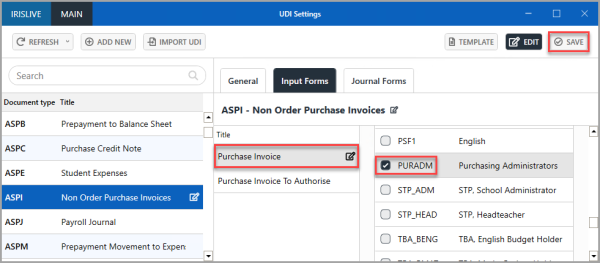
- The Update complete message appears. Select OK to return to the UDI Settings window. Now, you can remove Accounting access for the user group if they do not require use of the module. This does not affect their access to the documents that you have assigned access to.
- On the PSF Administration dialog, right-select the user group to which you gave access to Accounting, then select Delete from the pop-up menu. The confirmation message appears, select Yes to confirm the deletion.
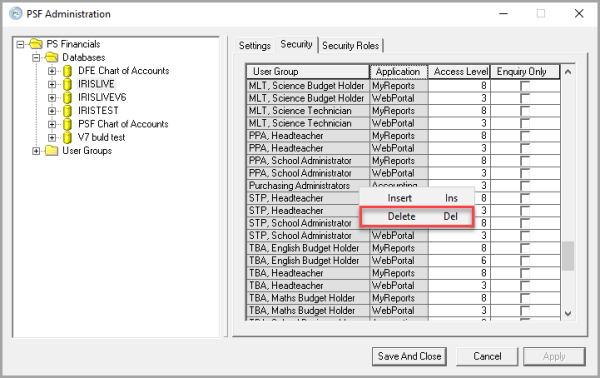
- The user group access to be deleted appears with a strike-through, select Save And Close to apply the changes.
Access to the ledger, supplier account, and nominal
Access to ledgers, nominals, and accounts in IRIS Financials is controlled by Security Roles. If you have already assigned a security role to the function, for example, post, modify, or view, in the ledger, nominal, or account, you need to assign the user group to that security role to give them access. For more information, go to Assigning Security Roles to User Groups.
If you have not assigned a security role to the function in the ledger, nominal, or account, assign the security role that the user group has, as described in these steps.
Access to the purchase ledger
- In IRIS Financials, select Maintenance, then select Ledgers from the menu.
- The Ledger Maintenance window opens. Select PURCHASE - Purchase Accounts from the left-hand panel, select the Security tab, then select EDIT.
- To let the user group view and post the documents, select the security role assigned to their user group. Select Drill (...) in View, View accounts, and Post (as required), then double-click the security role in the Select a role for dialog.
- When you have assigned the required security roles, select SAVE.
- An Update complete message appears. Select OK to close the message and return to the window.
Access to the purchase ledger supplier account
- In IRIS Financials, select Maintenance, then select Accounts from the menu.
- The Select a ledger dialog opens. Double-select to select PURCHASE - Purchase Accounts.
- The Account Maintenance window opens. Select the supplier account that you want to give the user group access to from the left-hand panel, select the Security tab, then select EDIT.
You need to assign the security role for the user group to each individual account for which you want to give them access. - To assign the security role that the user group has, select Drill (...) in View and Post, then double-click the security role in the Select a role for dialog. When you have assigned the security role for the accounts, select SAVE.
- An Update complete message appears. Select OK to close the message and return to the window.
Access to the purchase ledger control nominal
The supplier account is linked to the Purchase Ledger Control nominal so access to this nominal is also required.
If using a shared purchase ledger, you need to check the security roles against the Z - Academy Information nominal, which links the supplier account to the delivery location. The Z nominal is linked to the SCHOOL ledger, so you need to give the user group access to the required location ledger. For more information, go to Applying Security to a Ledger.
- In IRIS Financials, select Maintenance, then select Nominals from the menu.
- The Nominal Maintenance window opens. Select
- To assign the security role that the user group has, select Drill (...) in View and Post, then double-click the security role in the Select a role for dialog. When you have assigned the security role for the accounts, select SAVE.
- An Update complete message appears. Select OK to close the message and return to the window.
Nominal, ledger, and account security
Following the same principle, you also need to make sure the user has access to the nominals, ledgers, and accounts on the item detail lines. For more information, go to Applying Security to a Ledger, Applying Security to a Cost Centre, and Assigning Security Roles to User Groups.
Any changes to security require the user to log out and back in again for the changes to take effect.