Creating New Document Types
Document types are used to group a selection of document input forms (used to enter data in the system). They include sales invoices, purchase invoices, cheques, petty cash receipts, etc. Each document type provides access to one or more document input forms.
Each document type used in PS Accounting has its own number sequence associated with it and when posted, each document number (under most circumstances) can be used only once. There may be occasions therefore, when it is necessary to add a new document type so that document numbers can be repeated. This may be required for example, where a new cheque book has been issued containing the same cheque numbers as an older cheque book. In this circumstance, a new document type would need to be created for the new cheque book.
Another example is where an academy/MAT has two cheque books for two different bank accounts, a further document type will enable the two books to be recorded separately.
The following explanation will describe how to create a new cheque document type. Some of the settings will be different for other document types which is explained where applicable.
Creating a new cheque document type
- Select Masters > Document Types from the menu bar.
-
The Document Types Maintenance dialog is displayed. Each document type has a code which usually begins with the first two letters of the location code, with the second two letters relating to the document type. In the following example LLC1 is the code for location LL and cheques C1. It is important to maintain this naming convention as this affects how the document input forms work.
- To add a new document type, click in the top left field and enter the new document type code. In the following example, LLC2 has been used.

- Enter a Title for the document type enabling it to be differentiated from the other types. In the previous graphic, the name of the bank has been used.
- Click the Add button. The new document type is then displayed in the list.
- Complete the options as described in the following sections.
Setting document type number sequencing
The Sequence section of the Document Types Maintenance dialog is used to determine how the numbering sequences are dealt with when documents are created. The following options are available:
None
No number sequencing is used. The document/cheque number is entered at the time the document is posted, not necessarily in sequential order.
Automatic
The system automatically assigns the next number in the sequence for each new document posted.
Controlled (used for cheque book ranges)
Enables numbered ranges to be specified such as 1-50, 51-100. The user can then select the required range when creating the document and the system automatically assigns the next number in that range.
-
This is set by clicking the Edit Ranges button in the Sequence Ranges section.
- Enter the Start, Next and Last elements of the range then click the Add Repeat for each sequence range you want to make available then click the Close button.
Ranged (used for cheque book ranges)
Number ranges can be specified in the same way as Controlled, but the numbers can also be manually entered providing they have not been previously used. Numbers do not have to be used sequentially.
Setting document type access levels
The Access Level for document types defaults to 3 but can be amended if you want to restrict access to users with a higher access level.
The Input Allowed check box is selected by default and should only be deselected if you no longer want to use the document type. Deselecting it will prevent it from appearing in any lists.
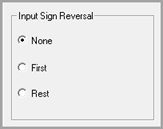
Applying automatic reversal settings

Determines whether the debit/credit entry on a line in the document is reversed automatically when the document is posted. Typically, this is always set to None, as there are already functions in place within the document input forms to post the debits/credits correctly.
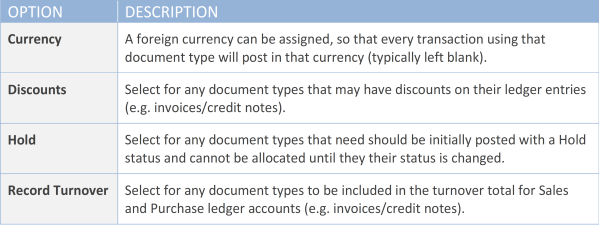
Setting special options

Selecting the document input forms
For each document type created, you will need to specify which document input forms will be available for use when the user chooses this document type.
-
From the User Defined Input Documents section, click the Edit Selection button.
-
From the User Defined Input dialog, click each document input form to be made available. Each selected form will be displayed in blue. Click a form again to deselect it (no highlight) if required.
- Select the document input form to be displayed by default from the Default drop-down list.
Defining how documents are posted (register options)
For each document type, you will need to determine whether the document will use the Register period when documents are posted. Choose from the following options:

Never – documents of this document type will never be posted to the Register period.
Optional – the user can decide when creating the document whether it will be posted to the Register period or directly to Books.
Always – documents of this document type are always posted to the Register period.
Adding comments
Comments can be added to the document type by clicking the Comments button.
Enter any required comments in the Comment for Document dialog then click the OK button.
This dialog can be used to provide any information on the setup of the document type which may be useful to anyone else who manages document types.
Linking document types to a ledger
The PARAMETERS ledger contains several pieces of information required by document input forms such as academy name, bank account numbers, etc. It is therefore necessary to create an account in the PARAMETERS ledger to link the new document type to an applicable ledger account. This will be required for document types such as cheque books, credit cards, etc.
-
Select Masters > Accounts from the menu bar to display the List of Ledgers dialog.
-
Select PARAMETERS. The Account Maintenance dialog is then displayed.
-
Click the Add button to display the New Account dialog.
-
Enter the previously created document type code then click the OK button.
-
Select the User Fields tab then enter a suitable Title for this account, e.g. Santander Cheques.
-
Enter the name of the ledger to be linked to this document (e.g. LLL_BANK) in the Element Text field then click the Apply button (the ledger name must match exactly).
Giving users access to a document type
Changes will only take effect once the applicable user has logged out and back in again.
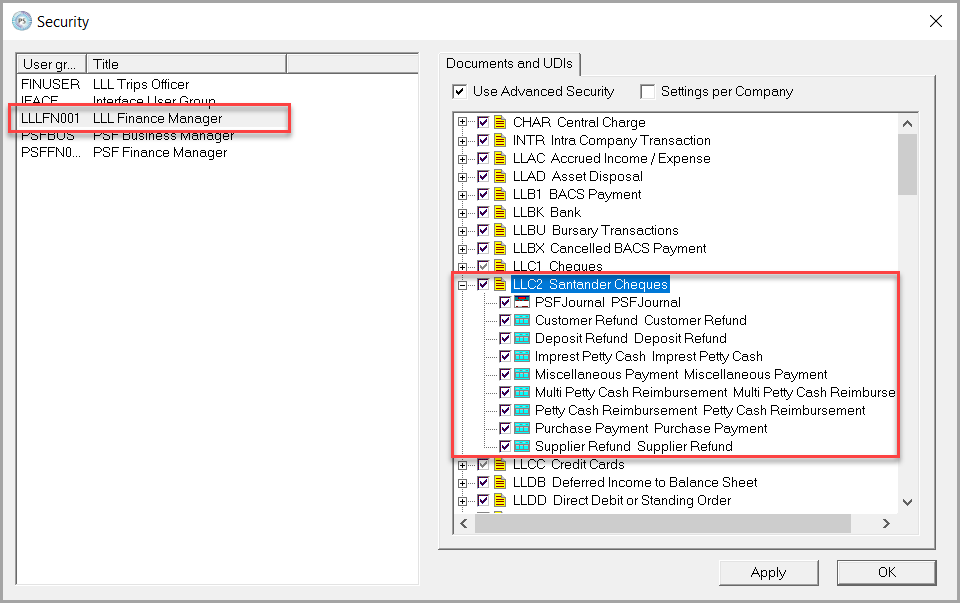
Once a document type has been created, users will need to be given access to the specific document input forms they will be working with. Access to the applicable documents will also be required for users who will be reporting on income or expenditure. Document access is set via the Security module.
- Select Admin > Security from the menu bar to display the Security dialog.

- Select the required user group in the left-hand panel, e.g. LLL_Finance_Manager.
- To give the user group access to all the documents and UDIs, deselect the Use Advanced Security check box.
- To specify individual document input forms, ensure that the Use Advance Security check box is selected.
- The yellow icon represents a document type whilst the cyan/turquoise icon represents a document input form. Expand the document types as required then select the applicable check boxes to give access to the required document types/individual documents. Alternatively, select the document type icon to select all the associated input forms.
- Click the Apply button to save your settings then click the OK button.