Importing Accruals
Some Of the nominals and ledgers used in this topic may be different to those in your chart of accounts.
You can import accruals into IRIS Financials so they automatically reverse into the required period. This is useful if you have an accruals schedule you post each month.
Download a copy of the Accrual Journal Import.csv and Accrual Import.dtt.
Please do not attempt to open or modify the Accural Import.dtt file. You need to save the Import.dtt file on the cloud server on which you run IRIS Financials.
There are two stages to importing an accruals journal.
- Adding your accrual data to the Accrual Journal Import.csv template.
- Importing the Accrual data using the Data Transformation Tool.
Adding your Accrual Data to the Template
It is important you update your accrual data carefully as any inaccuracies cause the import to fail.
-
Download and open the Accrual Journal Import.csv file.
The sample data contains accrual information for two example locations - AST and DON. The New Doc Flag column determines which detail lines form part of the same document when they are imported into IRIS Financials, as shown in the following graphic. The information included in the download is for demonstration purposes only and your own nominal and account codes may differ to that of the demonstration system.
 Please remove the example accrual data before adding your establishment/organisation's accrual information.
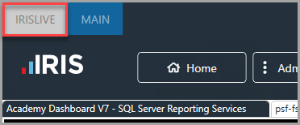
 - Enter the name of the Database you are importing the data. You can check which database in which you are importing data in the top left of IRIS Financials. If you want to import accrual information for another database, you can also go to Home > ChangeConnection to view all databases.
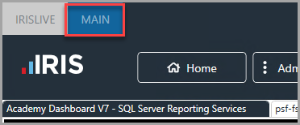
- Enter the Company name, which can also be found in the top left of IRIS Financials.
-
Enter the Doc Type code for the location for which you are importing the accruals journal, for example ASAC (where AS represents the location code of the Accruals Journal document type). You can have multiple accrual documents on a single import, either for the same location or other locations.
If you are unsure of the Document Type code, go to Documents > DocumentInput in IRIS Financials to find the applicable accruals document code for the required location.
-
The New Doc Flag column indicates which detail lines form part of a single document. Each time the number entered in the New Doc Flag column changes, a new document is posted.
In the following example, two documents are posted. One for AS location and one for DO location. All detail lines with 1 in the New Doc Flag column are posted as a single document and all detail lines with 2 in the New Doc Flag column are posted as a second new document. Both documents are automatically reversed when the import is complete based on the information you enter in columns M and N.
- Enter the accrual source document date in the Doc Date column. It must be in DD/MM/YYYY format.
- Enter the Year the source document is to be posted into. This must be in the same format as your Financial Years are set up in IRIS Financials - typically YYYY/YY format, e.g. 2020/21. You can check this by selecting Maintenance > Periods in IRIS Financials.
- Enter the period the source document is to be posted into in the Period column. The period must always be in double digits, i.e. 01, 02, 03, and so on. as they are set up in IRIS Financials. You can check this by selecting Maintenance > Periods.
When you re-open a csv file any leading zeros are removed so you need to reformat the Period cells.
To format the cell in the Period column:
1 - Highlight the entire Period column, right-select, then select Format Cells from the pop-up menu.
2 - The Format Cells dialog is displayed. Select Custom from the Category panel on the Number tab.
3 - Overwrite the word Custom with 00 in Type.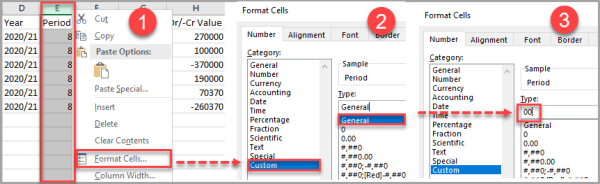
- Enter the code (including location code) for the Nominal to which the accrued income or expenditure is being posted
You need to balance each document to zero using the accruals nominal
You can post multiple accruals for the same location on the same document. However, please do not attempt to post accruals for multiple locations on the same document as these may not post correctly. - Enter the applicable Account code for the accrual information. Each expense nominal is linked to a ledger, where applicable, you must enter an account from the ledger.
To find a list of applicable ledgers:
1 - Select Maintenance > Nominals, then select the required Nominal.
2 - Make a note of the Ledger linked to the nominal.
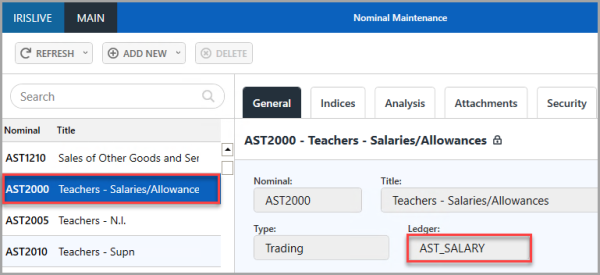
3 - Go to Maintenance > Ledgers, then select the ledger linked to the Nominal to which you are posting the Accrual Journal.
4 - Go to Links > Accounts. You must pick an account from this list, then enter the account code in Account on the Accrual Journal Import.csv.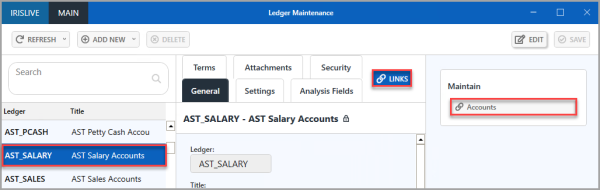
The Accruals nominal is not typically linked to a ledger so you do not need to enter an account on this line. - Enter the value in Amount, for example 600 (do not enter any currency symbols, i.e., £, $, etc.) Any credit values must be entered in a negative format, e.g. -600 (with a minus preceding the value).
- Enter an applicable Description for the accrual.
- Enter the applicable currency code in the Currency column. This is typically be GBP. For a list of available currencies, select Maintenance > Currencies in IRIS Financials.
- The Reversal Date determines the date the accrual is reversed with. This must be in the same format as your Financial Years are set up in IRIS Financials - typically YYYY/YY format, e.g. 2020/21. You can check this by selecting Maintenance > Periods in IRIS Financials.
- The Reversal Year/Period determines the period the accrual is reversed with. The Year/Period must be entered as they are set up in IRIS Financials. You can check this by selecting Maintenance > Periods.
-
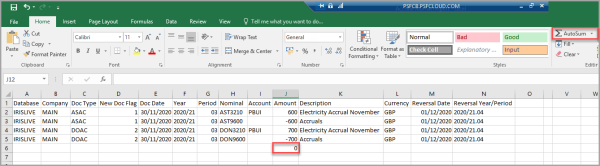
Repeat the previous steps to complete the journal. Before importing, you must check the document balances to zero. The easiest way to do this is select the cell immediately beneath the last entry in the Amount column (Column H), then select the AutoSum icon on the Excel toolbar. If the values do not balance to zero, check all the values entered in the Amount column for each individual document being imported and correct any discrepancies.
You must delete the zero value from the AutoSum before you import the file.
- When you have entered all the required accruals information, save the file in csv format.
Importing the Accruals Data Using the Data Transformation Tool
Once you have completed the import data spreadsheet, you need to import it using the Data Transformation Tool. This is accessed via IRIS Financials.
If you have not imported a accruals journal before, please download the Accrual Import.dtt.
- Go to Modules > Data Transformation Tool in IRIS Financials.
- The PSF Data Transformation displays. Go to File > Open, then select the Accrual Import.dtt file you downloaded earlier.
-
Select Browse, then double-select the Accrual Journal Import.csv data file you created previously.
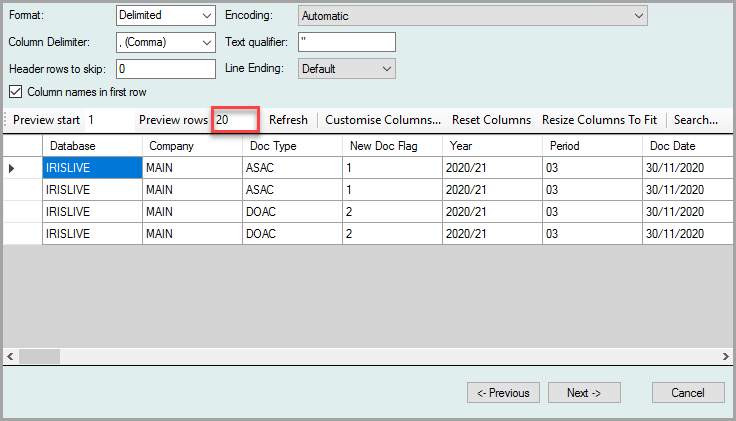
A preview of the entries that are to be imported are displayed. You can increase the preview rows if needed. Select Next.If you scroll to the right, a large number of unused columns are displayed. This is intentional as these fields are typically not required for accruals imports.
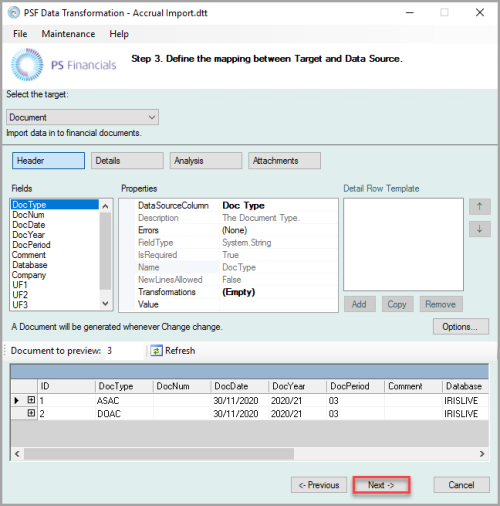
- The Step 3 dialog is displayed. A list of documents to be imported are displayed. You can increase the preview by increasing the number in the Document to Preview field.
- The Step 4 dialog is displayed, containing a summary of the import. Select Validate only, do not post any data, then select Post to check the import for any errors before posting to the database. The Summary dialog is displayed, check the posting details, then select Close to return to the Step 4 dialog.
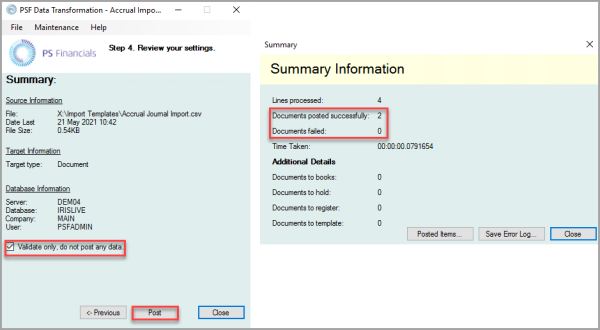
- Deselect Validate only, do not post any data, then select Post to post the document(s).