Add an applicant
It is recommended that you add applicants to Ed:gen using the Admissions module. However, you can also add a new applicant record to Ed:gen using the Applicants tab in the Pupil Manager module. This option only requires basic details and saves time when adding large numbers of new applicant enquiries. An Applicant Checker function prevents you duplicating student records.
To add an applicant record, follow the steps below:
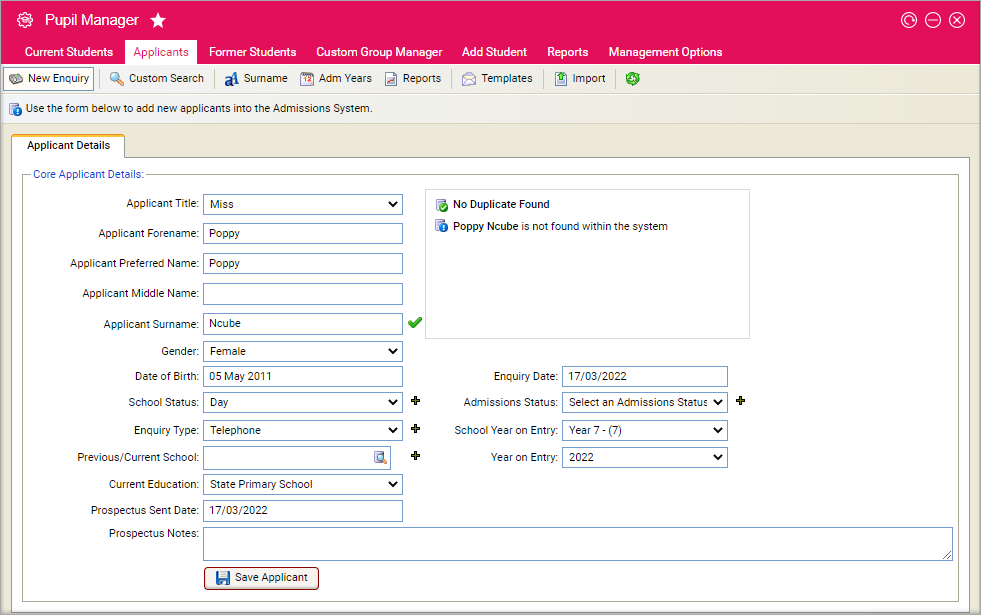
- Select the Applicants tab and select New Enquiry. The Applicant Details screen is displayed:
-
Complete the name and gender fields in the top half of the screen.
The
Applicant Checker
compares the applicant name with existing student records to check for duplicates:
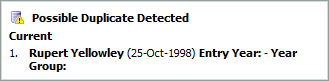
- A green tick indicates that no duplicate has been found.
- A warning icon indicates that possible duplicate records has been found. Additional information on the records detected is provided in the Applicant Checker box. Use this to check if the record you are adding is a duplicate.
An example of the Applicant Checker box is shown below:
-
Complete the fields in the second half of the screen as required. The fields available are explained below:
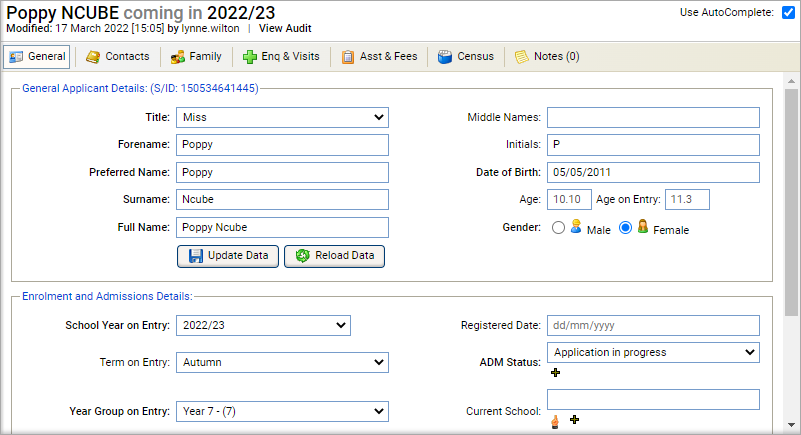
Field Explanation Date of Birth Enter the applicant's date of birth. Enquiry Date Enter the date of the applicant's first enquiry to the school. This defaults to today's date. This field is compulsory. School Status Select the applicant's boarding status from the drop-down list. This field is compulsory. Admissions Status Select the applicant's current status in the admissions process. This field is compulsory. You can change this at a later date as the admission process moves forward. Enquiry Type Select how the applicant's enquiry to the school was made. Previous/Current School Start to enter the applicant's previous or current school. Select a school from the list displayed. School Year on Entry Select the year group which the applicant will join when they start at your school. Year on Entry Select the calendar year when the applicant is due to start at your school. Prospectus Sent Date Enter the date that the school prospectus is sent out. This defaults to today's date. Prospectus Notes Use this field to add notes on any additional information sent with the prospectus. This is for information only. - Click Save Applicant. The basic applicant record is now displayed in the Applicants tab. An example is shown below:
-
You can now either:
-
Add more detail to the applicant record. See
Using applicant record tabs
for more information.
or - Add another applicant.
Click the add icon next to a field to add a new option to the drop-down list available.
The search icon indicates that the Data Selector Tool is available to save you time. Start typing in a field where this icon is displayed to see a list of options.
-
Add more detail to the applicant record. See
Using applicant record tabs
for more information.
Click on a student name in the Applicant Checker box to display their student record. Once you open the potential duplicate record the information you have added in Applicant Details is deleted.