PaperCut Cartadis CPad Configuration
CPad terminals are touchscreen devices running PaperCut embedded software. These devices plug into an MFD, and can turn almost any MFD into a PaperCut tracked & controlled machine. Using a CPad alongside a BioStore IDPoint allows MFDs that do not have their own embedded software display to support IDPrint(PaperCut).

Prerequisites
- 1x BioStore IDPoint
- 1x Cartadis CPad
- 1x BioStore Serial-to-Ethernet Splitter cable (female)
- 1x Serial RS232-to-RJ11 converter cable
Physical Connections
Ensure both the IDPoint and CPad are powered on and connected to the network.
-
Connect the Serial-to-Ethernet Splitter cable to the IDPoint. Ensure the short end of the cable is connected to the IDPoint, and the long end to the network port.
-
Connect the Serial Converter to the RJ11 cable.
CPad Configuration
To use an IDPoint with the CPad, the correct reader type must be selected. Carry out the following steps:
- Enter the initial configuration menu
- To enter the menu, reboot the device and when the progress bar appears, touch each corner of the CPad screen in this order:
- top-left, top-right, bottom-left, bottom-right
- There may be a password required to enter the menu. Contact your CPad supplier for this information
- To enter the menu, reboot the device and when the progress bar appears, touch each corner of the CPad screen in this order:
-
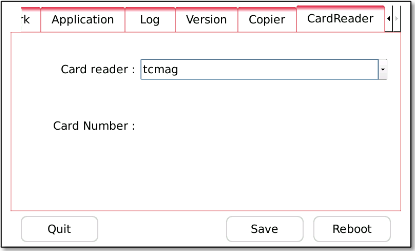
Select the CardReader tab, and from the dropdown menu select tcmag. If this option is unavailable, go to Appendix A – Adding an IDPoint Configuration File at the end of this topic.
PaperCut Configuration
Some configuration is needed on the PaperCut server.
-
Log in to the PaperCut Admin console and select the CPad from the Devices section. Under the Advanced Config, ensure tcmag is entered in the ext-device.cartadis_cpad.reader-type field.
ID Print Configuration
Note that ID Print will need to be configured before the IDPoint will work. Go to ID Print Configuration for PaperCut Printers , or the help files installed alongside the ID Print software, for information on setting up ID Print and applying IP Addresses to IDPoints.
Appendix A - Adding an ID Point Configuration File
This step is optional – if the ‘tcmag’ device is on the CPad, it can be used instead of adding a separate configuration file.
By using a client such as WinSCP or PuTTY, you can edit files directly on the CPad.
Enter the following information in a text file and save it as IDPoint.rdr.
type=serial
timeout=10
startWith=""
endWith=""
minSize=0
ignored="\0"
path=/dev/s3c2410_serial0
# 1200, 1800, 2400, 4800, 9600, 19200, 38400, 115200
speed=9600
# none, even, odd
parity=none
This file can then be copied to /usr/local/Cartadis/drivers/ on the CPad.
Restart the CPad, and this file will be selectable in the CardReader section of the config menu.