Connect ID Print to Printers using HID Implementation
By using a HID implementation of IRIS BioStore’s ID Print software, an IDPoint can be connected directly to an MFD. The IDPoint also connects to the IRIS BioStore database, which identifies users and allows them to unlock their print jobs.
The basis of the solution is a BioStore IDPoint.
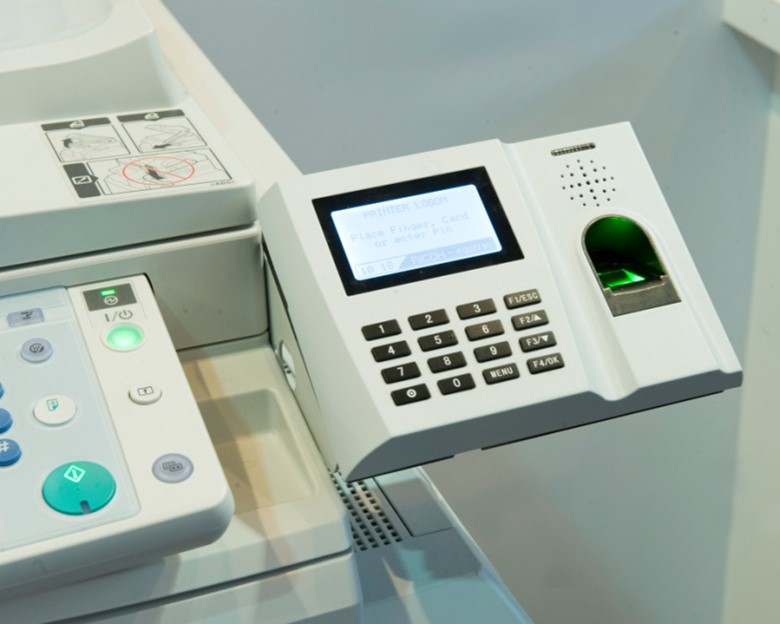
The IDPoint comprises a fingerprint scanner, card scanner, and keypad. In this solution, the IDPoint connects directly to a USB port on the MFD using an HID cable supplied with the IDPoint. A network connection is still required for the IDPoint to communicate with the IRIS BioStore database.
The identification process then works in the following way:
-
The user places their finger on the biometric scanner (or enters a PIN, or swipes a card) at the IDPoint
-
The IRIS BioStore IDPoint sends the encrypted finger template to the IRIS BioStore server for comparison and identification
-
If the user is successfully identified, a unique IRIS BioStore field (for example, Person ID or Bio ID) is then sent to the printer as a card number through the supplied HID USB cable.
-
The print server, enabled for card authentication, logs the user in on the MFD.
ID Point Specification
Required:
- 1 x power and 1 x network point
- 1 x network cable
Included:
- 180cm mains adaptor
- Wall mounting bracket and screws
- An HID USB cable will also be needed, available from IRIS BioStore
Specification:
- 185 x 135 x 40mm
- 350g
- 400 MHz MIPS 32-bit processor
- LED indicator
- 70 x 40mm LCD graphic display
- Operating temp 0 – 42°C
- 5V DC
- Integrated proximity or smart card reader
Please note:
- The network and power points required by the IDPoint are in addition to those required by the printer or multi-function device. The power socket needs to be sufficiently close to the base of the printer for the mains adapter to reach the IDPoint, otherwise an extension lead will be required.
- Individual static IP addresses are required for each IDPoint.
- IDPoints should be positioned so that is enough room to insert a pen drive into the USB slot on the left side.
IRIS BioStore Configuration
Information required:
-
The IP Address, Subnet Mask and Default Gateway assigned for each IDPoint
-
A login and password created in ID Managerr with the ID Print role
-
The IP Address or Host Name and port of the BioStore Secondary Server
On-site support or intervention required for IRIS BioStore installation:
-
Arranging access to the appropriate servers
-
Allocating IP addresses for the IDPoints
-
If synchronizing with Active Directory - Providing login details for Active Directory (and helping to ensure that a unique ID is stored in an accessible location within AD)
There is an element of configuration required on the IDPoints themselves, as described in the following section.
Setting up an ID Point
After configuring the IDPoint options, it is necessary to install the licence configuration onto each IDPoint device. This is done by using a USB memory stick.
Insert a USB pen drive into a USB port on the computer (the configuration file is quite small - any capacity drive can be used). Then open ID Print Setup, click on the Licence tab and select Save IDPoint Configuration. This opens a file location dialog. Select the USB stick, which will probably be labelled as Removable Disk. Click OK.
The configuration file cannot be placed in a folder on the drive; it must be placed in the root of the drive.
At this point it is necessary to enter a PIN code to protect the configuration file. Enter a suitable PIN code and click OK. This will save the configuration file idpoint.cfg to the USB stick. The USB pen drive is now ready for use with the IDPoint device; go to Licensing an IDPoint device, for further details.
If you don't have direct access to a USB pen drive, for example if you're working on a Virtual Machine, save the file to a location on the local machine, transfer the file to a machine that has USB access, and then transfer the file from the new machine to a USB pen drive.
All configurations made to IDPoints are saved in the same file on the USB drive, so a single drive can be taken to each IDPoint device in turn, without having to generate a new licence for each one.
Licencing an ID Point
Insert the USB drive into the USB port on the IDPoint device. Restart the device using the Reset button on the side of the device (a straightened paperclip or similar may be required to reach the button). While restarting, a Linux boot message is displayed along with a progress bar. Wait until the progress bar is completed, and the device will display Initialising... in the middle of the screen. As soon as this appears, press the F1/ESC key on the IDPoint device. The screen will then display Starting Setup. The following options will be displayed:
1) Update Licence
2) Update Firmware
3) Delete Licence
Select the 1 key on the IDPoint device to choose Update Licence. On the following screen, use the up and down arrows to choose the available licence, and press the F4/OK key. The screen will display Saving licence, please wait. When this message disappears, the licence is installed and a screen similar to the following is displayed:
IDPoint by Biostore
Ver: 2.1.28 Lic:1
IP: 192.168.0.143
NM: 255.255.255.0
GW: 192.168.0.1
Waiting To Connect
The IDPoint will now be ready for use.
Active Directory Integration
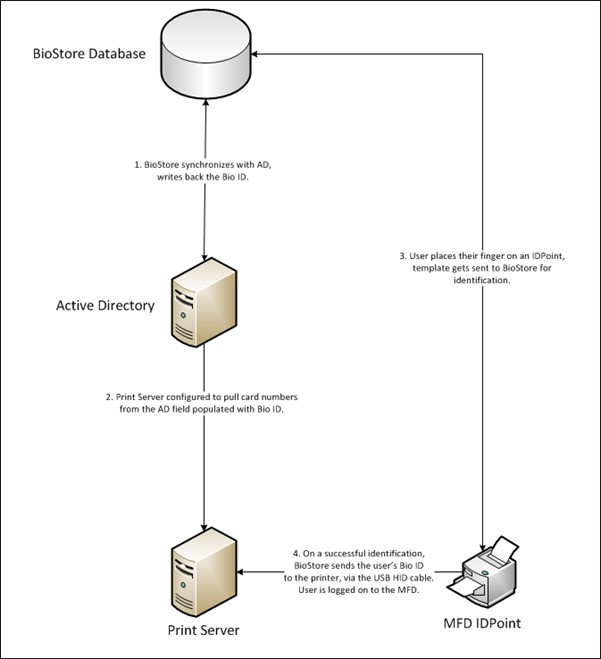
The IRIS BioStore database is usually populated automatically from the school Management Information System (MIS), whereas many print solutions use Active Directory as a source of user data. There is an Active Directory synchronisation module within ID Manager which allows a link to be set up between each user’s record in the IRIS BioStore database and the equivalent record in Active Directory. This requires a unique key for each user to be stored in both Active Directory and IRIS BioStore, such as the SIMS ID. ID Manager can then look for this unique key in Active Directory and pull back the user’s AD credentials. After using ID Manager to write back the Person ID or Bio ID to an empty AD field, the print server can then be configured to pull its card numbers from that field when it synchronizes with AD.
In print solutions which support self-authentication (that is, if an unknown user tries to scan their finger/card/pin on an IDPoint, the print solution asks them to log on with their Windows Login credentials first and thereafter associates the new user with that login), no Active Directory integration is needed.
Basic Architecture