BioStore Primary Server Backup
Introduction to BSDB backups
All IRIS BioStore implementations should have an established backup and restore plan for failure recovery. This will ensure that you have the required backup files to recover from various failures, and that the appropriate people know where backups are located and how to restore them. In general, IRIS BioStore database (BSDB) backups should be performed according to your site's backup policy.
You can select the location for backups to be saved. Backup files can also be manually copied to other locations, to provide another layer of failure protection. Note that there is currently no limit to the number of backups that can be stored. It is recommended to regularly check your available storage space.
It is recommended to schedule backups at quiet periods to minimize any disruption to your users.
You can find the backup and restore options under the Backup & Restore tab in the BioStore Primary Server.
Selecting a Backup Location
The backup location is used to define where backups are saved to. It is also used to populate the list of available restore points. By either adding previous backups to the selected backup location, or selecting a different backup location, you can change the contents of the list of available restore points.
Note that all backups can be used to restore the database, but the list of available restore points only displays backups in the currently selected backup location.
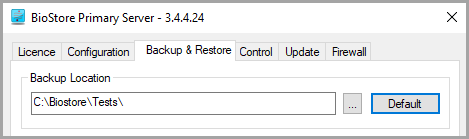
You can set the backup location from the Backup & Restore tab in the BioStore Primary Server.
The current backup location is displayed here. By default, this location matches the location of your IRIS BioStore database. To change the backup location, select the Browse [...] button.
You can return to the default location by selecting the Default button.
Note that the list of available restore points will only display backups that are in the selected location.
If you want to save to a network drive, use the UNC path (e.g. \\192.168.0.42\BioStore\DatabaseBackups\) rather than a mapped drive.
Scheduling Regular Backups
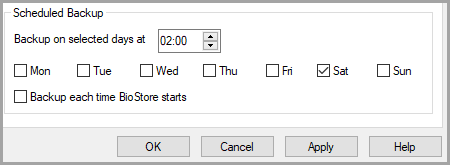
You can schedule regular backups from the Backup & Restore tab in the BioStore Primary Server.
It's highly recommended to schedule updates for quiet periods, when there will be minimal disruption to your users, e.g. in the evening or at night. You should also avoid scheduling backups at times which clash with automatic licence updates (if you choose to enable this feature). Additionally, the IRIS BioStore database is updated with new MIS data at 01:00 by default, so this time should also be avoided.
You can schedule backups by entering a suitable time (e.g. 22:00), and selecting the days which you want the backup to run on.
By enabling Backup each time BioStore starts, a backup will be taken each time the BioStore Primary Server starts, e.g. when the machine reboots, when the service is manually restarted, or when the service recovers after a crash.
Click Apply to apply your settings. You will need to restart the BioStore Primary Server service if it's already started, which can be done from the Control tab.
To change the schedule time, or to add/remove days that the backup will run on, simply make your desired changes and then re-apply the settings.
Manual Backups
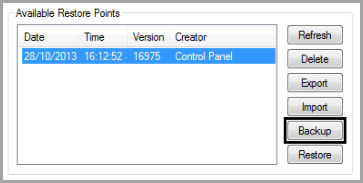
You can take a manual backup from the Backup & Restore tab in the BioStore Primary Server, using the following steps:
- Select Backup.
- In the window that appears, enter the login credentials of a BioStore Super User or Backup Operator, and select Backup.
- The backup will run. After the backup has successfully completed, the backup file will be saved in your chosen backup location, and it will be added to the list of available restore points.
Manual backups are displayed in the list of available restore points with Control Panel set as the creator.
Live Backups

Live backups are the same as manual backups, except they are taken using ID Manager rather than the BioStore Primary Server.
You can take a live backup from the Tools menu in ID Manager, using the following steps:
- Log in to ID Manager with a Super User, Administrator, or Manager account.
- When you're in the People view (by selecting People from the left hand menu), select the Tools tab on the bottom menu bar.
- Select Live Backup.
- In the window that appears, click the OK (tick) button.
- The backup will run. After the backup has successfully completed, the backup file will be saved in your chosen backup location, and it will be added to the list of available restore points.
Live backups are displayed in the list of available restore points with ID Manager set as the creator.
Restoring a Backup
When you restore a database backup, any existing database in use will be renamed, and will appear in the list of available restore points as a version 'R' backup. If necessary, you can restore this renamed copy of your database.
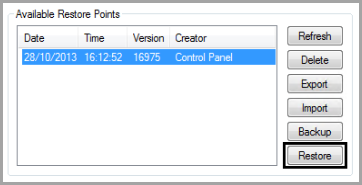
You can restore a backup from the Backup & Restore tab in the BioStore Primary Server, using the following steps:
- Select one of the available restore points.
- Select Restore.
- A message will appear notifying you that your database will be renamed, and the BioStore Primary Server service will be restarted (unless it's already stopped). Select Yes to continue, or No to cancel.
- After selecting Yes, your database will roll back to the selected restore point. Any existing database in use will be renamed with the date and time that you rolled back to a restore point, and will be otherwise untouched.
- If the BioStore Primary Server was started when you started restoring, it will be restarted and you'll be prompted to test the connection by entering your Super User credentials. If the BioStore Primary Server was stopped before restoring, you can test the connection by selecting Test Connection under the Configuration tab.
- After restoring, you must restart each connected BioStore Secondary Server service. This is necessary to avoid any issues with cached versions of the database. This can be done by opening each of the Secondary Servers, and restarting the service from the Control tab. Only restarting the BioStore Primary Server is not enough.
The list of available restore points will be updated to display the renamed database as an option to restore.
Exporting a Backup File

Exporting a backup file allows you to create additional copies of available restore points. This can be useful if, for example, you want to copy your available restore points to a network drive.
You can export a backup file from the Backup & Restore tab in the BioStore Primary Server, using the following steps:
- In the list of available restore points, select the backup that you want to export.
- Select Export.
- In the window that appears, navigate to the location you want to export the backup file to, and select OK.
- The backup file will be exported to your chosen location. The original backup file will remain in the same place, and will still be an available restore point.
You can also copy or move a backup file manually if necessary. Simply navigate to the backup location and copy the file to a new location. The BioStore Primary Server will continue to work regardless of where backup files are moved to.
Importing a Backup File
Importing a backup file allows you to restore the database from a backup that isn't in the list of available restore points, such as from a backup that was taken from an old installation of the BioStore Primary Server.
Note that this process will go through the same steps as a normal restore, i.e. restarting the BioStore Primary Server, and renaming the current database.
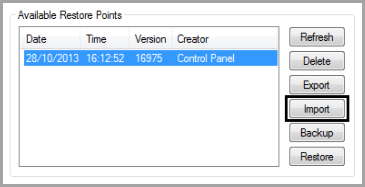
You can import a backup file from the Backup & Restore tab in the BioStore Primary Server, using the following steps:
- Select Import.
- In the window that appears, navigate to the location of the backup file you want to import, select it, and then select Open.
- The selected backup file will be restored. Any database currently in use will be renamed and added to the list of available restore points, and the restored backup will become the active database. You will be notified when the restore has been completed successfully.
Deleting a Backup File
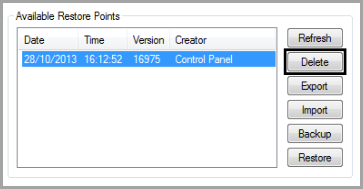
You can delete a backup file from the Backup & Restore tab in the BioStore Primary Server, using the following steps:
- In the list of available restore points, select the backup that you want to delete.
- Select Delete.
- You will be prompted to confirm that you want to delete the backup. Note that you cannot undo this action. Select Yes to delete, or No to cancel.
- If you click Yes, the backup will be removed from the list of available restore points, and the backup file will be deleted from the backup location.
You can also delete a backup file manually if necessary. Simply navigate to the backup location and delete the relevant file. It will be removed from the list of available restore points.