Xero
To enable the Xero integration in Senta, go to Settings > General Settings > Extras and toggle the Xero feature to On. This will add a Xero tab to General settings.
From here, you can enable the client-level and/or practice-level integration:
Client-level integration
Once you have switched on the Xero integration in Senta, you can connect individual client records in Senta to companies that you have access to in your Xero account to view the company information including the Executive Summary. This information can then be pulled into use by the Advisory feature.
To set up the client-level integration, select Enable client-level integration in Settings > General settings > Xero.
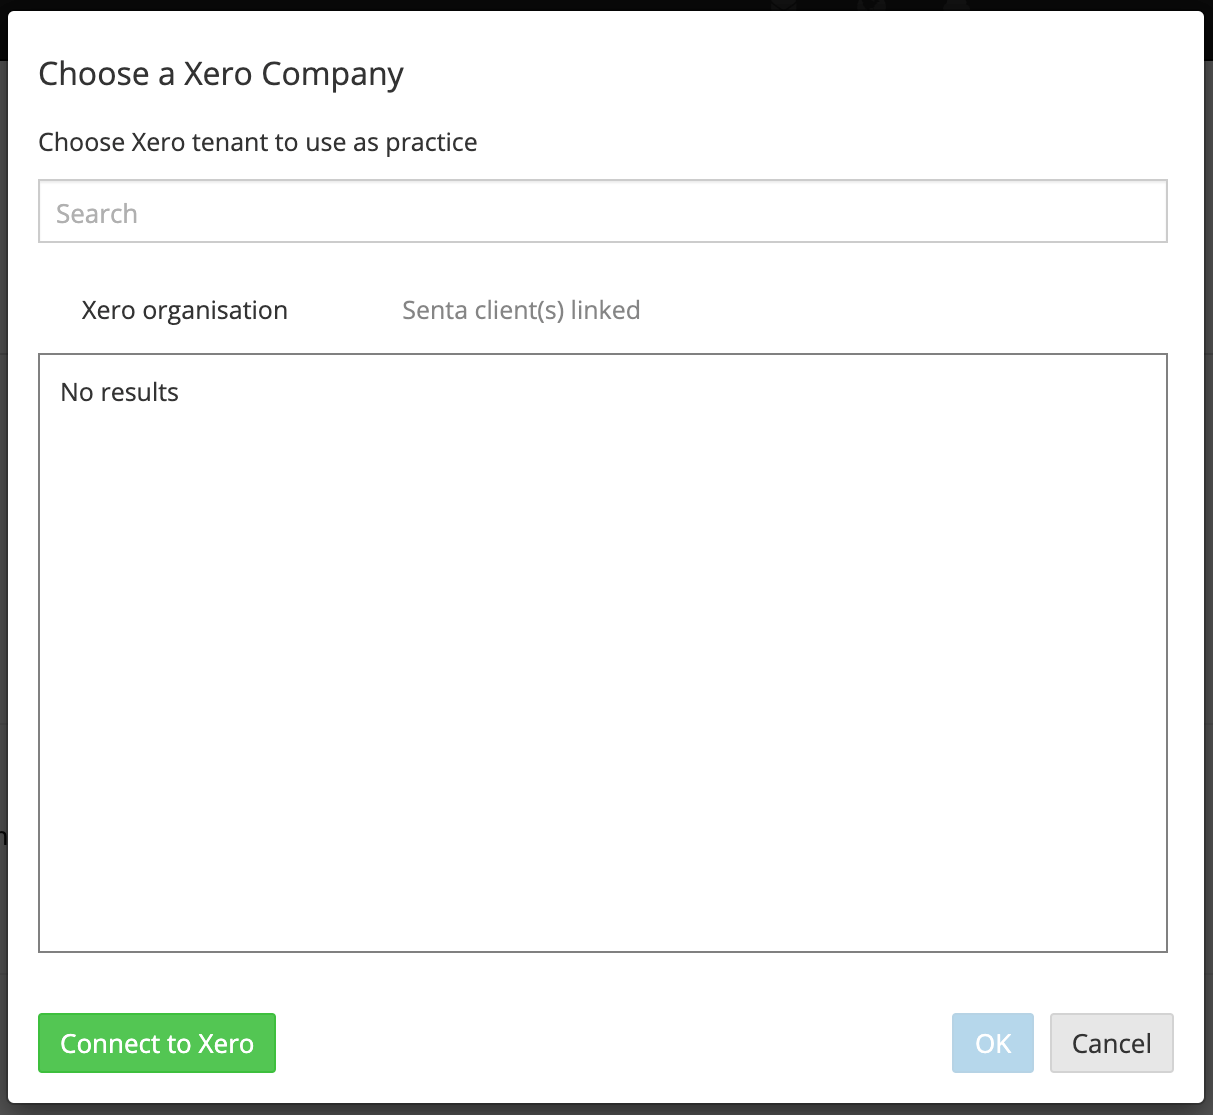
To connect a client record to a Xero company, go to the Xero tab on a client record you would like to connect. Select Connect to Xero to view a list of previously connected Xero companies. If the company is displayed in the list select the company and then select OK. If this is the first time connecting the Xero company, select Connect to Xero below the list.
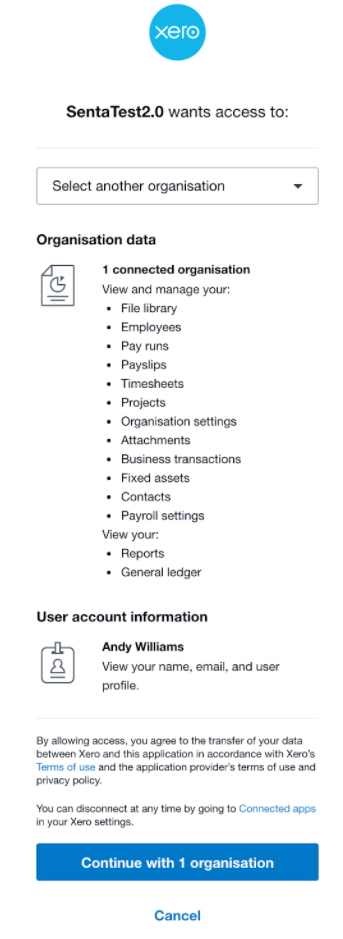
If you are not logged into Xero already, you will be redirected to the sign in page. Once signed in, you will be able to allow access to your Xero account.
It is important that you sign into the Xero account where you manage the company you wish to link this Senta client record to.
Select another organisation to choose the company you wish to connect to and then select Allow access.
Under the Xero tab, you will now be able to view information about the company, any registered users and addresses, plus their Executive Summary.
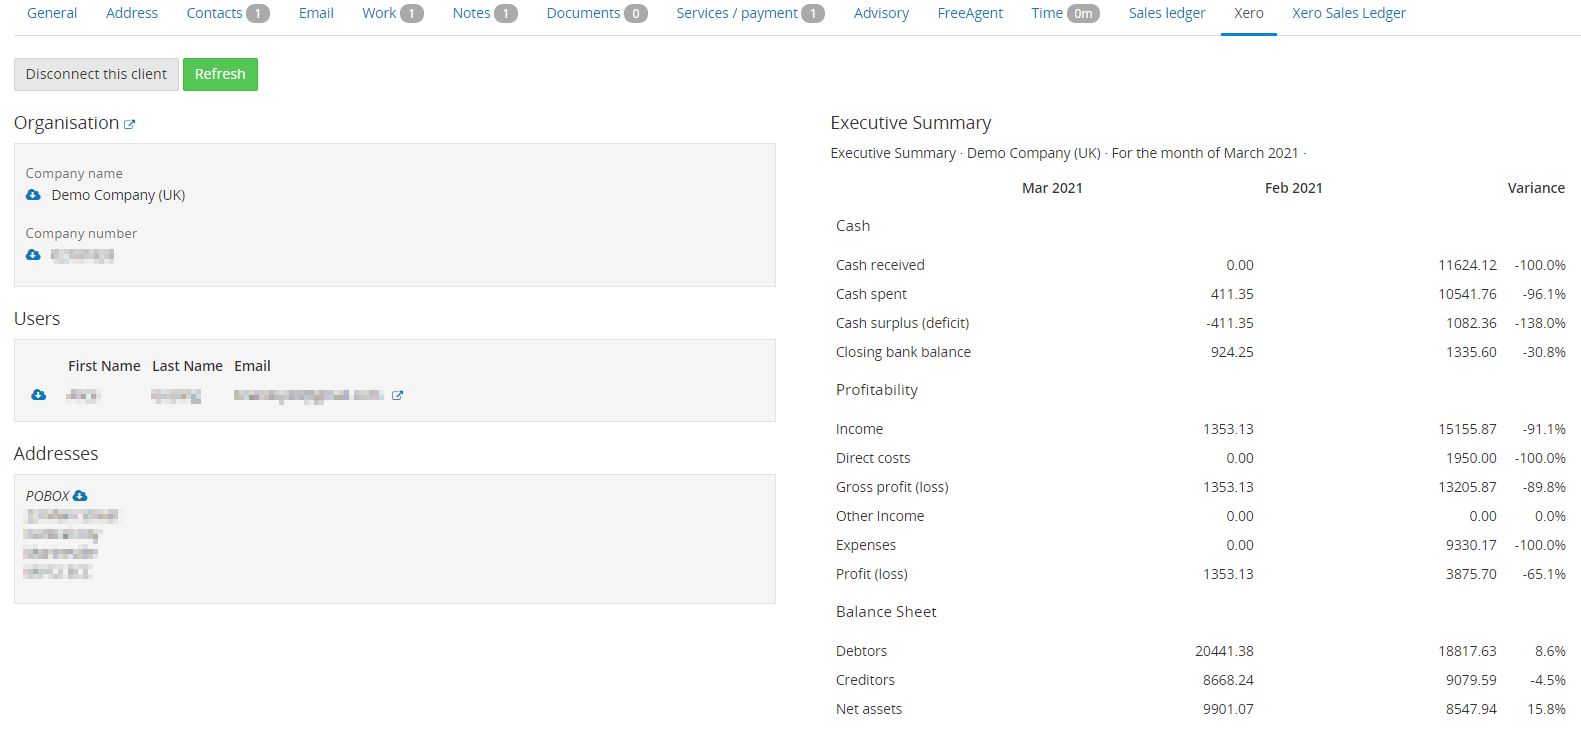
To disconnect the integration on a client, click Disconnect this client.
To refresh the data that is being pulled from your connected Xero organisation, click Refresh. This can be useful if you've made changes to an organisation while the Senta Xero integration is active.
To import any of the company, user or address details to the Senta client record, select the blue cloud next to the relevant field(s):
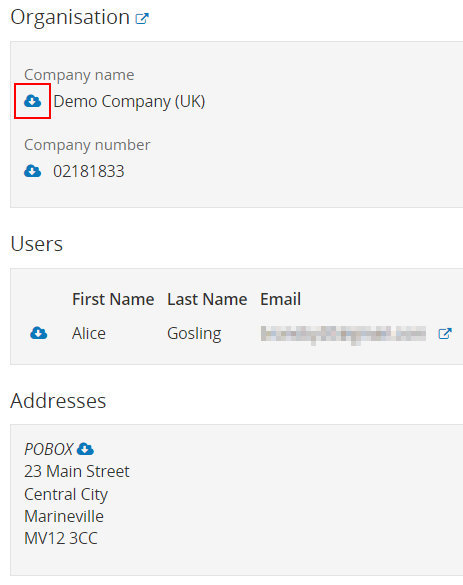
The Company name, Company number and Address are pulled from the Organisation details in Xero and the user details are taken from the Xero Profile settings and Account pages.
The following Senta fields will be updated:
| Xero field | Senta field |
| Display name | Client name (General tab) |
| Registration Number | Company number (Companies House tab) |
| Street address or PO box - First line (Postal address) | Address Line 1 (Address tab) |
| Street address or PO box - Second line (Postal address) | Address Line 2 (Address tab) |
| Street address or PO box - Third line (Postal address) | District (Address tab) |
| Town / City (Postal address) | Town / city (Address tab) |
| Postal / Zip Code (Postal address) | Postcode (Address tab) |
| First (Name) | First name (Contacts tab) |
| Last (Name) | Last name (Contacts tab) |
| Email address | Email (Contacts tab) |
Practice-level integration
Enabling the Xero practice-level integration will allow you to sync client data in from your Xero account, push client data changes out from Senta to Xero and also view sales ledger information for each client.
Set up the practice-level integration
Once you have switched on the Xero feature, select Choose your practice from Xero in Settings > General settings > Xero.
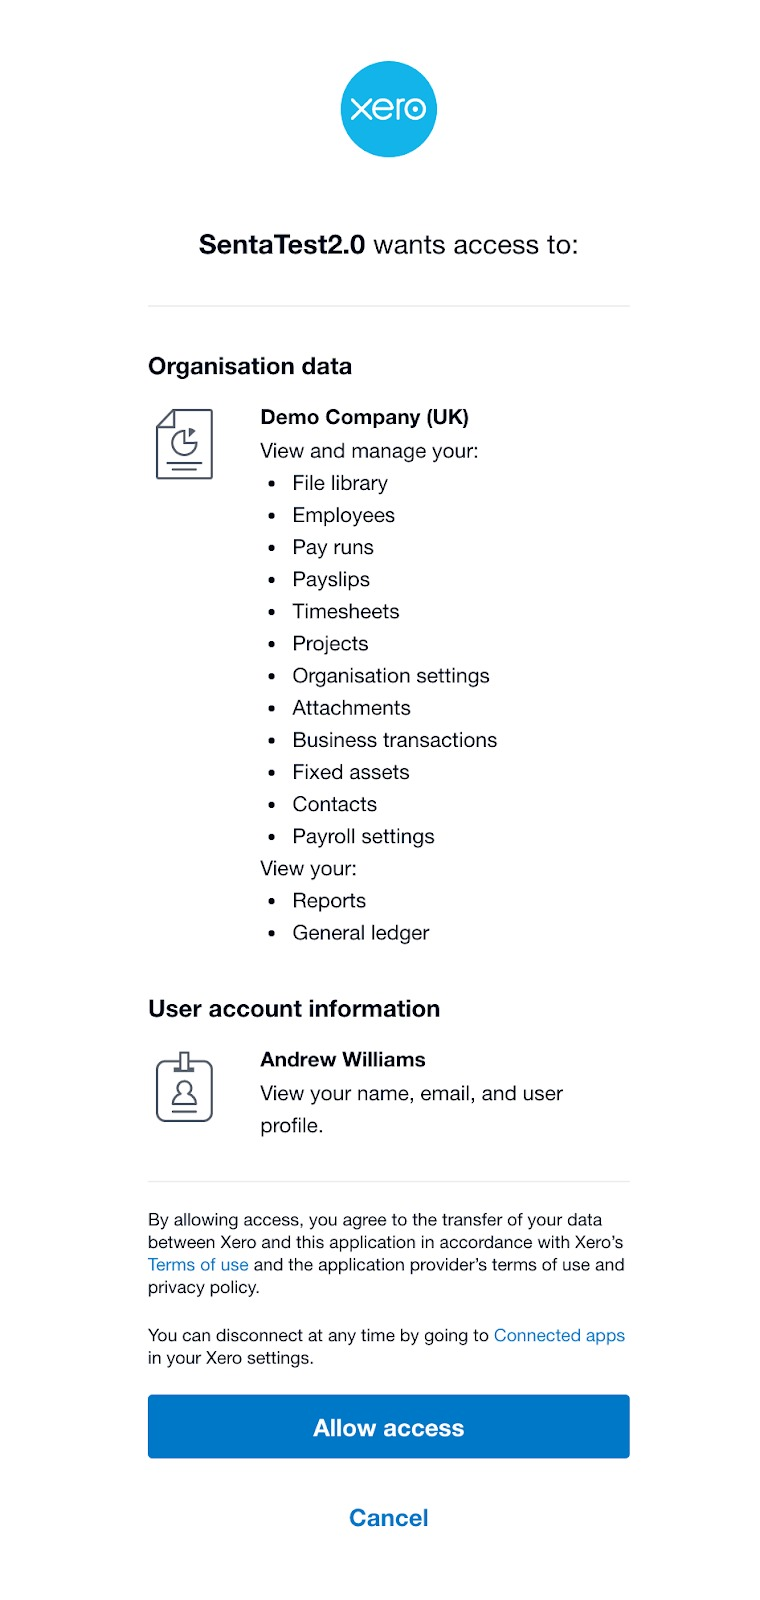
You will need to select your organisation from Xero to allow Senta to read your Xero contacts. To do this, select Connect to Xero.
If you are not logged into Xero already, you will be redirected to the sign in page. Once signed in, you will be able to allow access to your Xero account.
If you only have one organisation connected to your Xero account, you will see this page where you can Allow access:
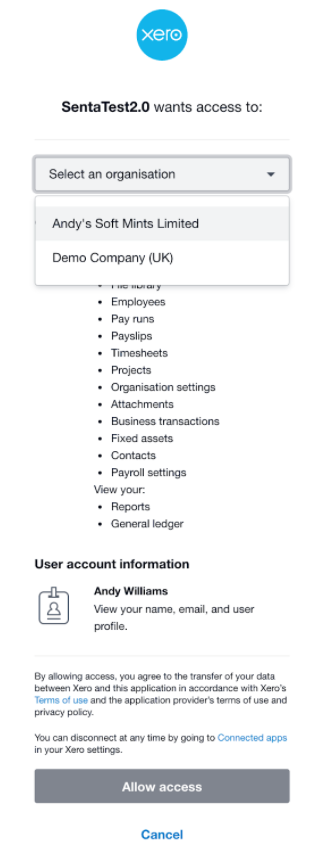
If you have multiple organisations under a single Xero account, you will see a drop-down to choose which organisation you would like to authorise:
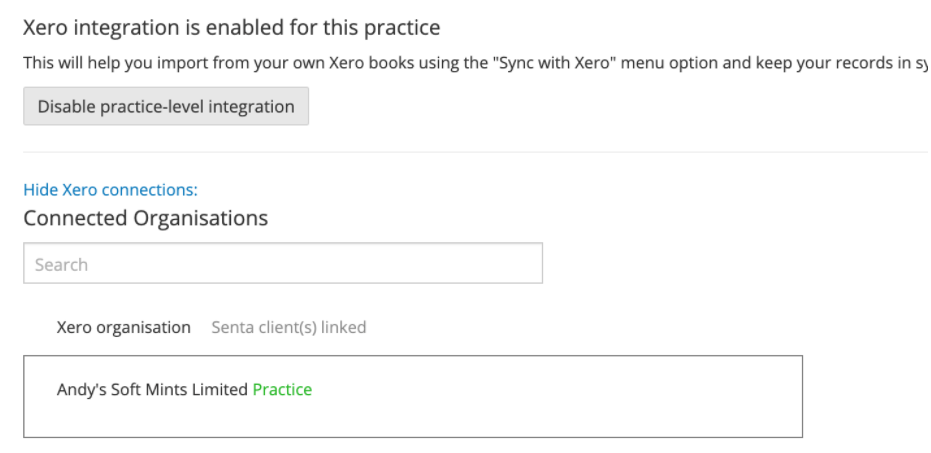
Once you click Allow access, Senta will link that organisation to Senta:
Sync client data in from Xero
Now you have connected your organisation's Xero account to Senta, there will be a new option of Sync with Xero in the Clients menu.
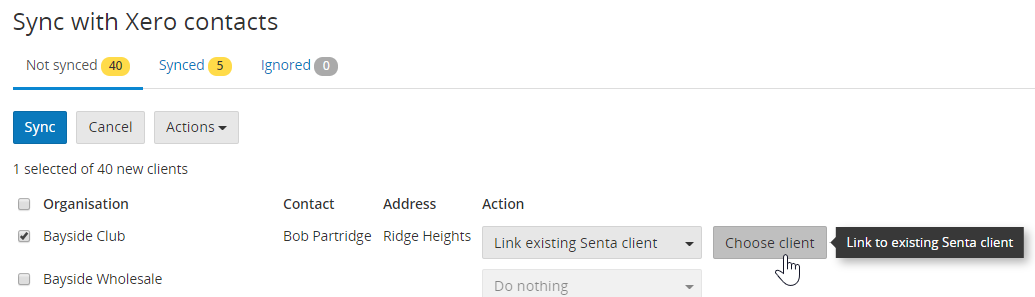
From this page you can see all of your Xero contacts, which can be synced into Senta as clients.
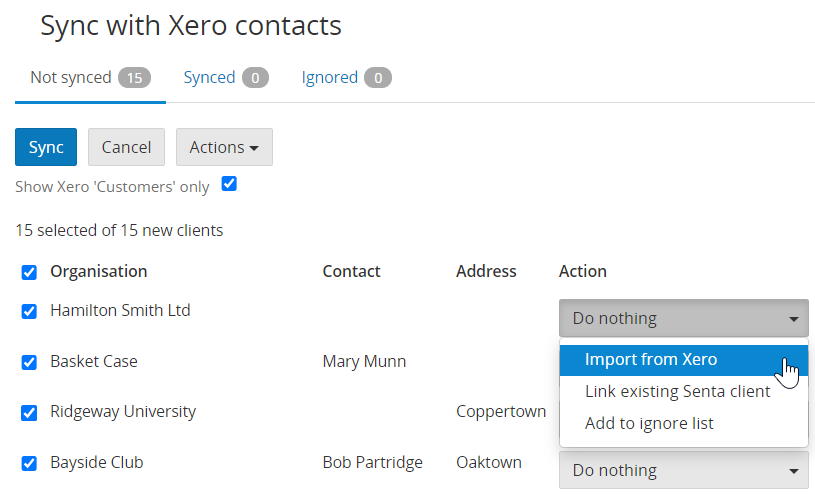
You can bulk sync them all in one go, or choose what to do for each client. You can either:
Whichever action you choose, you then need to select the client using the tick boxes, and select Sync to apply the action.
Import from Xero
Once you import clients from Xero, they will be available on your client list. These will also display under the Synced tab on the Sync with Xero page.
Link existing Senta client
If you choose to link the Xero contact to an existing client in Senta, you can then select Choose client to select the client in Senta.
Once this client has been linked, the name of the Senta client will display to the right of the Xero contact on the Synced tab.
At the point of linking, no data will be pushed from Senta into Xero, or from Xero into Senta. Once you have linked the Xero contact to the Senta client, you will see notifications on the Senta client record offering to push data into Senta or into Xero, if there are any differences in data between the 2 databases.
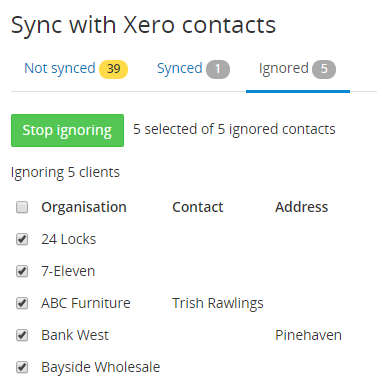
Add to ignore list
Xero stores non-clients such as suppliers as contacts, so you may choose to not sync these contacts into Senta. If you choose to ignore the Xero contact, they will be added to the Ignored tab on the Sync with Xero page.
From the Ignored tab you can also choose to stop ignoring these Xero contacts and to import their data into Senta.
Update client data in Senta and Xero
For any clients that you have imported from Xero, or linked between Senta and Xero, you will be given the option to push any data changes between the apps.
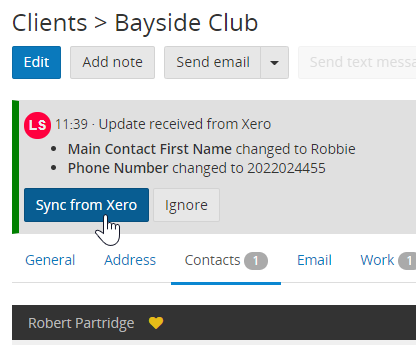
For example, if I change the first name of the primary contact on Bayside Club from "Bob" to "Robert", Senta will give me the option to either push this data change to Xero or to ignore the change and not update Xero:

If I then change the contact's first name to "Robbie" whilst in Xero, Senta will give me the option to sync this change in from Xero or ignore it:
The following fields sync between Senta and Xero:
| Senta field | Xero field |
| Client name (General tab) | Contact Name |
| First name (Primary contact) | First name (Primary person) |
| Last name (Primary contact) | Surname (Primary person) |
| Email (Primary contact) | Email (Primary person) |
| Telephone (General tab) | Phone |
| Address Line 1 (Address tab) | Main address field - First line (Postal address) |
| Address Line 2 (Address tab) | Main address field - Second line (Postal address) |
| Address Line 3 (Not a default field, please see below) | Main address field - Third line (Postal address) |
| District (Address tab) | Main address field - Fourth line (Postal address) |
| Town / city (Address tab) | City/Town (Postal address) |
| Region (Not a default field, please see below) | State/Region (Postal address) |
| Post code (Address tab) | Postal / Zip Code (Postal address) |
| ABN (Applies to Australian dataset only) | Tax Number |
In Senta, Address Line 3 and Region are not default fields. To add these in go to Settings > Forms > Client details and navigate to the Address tab.
Add the fields as text fields with the following field references:
Address Line 3 = address3
Region = region
For more information on configuring forms, see our guide.
Sales ledger
Each client that has been synced with Xero will now show a Xero Sales Ledger tab, with details of any invoices.
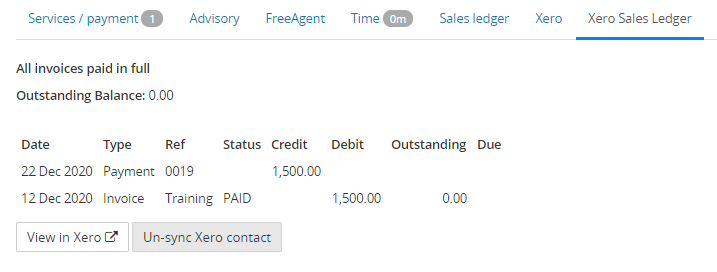
From the Xero tab you can also view this information in Xero by selecting View in Xero.