Set up Worldpay
Link your WorldPay account with IRIS Elements Cashbook to enable you to collect card payments for customer invoices.
Configuring the WorldPay account
-
Sign in to your WorldPay account at https://secure.worldpay.com/sso/public/auth/login.html.
-
Select your Merchant Code from the list, then select Proceed.
Contact customeramendments@worldpay.com for queries about your merchant codes.
-
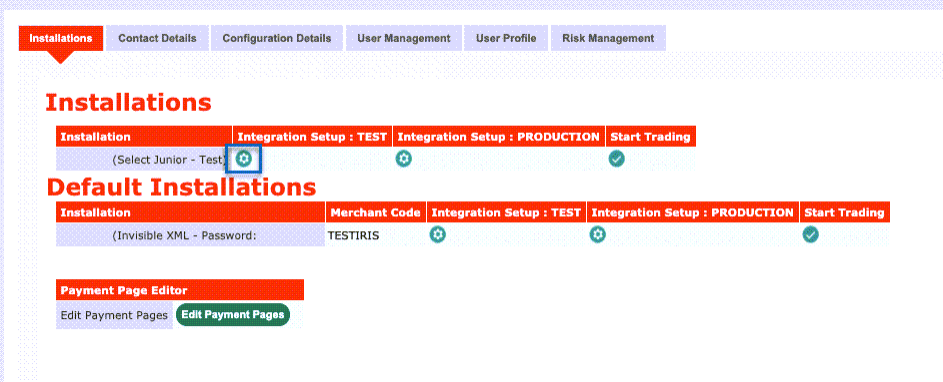
Select SETUP from the menu.
-
Open the installation administration page by selecting the cog icon from Integration Setup: Test.
-
Complete the following details on the form:
| Field | Value | Purpose |
|---|---|---|
| Payment Response URL | Enter the following value into the blank field:
<WPDISPLAY ITEM=MC_callback> |
Used as a specific server point for a Worldpay Callback to be sent to, this is so the IRIS Elements Cashbook invoice/transaction can be updated to ‘success’. Without this the payment would stay as ‘pending’ in IRIS Elements Cashbook, even if the payment has been successful in Worldpay. |
| Payment Response enabled? | Ensure box is ticked | |
| Enable the Shopper Response | Ensure box is ticked | This option allows your server to reply to the Worldpay Payment Response/Callback with a result page for the customer to be redirect to. This is to be configured within your server. |
| Payment Response Password
(optional, but recommended) |
This is a password of your choice (not the Worldpay account password). This password will also have to be set in set in IRIS Elements Cashbook on the Worldpay integration page > Response Password field |
This is optional, but recommended.
This password helps us ensure that the payment data received by IRIS Elements Cashbook has not been tampered. |
| MD5 secret for transactions
(optional, but recommended) |
This is a password of your choice (not the Worldpay account password). This password will also have to be set in set in IRIS Elements Cashbook on the Worldpay integration page > Response Password field |
This is optional, but recommended.
This password encrypts data transferred between WoldPay and IRIS Elements Cashbook. |
| SignatureFields
(optional, only complete if using MD5 secret for transactions as above) |
Enter the following value into the blank field:
instId:amount:currency:cartId:MC_userId |
This sets which fields are to be encrypted if using MD5 secret. This must be entered exactly to otherwise integration will fail. |
-
Select Save Changes.
Configuring IRIS Elements Cashbook
-
Go to Settings. (If you've switched to the new design, select your initials, then Account Settings.)
-
Select Receiving Payments. From the WorldPay section, select Settings.
-
Complete the WorldPay set up form:
-
Response Password - to match Payment Response Password set in WorldPay.
-
Installation ID - enter to match ID from WorldPay. In Worldpay go to Setup > Installations.
-
MD5 secret - only enter if also configured in WorldPay. If used this should be instId:amount:currency:cartId:MC_userId in both IRIS Elements Cashbook and WorldPay.
-
Bank Account - select the bank account that you would like to record the payments going into.
-
Currency - select the currency of your payments. IRIS Elements Cashbook does not currently support multi-currency bank accounts, this means that payments should be recorded in the same currency as the bank account.
-
Payment Method - select the payment method you would like to record these payments as. Set up payment methods.
-
Test Mode - if you would like to test your connection to the payment processor only then tick the box for test mode. When test most is enabled payments will not be collected from your customers.
-
Default Payment Provider - select if you want WorldPay as your default payment processor.
-
Redirect me to PayOnline settings - you will also need to add the PayOnline button to any unpaid invoices.
-
Test the integration
Once the settings have been updated in Worldpay and IRIS Elements Cashbook, you should create a test invoice and take a payment for that invoice either from the Invoice page or the PayOnline option using the following test card details provided by Worldpay:
-
Scheme Card Type: VISA
-
Card Number: 4444 3333 2222 1111
-
CVC: 555
-
Expiry Date: Any future date (within the next few years)
If the test payment is successful you will be redirected to IRIS Elements Cashbook and see a ‘payment successful’ message.
After making the payment take note of the test transaction details from the Worldpay Transactions page to provide the details to the on boarding team.
You must now have your primary contact call the Worldpay on boarding team to ensure website compliance is met (This team will advise you of any changes which may need to be made). You can reach them on 0330 333 1233 option 2.
Start taking payments
With the test transaction successful you now need to apply these settings to your live payments.
-
Sign in to your WorldPay account at https://secure.worldpay.com/sso/public/auth/login.html
-
Select your Merchant Code from the list, then select Proceed.
-
Select SETUP from the menu.
-
Open the installation administration page by selecting the cog icon from Integration Setup: Test.
-
Select Copy to Production.
-
Return to IRIS Elements Cashbook. Go to Settings. (If you've switched to the new design, select your initials, then Account Settings.)
-
Select Receiving Payments. From the WorldPay section, select Settings.
-
Clear the Test Mode checkbox and select Update.