 |
 |
|
|
Open PTP CT Platform.
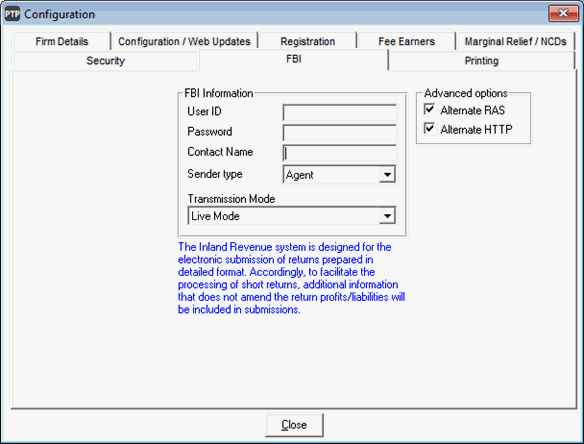
Click the Spanner icon located on the tool bar to access the Configuration section.
Select the FBI tab then enter the User ID, Password and Contact Name within this screen.
Set the Sender Type to Agent, ensure that the Transmission Mode is set to Live Mode, click Close to proceed.
There are two methods of doing this, a quick method of filing one particular client on its own and a longer method which would allow multiple returns to be submitted together of required.
Method 1:
Open PTP CT Platform and select the company.
Select the CT600 Returns tab and select the relevant return.
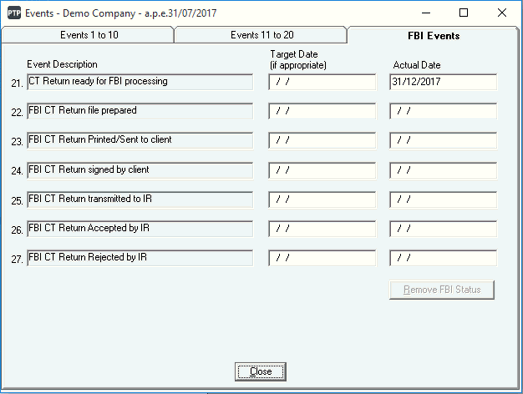
Click Events.
Enter a date into the Actual Date column for event 21 CT Return ready for FBI processing.
Click Close.

On the CT600 Returns tab highlight the relevant return.

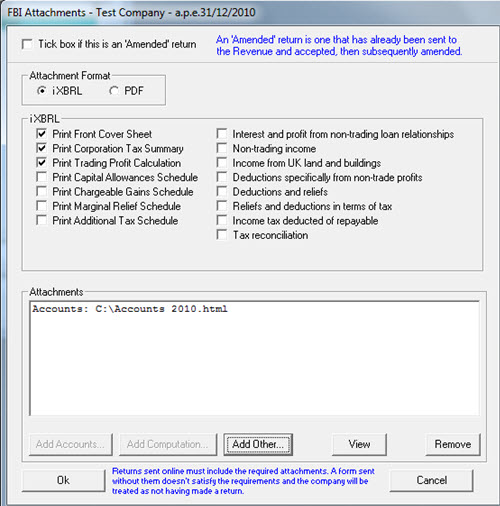
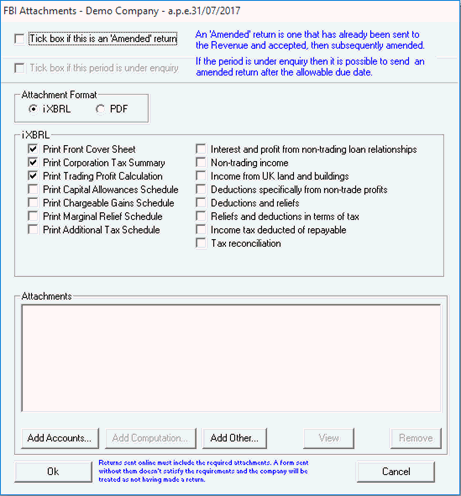
Select the Print FBI Tax Return button to access the FBI Attachments screen.
Select the required options within the FBI Attachments screen.
The top half of this section relates to the Computation, the Attachment Format should be set to iXBRL and any required schedules selected.
Click Add Accounts to be able to browse to the saved accounts and attach them.
Any additional attachments can be added by clicking Add Other but they must be in pdf format.
Click OK.
Select the appropriate printing options when prompted.
Click the Submit FBI Tax Return button as this will now be enabled.
Enter the date the client signed the tax return and click Update Client to continue.
Click the Submit FBI Tax Return button, highlight Local Area Network (LAN) and click Connect.
This is the point at which the Tax Return is actually submitted to HMRC.
The Tax Return will display under one of the remaining two FBI status options:
Returns accepted by Revenue - this status indicates that the submission was successful.
Method 2:
Open PTP CT Platform and select the company.
Select the CT600 Returns tab and select the relevant return.
Click Events.
Enter a date into the Actual Date column for event 21 CT Return ready for FBI processing.
Click Close.
Click the FBI icon located on the tool bar to access the FBI Status section.
Select the Send option located to the left of the required client to access the FBI Attachments screen.
The Tax Return will then be validated in to ensure it complies with HMRC guidelines prior to submission.
The Tax Return will display under one of the remaining two FBI status options: