 |
 |
|
|
This topic is meant for use as a reference for those using the PTP OpeniXBRL online service. PTP OpeniXBRL enables accounts written in Microsoft Word® to be converted to an iXBRL document which can then be submitted to HMRC as part of a corporate tax filing.
The topic contains instructions on how to prepare an accounts document prior to uploading to PTP OpeniXBRL. It gives detailed instructions for applying the tags required to meet the Joint Filing Common Validation Checks required for submission to HMRC. Finally, it gives an explanation of common errors and how to resolve them.
This section covers how to verify that the source accounts are prepared
correctly for use with PTP OpeniXBRL. The following guidelines for preparing
your Word accounts document will enable you to make the most of PTP OpeniXBRL's
auto tagging capabilities.
The accounts must be in Word 2007 (".docx") format for the document to be recognised by PTP OpeniXBRL. Any accounts in other formats should be converted to Word 2007 before uploading.
For the best auto tagging performance, financial tables should be in Word table format rather than tab-aligned or white space tables. Word has built-in tools to convert text to table format. In addition, to make the best use of auto tagging, table columns should represent the context of the facts (for example, dates) and row headings should represent report line items (for example, turnover).
The source accounts should not contain information to be tagged in em- bedded objects as these will not be included in the final iXBRL file. Information held in embedded Excel, Word, PDF or other formats should be moved into the main document as text or tables before uploading.
Special text types such as headers or hyperlinks will not be included in the converted iXBRL document and so any information that needs to be tagged should be moved to the main text.
The final iXBRL document will be text-based and so rich media content such as charts or pictures will not be included. Any information that is held in rich content and needs to be tagged, should be moved to tables or the main text.
The file size of the source document should not be more than 15MB. Usually very large file sizes are the result of embedded content. Removing any embedded content will make the file size smaller.
HMRC require that certain pieces of information are always included in iXBRL accounts submitted through the Government Gateway. Prior to uploading you should ensure that the information outlined in Chapter 3, Passing the Joint Filing Common Validation Checks (JFCVC), is included in the text of your accounts.
The first step in passing the JFCVC is to ensure that the following required information is present in your accounts. If these are not included and tagged, you will not be able to successfully submit the resultant iXBRL to HMRC:
• Company name
• Company Registration Number
• Period start date for the accounts
• Period end date for the accounts
• Balance sheet date
• Date of approval of the balance sheet
• Name of the director approving the balance sheet
• If the accounts include a profit and loss account, the final profit or loss over the period
• Date of signing for the directors' report
• Name of the director approving the directors' report
The following table lists the JFCVC and gives the steps required to tag each item.
For items marked as Manually tag, you should select the relevant text before choosing the appropriate concept and reviewing the tag details.
To go straight to the correct concept, you can search for the text given
as the concept label in brackets below:
Validation |
|
|
HMRC Ref |
Rule (Label of Concept Affected |
Step in PTP OpeniXBRL |
1 |
Company name is MANDATORY (Entity current legal or registered name) |
Manually tag |
2 |
Period Start Date is MANDATORY (Start date for period covered by report) |
Manually tag,leaving the Date field as the value that is automatically filled in (the end of period date). |
3 |
Period End Date is MANDATORY (End date for period covered by report) |
Manually tag,leaving the Date field as the value that is automatically filled in (the end of period date). |
4 |
Period Start Date MUST be 6April 2008 or later (Start date for period covered by report) |
Always true for new filings |
6 |
Balance Sheet Date is MANDATORY (balance sheet date) |
Manually tag, leaving the Date field as the value that is automatically filled in (the end of period date). |
7 |
Balance Sheet Date of Approval is MANDATORY (UK-GAAP: Date of approval of accounts UK-IFRS: Date of authorisation of financial statements of issue). |
Manually tag, leaving the Date field as the value that is automatically filled in (the end of period date). |
8 GAAP |
Name of Director Approving Balance Sheet is MANDATORY (UK-GAAP: This is a hidden tag) |
|
8 IFRS |
Name of Director Approving Balance Sheet is MANDATORY (UK-IFRS: Explanation of body authorisation / Description of body authorising financial statements). |
Manually tag. |
9 |
Dormant/non-dormant indictor is MANDATORY (Entity is dormant) |
Add 'true' or 'false' as a hidden tag. |
10 |
Trading/non-trading indictor is MANDATORY (Entity is trading) |
Add 'true' or 'false' as a hidden tag. |
11 |
Profit or Loss for the period is MANDATORY if the Accounts contain a P&L account (UK-GAAP: profit (loss) for the period UK-IFRS: Profit (loss)) |
Review the auto tag suggestions of the P&L account table. |
12 |
Date of signing Directors' Report is MANDATORY (Date of signing of Directors' Report) |
Manually tag, leaving the Date field as the value that is automatically filled in (the end of period date). |
13 |
Name of Director signing Directors' Report is MANDATORY (This is a hidden tag) |
|
14 |
Reject inconsistent duplicate fact values, taking into account declared precisions for numeric facts (any primary items) |
It is acceptable to tag the same fact in multiple places in the document, but care should be taken that they have the same value. |
15 |
A Name or Description item MUST exist for each generic dimension member used (Name* or Description items) |
Every time a generic dimension member is used, for example, Director 1, the member should be manually tagged in the document. Examples of this are given in items 8 and 13. |
16.1 |
For PTPOpeniXBRL, the Company Reference Number is MANDATORY (UK Companies House registered number) |
Manually tag. |
16.2 |
For PTPOpeniXBRL, the filer must be created with the correct Compant Registration Number |
The Company Registration Number is requested when each filer is created. If this was not filled incorrectly, it can be changed after creating the filer by clicking Edit from the Manage Filers screen. |
During the auto tagging process it is possible to attempt to tag in
a way that would lead to invalid iXBRL. PTP OpeniXBRL shows that this
is the case by marking facts with diagonal stripes.
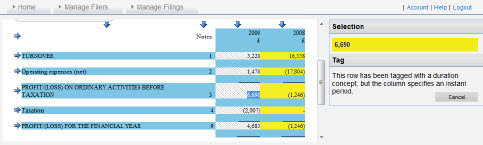
If you click on the striped-highlighted tag, then a message will be
displayed explaining what the error is. The table below gives advice on
how to resolve common auto tagging errors. All the errors listed in the
table are as a result of the line item concept not being compatible with
the selected column context. In general, you will need to select a column
context that matches the largest number of line items possible and then
manually tag line items that are not compatible with this context.
| Reported error | How to resolve |
| This row has been tagged with a duration concept, but the column specifies an instant period. |
|
| This cell has not been tagged because its grouping information was missing or not valid. |
|
| This cell has not been tagged because the specified combination of units and concept type is invalid. |
|
| This cell has not been tagged because its column context is missing dimensional information required by its row line item. |
|
| (No error message) Where there is a yellow-highlighted con- firmed value and diagonal highlighting sur- rounding it. |
|