 |
 |
|
|
This topic explains the quickest way to start using the PTP OpeniXBRL online service. PTP OpeniXBRL enables accounts written in Microsoft Word to be converted to an iXBRL document which can then be submitted to HMRC as part of a corporate tax filing. This guide shows how to access the most frequently used PTP OpeniXBRL features and gives guidance on suitable workflows to use during the conversion.
In order to get the most out of PTP OpeniXBRL then the Quick Start Guide should be used along with the PTP OpeniXBRL User Manual which gives in-depth explanation of all of the features available. The User Manual can be accessed by clicking Help on any page when logged in to PTP OpeniXBRL.
This topic does not cover the principals of XBRL or iXBRL or how it applies to the tagging of accounts.
When a note such as this is shown then further reading is recommended. This is because additional functionality or supplementary information is available that is not covered in this guide.
Click the links below to jump to a particular section:
The PTP OpeniXBRL service is provided as an interactive website. This means that it is used entirely through your internet browser.
The following browsers are supported:
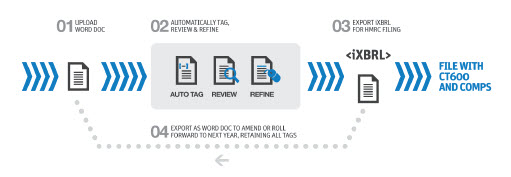
In order to convert a Word file to an iXBRL filing with the PTP OpeniXBRL service, the workflow shown in Figure 1.1, 'iXBRL conversion process' can be used. Firstly, you should check that you have access to the service and a suitable source document. Once you have uploaded the accounts, the act of tagging the document can take place using PTP OpeniXBRL.Finally, the tagged iXBRL document can be saved, ready for sending to HMRC as part of your corporate tax filing.
The remainder of this topic covers each aspect of this workflow in turn.
This section describes what you need to access the service and how to log in so that you can start to convert Word accounts to iXBRL filings.
The following credentials are required to access to the PTP OpeniXBRL service:
These should be provided by your support desk and you will not be able to use the service without them. When you have this information, you should ensure that you can access the service and log in.
To log in to PTP OpeniXBRL, type the internet address of the service into your browser address bar.
This will show the log in page where you can enter your username and password. If successfully logged in, you should be directed to the PTP OpeniXBRL home page. If your supplied credentials are not recognised by the website, then ensure that they were typed in correctly before reporting this to the person who provided you with the credentials.
To return to the home page at any time, click Home on the PTP OpeniXBRL menu bar.
This section covers how to verify that the source accounts are prepared correctly for use with PTP OpeniXBRL.
The following guidelines for preparing your Word accounts document
will enable you make the most of PTP OpeniXBRL's auto tagging capabilities.
File format
The accounts must be in Word 2007 (".docx") format for the document to be recognised by PTP OpeniXBRL. Any accounts in other formats should be converted to Word 2007 before uploading.
Table format
For the best auto tagging performance, financial tables should be in Word table format rather than tab-aligned or white space tables. Word has built in tools to covert text to table format.
In addition, to make the best use of auto tagging, table columns should represent the context of the facts (for example, dates) and row headings should represent report line items (for example, turnover).
Embedded objects
The source accounts should not contain information to be tagged in em- bedded objects as these will not be included in the final iXBRL file.
Information held in embed- ded Excel, Word or PDFs or other types should be moved into the main document as text or tables before uploading.
Special text types
Special text types such as headers or hyperlinks will not be included in the converted iXBRL document and so any information that needs to be tagged should be moved to the main text.
Rich content
The final iXBRL document will be text based and so rich media content such as charts or pictures will not be included.
Any information that is held in rich content and needs to be tagged, should be moved to tables or the main text.
File size
The file size of the source document should not be more than 15MB. Usually very large file sizes are the result of embedded content, this may be removed to make the file size smaller.
Required information
HMRC require certain pieces of information to be included in the iXBRL accounts for every submission through the Government Gateway,
this is referred to as the joint filing validation checks and can be found here: http://www.hmrc.gov.uk/ebu/ct_techpack/ joint_filing_validation_checks.pdf.
You should ensure that your accounts contain all the infor- mation defined
here, this can be done prior to uploading.
Further reading
For more information on preparing accounts for use with PTP OpeniXBRL see the User Manual.
This section explains how to add an accounts document to PTP OpeniXBRL and how to check whether PTP OpeniXBRL has accepted the file.
When the accounts are added, they are converted into iXBRL. In this form, the accounts will be referred to as a filing. This guide refers to both Filers and Filings with the following meanings:
A Filer is the entity making a submission to HMRC.
A Filing represents a single document containing company accounts.
In order to add a filing, first you must add a filer; this allows all documents related to a particular entity to be grouped together.
To add a new filer, use the PTP OpeniXBRL menu bar to navigate to the Manage Filers page and click Add New Filer.
A pop-up window displays.
Fill in the company's name and the company registration number and click Add Filer.
The Manage Filers page should show the new filer in the system. If you made a mistake entering the filer, then it can either be deleted or edited by clicking on EDIT or DEL on the line for that filer.
A pop-up window displays.
Select the filer's name and the Taxonomy you wish to use for the tagging.
You will also be prompted to enter the beginning and end dates for the accounting period and to give the filing a descriptive name.
A second pop-up should display which allows you to browse for the accounts to be filed.
Click Browse... and select the accounts from the file select window.
Once you have selected the filing to be imported, ensure that Auto Tag on Import is checked and click Upload.
When the filing has successfully uploaded, a final pop-up displays asking you to review the initial conversion of the document. The listed items are types of Word content that will not be included in the final iXBRL filing.
The presentation of the final iXBRL document can be reviewed at this point by clicking Tag Document and navigating the review screen to check that the generated iXBRL that is shown, is a faithful recreation of the original accounts.
This section explains the basics of tagging an iXBRL filing in PTP OpeniXBRL. It will cover the three tagging stages.
Review of auto tagging is a review of the context and line items suggested by PTP OpeniXBRL for data in financial tables.
Manual tagging is the identification and tagging of information not in tables.
Hidden tagging is the addition of tags defined by the chosen XBRL taxonomy but not usually found in company accounts.
Any tagging stage can be carried out at any time and confirmed tags are always saved by PTP OpeniXBRL even if you shut down your browser without logging out.
Further information on tagging in PTP OpeniXBRL can be found in the User Manual.
All tagging is carried out from the review page, which can be accessed by clicking Tag Document from the Filing Details page.
The main part of the review screen shows the converted iXBRL document. Tables and body text in the main screen are highlighted with different colours in PTP OpeniXBRL as follows:
Blue shows where suggestions are waiting to be reviewed.
Green shows the column or row currently under review.
Yellow shows facts that have been confirmed.
Hashed areas shows facts where there are errors in the tagging, click on the hashed area to get more information.
Areas with no highlighting show that there are no confirmed or suggested tags
The area beside the document shows the tagging pane that enables you to tag the document.
The contents of this area will change depending on what tagging stage you are currently on and what is selected in the main review window.
When you auto tag an uploaded document, PTP OpeniXBRL will automatically make tagging suggestions for values reported in financial tables.
To be recognised as a financial table, column headings must contain dates (representing context) and rows must contain line item labels (rep- resenting concept).
For each context and line item, PTP OpeniXBRL will suggest an appropriate XBRL concept for confirmation.
You are given the opportunity to confirm that the suggested concept
matches the facts in the filing or to select a different concept from
the taxonomy.
To begin reviewing the suggested tags:
Click Review. A summary of the review tasks remaining should now be showing at the side of the screen.
Click Review again to continue. The screen will show a financial table requiring review, where the first context is highlighted in green ready for review.
By default, PTP OpeniXBRL asks for a review of the contexts first and then moves on to the line items. It will step through each table in the document in this fashion.
For further information on reviewing line items and context created by auto tagging, refer to the User Manual.
Non-tabulated facts in the filing must be manually tagged. When manual-tagging
you can also change or remove the tags applied to the rows and columns
of a table.
To manually tag a fact in the filing:
This displays the concept browser.
Once you have navigated to the correct concept for the fact, click Select Concept. At this point, the Tag Details and Dimensions can be reviewed.
When the concept is defined correctly, clicking Apply Tag will apply the concept to this fact. The tagged information will appear highlighted in the main review window.
Text that has been tagged will be highlighted in yellow, to update or delete a manually entered tag, select the highlighted text from the main review window.
Some information required to be included in the filing is not normally exposed as text in the accounts, such information is stored in an iXBRL document as Hidden Tags.
These include information such as whether the company is trading or not.
To edit the hidden tags:
Click Add hidden tags from the main review page. This will show an alphabetical list of the tags that can be included, along with a list of tags that have already been added to the filing.
Select the tag to add and then enter the Tag Details and Dimensions as required. Once complete, click Add Tag to add the tag.
If you click on the wrong hidden tag, you can click Cancel to reselect. Selecting a tag that already has been given a value will allow you to edit or delete that tag.
For a guide to the HMRC tagging requirements see http://www.hmrc.gov.uk/ct/ct-on- line/file-return/xbrl-guide.pdf.
This section explains how to export a document stored in PTP OpeniXBRL to your computer. There are two export options, export to Word or iXBRL format.
Exporting to Word format allows the filing to be adjusted if required without losing any tagging that has already been carried out. Exporting to iXBRL allows the filing to be saved in a format to be submitted to HMRC.
The options to export are found on the Filing Details page for a particular filing.
For further information of using the Word export in order to make changes to partly tagged filings, see the User Manual.
Clicking Export iXBRL will open your browser's "open file" dialogue. Select "Save file" and you will be able to save the iXBRL file to your computer.
The iXBRL file contains the formatted document and all of the tagging that has been applied in PTP OpeniXBRL. Once tagging is complete, this is the file that should be submitted to HMRC.