 |
 |
|
|
This topic explains how to import journal postings from Accounts Platform into PTP Accounts Production.
Please ensure the following tasks are completed before importing the journal postings. The client details have been exported or created within PTP Accounts Production and the set of accounts are completed prior to exporting.
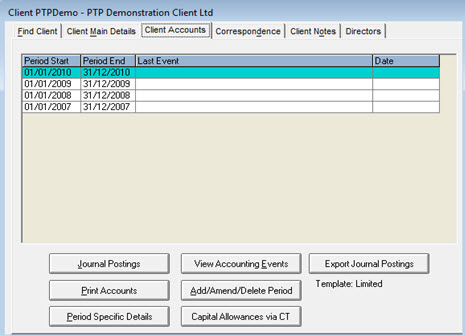
Highlight the Client, in the Find Client list.
From the Client Accounts tab select the required Accounting Period.
Ensure a copy of the trial balance of the Accounting Period expected to be exported and the Chart of accounts are printed prior to exporting the Journal Postings.
A warning screen displays; please read this message and click OK.
The following screen displays.
Click OK.
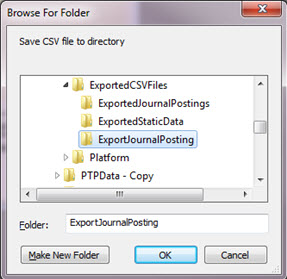
The CSV file will be saved to the default location. This location can be changed, however we recommend that all exported files are saved in the same location
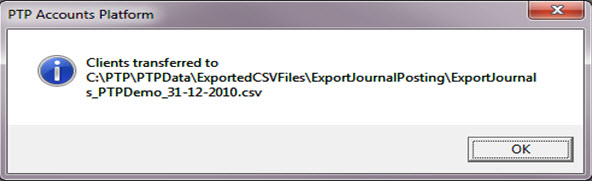
The following screen displays showing the location of the saved CSV file.
Note the saved location and click OK.
Once exported, the journal can
no longer be amended. A new Event is recorded Journal Postings have
been exported.
On the View Accounting Events button, a date is now recorded on Event
21 (Journal Postings have been exported). The journal is now locked
for editing. Journal Postings can be unlocked by removing the dates
within event 21. However, we recommend any changes to the journal
postings to be performed within PTP Accounts Production after importing.
PTP Accounts Production has a different account code structure (Chart) compared to that used in Accounts Platform (Template). An Import Map is therefore required to translate the account codes used within Accounts Platform to the corresponding PTP Accounts Production code.
From the PTP Accounts Production toolbar, select Client | Select
From the Client Browser find the required client and click Select.
Select Posting | New
The first time a Posting Entry is created on a client An Accounts Chart will need to be selected (ELTD for Limited Companies or EPST for Partnerships or Soletrader).
Select the correct accounts chart and click OK.
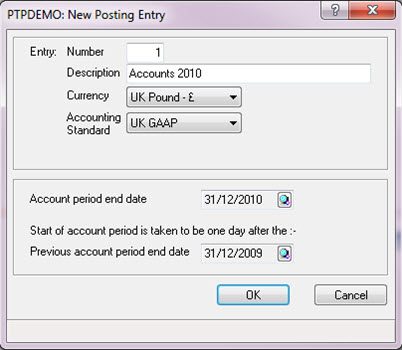
The following screen displays.
Enter a Description (for example, Accounts 2010 – this is for identification only and will not appear on the Financial Statements).
Click the magnifying glass next to Account period end date and enter New year-end date in the Insert Accounting Period screen.
Click OK and OK again.
Click the magnifying glass next to Previous account period end date. Where no previous period end date is found a selection screen is provided, select Enter Date.
If this is the first year of the business select Trade Date to use the Trade Incorporated/Commenced date.
Once Enter Date is selected from the Please Choose an Accounting Period screen, click Add and enter New year-end date in the Insert Accounting Period screen.
Click OK and OK again.
Accounts Platform required a period ‘Start’ date. PTP Accounts Production will take the start date from the previous account period end date +1 day.
Click OK.
The following screen displays.
Enter 11 in the Document type field and click OK.

From the posting entry screen select Advanced | Import Postings:
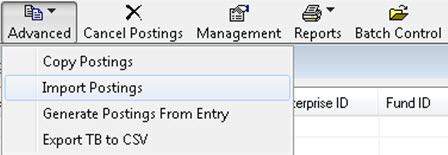
Select A - Standard (for example, comma separated) import file.
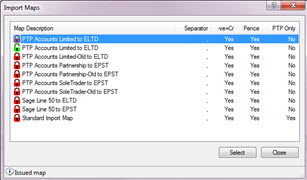
The following screen displays.
An ‘issued’ Map will be identified with a red lock and a ‘user’ map with a green lock.
Select appropriate PTP Accounts map and click Select.
A screen displays; locate the clients CSV file.
Browse to the saved location, (previously recorded).
Select the file to be imported.
Click Open, the client Journal Posting has now been imported.
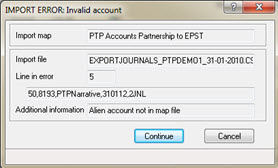
Alien account not in map file may occur for the following screen to display.
Account code used on the CSV file is not located within the Import Map. Important detail in the screen is the csv data line: 50,8193,PTPNarrative,310112,2JNL. The csv data line therefore indicates that the ‘Alien account not in map file’ is 8193. The Chart of accounts taken from Accounts Platform confirm what account 8193 relates to.
Click Continue.
Click the magnifying glass next to the Transfer amount to PTP account field to launch the Please choose an account screen.
Select the appropriate account code and click OK.
If uncertain which account code to select, you can select 0 (suspense account). This can be reviewed when the import has been completed
Click OK again to confirm selection and continue with the import, repeat if necessary.
Once a selection of an account code has been made for an Invalid Account, that selection should be retained for the selected client and used automatically on the next import.
Client specific amendments to the import map can be reviewed by selecting Edit | Import Maps | Change
If a global change is required so all clients use the same mapping then
a change will need to be made manually under Setup
| Import Maps
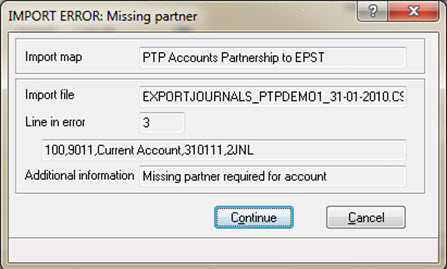
A known situation where the Import Error – Invalid Account message will display is where the CSV file includes Stock (P&L).
The account codes for Stock (P&L) have not been included within the Import Maps. The reason for this is due to differences between Accounts Platform which provides accounts codes for a Decrease/(Increase) in stock and PTP Accounts Production which provides separate account codes for Opening/Closing Stock. Users are therefore required to choose how they wish to map these accounts.
Accounts Platform codes for Stock:
2200 Decrease/(Increase) in stocks
2201 Decrease/(Increase) in raw materials and consumables
2202 Decrease/(Increase) in Work in progress
2203 Decrease/(Increase) in Long term contract work in progress
2204 Decrease/(Increase) in Finished goods and goods for resale
2205 Decrease/(Increase) in Payments on account
Even though these accounts contain a movement only, users should be able to identify Closing
Stock by the balances in Closing Stock accounts located on the Balance Sheet:
7100 Stock and work in progress
7101 Raw materials and consumables
7102 Work-in-progress
7103 Long term contract work-in-progress
7104 Finished goods and goods for resale
7105 Payments on account#
A Journal can be made once the import is complete to make sure the correct balances are present in each Stock account
The following screen may display.
Click Continue.
From the Please choose a Director/Partner/Proprietor screen, select the appropriate client.
Click OK to continue with the import.
Once the import is complete confirmation will display, click OK.
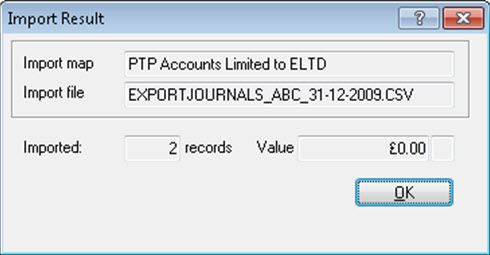
The Value should relate the Trial Balance from the CSV imported.