 |
 |
|
|
This topic explains how to generate and submit a CT600 return online, with iXBRL Accounts.
If you have already entered your user ID and Password, please proceed to STEP 1 – Attaching Accounts.
In this Topic Hide
Entering the User ID and Password
Step 2 - Generating the Electronic Tax Return in IRIS Business Tax
Practices may register for Online Services at www.hmrc.gov.uk. Your Agent Reference should be available from your local tax office.
Log in to IRIS Business Tax as the MASTER user and select the client.
From the top toolbar select Setup | Practice Options
Click Tax Options.
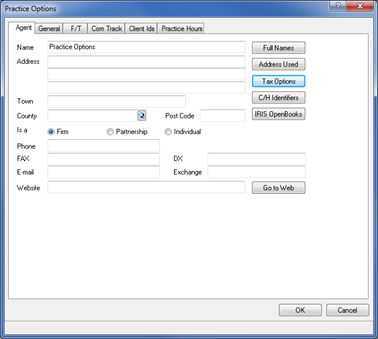
Click the Corp. Tax
tab and enter your Agent reference,
User id, Password
and Return E-mail
address.
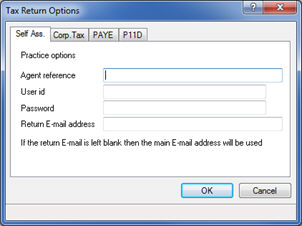
Agent reference - HMRC issues each agent with an ‘Agent Reference’ that must be entered when registering for the Online Service.
User id - the AIS trader identifier for the Internet service is a 12 character code (mostly letters) allocated by HMRC.
Password - a combination of letters and numbers, between 8 and 12 characters in length, which is defined by the agent when registering for the Agent Internet Service via the Government gateway.
Return E-mail address - used for extra confirmation that the HMRC has accepted a tax return. This feature can also be controlled through the Government gateway so, if the email address is left blank here, a message may still be sent if the option has been set on the gateway.
Accounts must be attached unless the user has indicated otherwise, giving a reason on the Data Entry | Summary screen, in IRIS Business Tax.
Due to changes in legislation, IRIS Business Tax will expect iXBRL accounts and iXBRL computations to be attached when generating an electronic Tax Return. If the accounts need to be attached in PDF format, the Accounts attached in PDF format option must be selected in the Data Entry, Summary screen to indicate that the accounts need to be attached in PDF format.
A PDF copy of the accounts can be submitted with the return instead of iXBRL accounts in any of the following circumstances:
The return is filed before 01/04/2011
The return is for a corporation tax accounting period ending before 01/04/2010
The return for a corporation tax accounting period ending on or after 01/04/2010, but is filed before 01/04/2011
The company is exempt from iXBRL filing
To save the iXBRL Account file from IRIS Accounts Production:
From the menu bar select Reports | iXBRL and CH E-File.
Select the appropriate Financial
Statements, for example,select LTD from the Report/Document
filed and click OK.
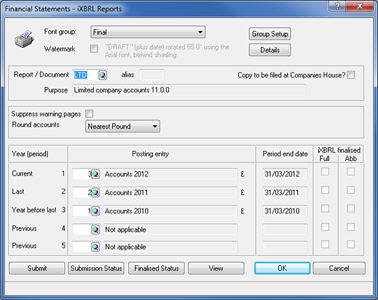
The iXBRL accounts must be finalized. For further information please refer to the Accounts.
Within the Tag Editor screen click the iXBRL Finalise icon.
Upon successful
validation, click the Create HMRC
Copy icon

You are now prompted to select the
location to save the HMRC copy of the iXBRL accounts file.
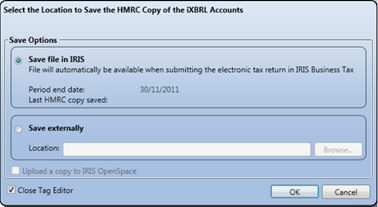
Save file in IRIS – this allows
the iXBRL account file to be automatically attached when generating
the Electronic CT600 in IRIS Business Tax.
Save externally – this allows
the iXBRL accounts file to be saved in a specific folder.
Click OK.
In IRIS Business Tax, select the Limited Company Client.
From the Reports menu select Electronic Tax Return.
The following screen displays.
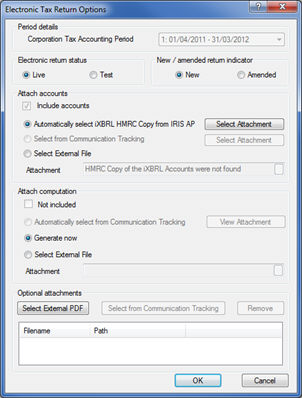
Automatically select iXBRL HMRC Copy from IRIS AP - allows IRIS Accounts Production users to attach the HMRC copy of the finalised iXBRL accounts produced within IRIS Accounts Production. IRIS Business Tax will automatically select the HMRC copy of the iXBRL accounts generated within IRIS Accounts Production for users with a relevant license for the product.
Select from Communication Tracking - allows IRIS Practice Management users to attach accounts stored within IRIS Communication Tracking.
Select External File - allows the user to click the magnifying glass, browse to find and select an existing iXBRL or PDF document to be attached for the client Attach computation.
iXBRL or PDF computations should be attached to the CT600 unless the user has indicated otherwise and given a reason on the Data Entry | Summary screen.
Not included - select if computations are not attached.
Automatically select from Communication Tracking - select iXBRL or PDF documents to be attached to the Electronic Tax Return which have previously been saved within IRIS Communication Tracking.
Generate
now - if this option is selected the iXBRL or PDF computation
will be generated at run time. The computation will display on
the screen before the CT600 is displayed, giving the user the
opportunity to check the computation is as required.
This is the default option.
When attaching an iXBRL tax computation for a long Corporation Tax Account Period (CTAP), due to cross checking of the iXBRL document and the CT600, the accounting period that the computation relates to must match that shown on the CT600.
In the situation where there is a long CTAP, IRIS Business Tax assumes that the computation will be attached to the 1st CTAP submitted. When dealing with a long CTAP there are several options available to attach the computation:
Select Generate now to generate the iXBRL computation for the relevant CTAP shown at the top of the screen.
Select Automatically select from Communication Tracking and ensure that when filing for the 2nd CTAP the setting Data Entry | Summary | Computation has not been ticked for the 2nd CTAP period and the reason set to Submitted with accompanying return.
When using external software to generate the iXBRL tax computation users are required to ensure the relevant period that the computation relates to has been correctly set in the iXBRL computation produced.
Use this section if you want to submit additional PDF documents to HMRC, such as a letter or additional calculations.
If the Generate now option was selected in the Attach computation section, when clicking OK to the Electronic Tax Return Options screen the following screen displays:
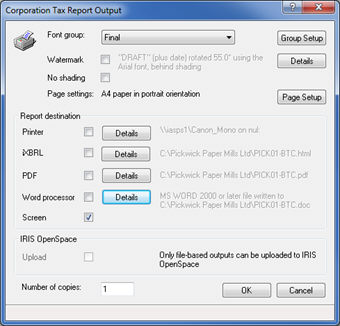
Printer - Sends the report to the selected printer. Click Details to change the Windows settings or choose a different printer.
iXBRL - Sends the report to an iXBRL file that is saved as a .htm file extension. Click Details to set the path and file name.
This option is available for the Enhanced Corporation Tax Computation in IRIS Business Tax.
PDF - Sends the report to a PDF. Click Details to set the path and file name.
Word processor - Sends the report to MS Word. Click Details to set the path and file name.
Screen - Produces the report on the screen.
Once all relevant options for the computation output have been
selected, click OK.
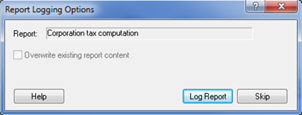
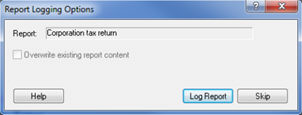
IRIS Practice Management users will be prompted to log the report.
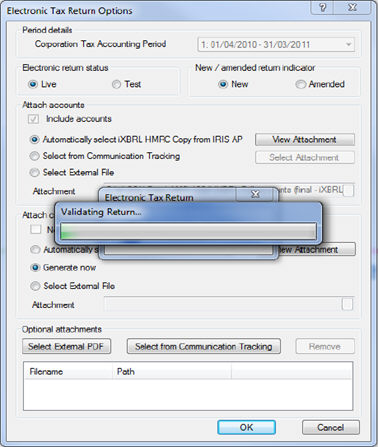
If there are no validation errors, the Internet Filing CT600 Report Output
screen shown below will generate:
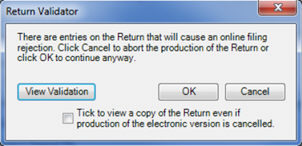
If a validation error message is generated, the following prompt will be displayed. The reported validation error message must be resolved before the return can be generated.
Once the relevant options for the Internet Filing CT600 Report Output have been selected, click OK.
IRIS Practice Management users will be prompted to log the report.
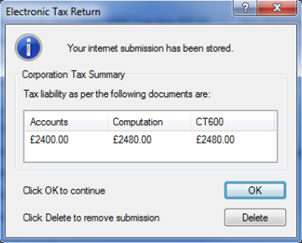
Review the CT600 Return as required and click Close.
The following confirmation message will generate to inform you that the electronic return has been stored.
From the Reports menu select Transmit
Internet Return.
The Transmit Internet Return screen displays.
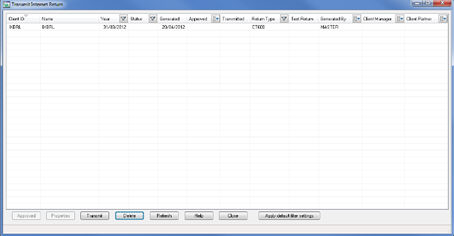
For detailed information regarding the Transmit Internet Return screen please the Appendix of this guide.
Highlight the
Return to be transmitted and click Transmit.
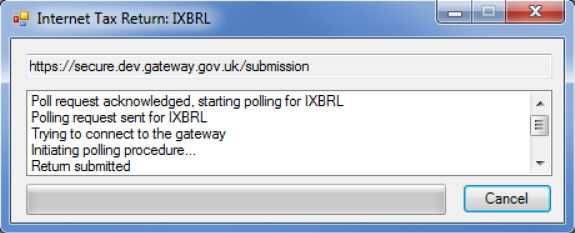
The following screen displays:
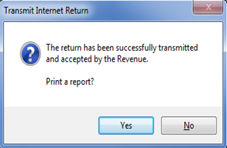
The following message displays.
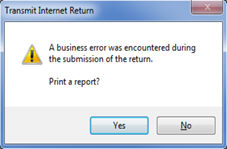
If the return is rejected the following message displays. Click Yes
to view/print details about the validation error(s) that have caused the
return to be rejected.
If any amendments are made to the computation / CT600 Return after the Electronic Return has been generated, you will be required to re-generate the Electronic Return in order for the updated changes to be transmitted to HMRC.
The Transmit Internet Return screen will update the Status column for the transmitted return(s).
Information on the transmission screen can be sorted by clicking on one of the column headings.
Approved – Used to update the job stages section within Practice Management. This option is not available for non Practice Management users and Practice Management users who have not set up an automatic job stage for return approval.
Transmit - Used to send a return or a batch of highlighted returns. For Practice Management users this option will be disabled where the approved job stage has not been completed, if there is an automatic job stage for return approval.
Delete - Used to remove returns from this list. The details of the transmission will be retained in the tax return dates.
Refresh – Used to update the list on a network system where other users may have created Internet returns since opening the screen.
Apply default filter settings – Used to apply the default column filters for the Transmit Internet Return screen. This will reset all the columns except the Year column, which will be filtered to use the current tax year. The screen shows a summary of the Internet returns awaiting transmission or that have been transmitted. The status indicates what has happened to the XML return.
No status - awaiting transmission to HMRC, click Transmit.
Accepted - the return has been accepted by HMRC and will be forwarded to the tax office.
Authentication Failure - the username or password is incorrect or HMRC does not hold a 64-8 for the client (the UTR is not on their client list). Check the username and password by using them to log into the Government Gateway. If this works, check the UTR by looking at the whole client list on the Gateway (press Ctrl+F to search for the UTR).
Duplicate - the return was rejected as a duplicate which means that a valid return has already been accepted for this client. If a revision has been made to the return, the revision must be sent by post.
Fatal Error - something unexpected happened during the processing of the return, usually a failure to connect to the Internet. Check that the Internet is working and try to transmit again.
Pending – the return has been transmitted but HMRC has not yet responded. Click Transmit to ‘query again’. Results from pending returns must be collected within 30 days of the original transmission attempt. If left longer than 30 days, right-click on the entry, reset the status of the return and transmit it again.
Rejected - there is a problem with the return. Look at the report to find out which box or boxes were wrong and for details of the exact error. The rejection message will include an error number.
System Error - this should be rare as it indicates there is a problem with the Gateway. The Internet connection has been made but the Gateway is not communicating. Try to transmit again later. If the problem persists call IRIS or the HMRC Electronic Help desk on 0845 60 55 999.
Test Case - the return transmitted was a test case and it would have been generated as a final return.
Use the column filters to filter the number of returns shown on the screen. The columns can be filtered to allow more specific returns to be shown on screen instead of all returns. The following filters can be applied in the transmit internet return screen:
Year - this filter can be used to filter the returns shown on the screen by the self-assessment tax year. This does not filter Corporation Tax Accounting Periods shown in this column. By default, the transmit internet return screen will display returns for the current filing tax year, and will automatically change to the next filing tax year from the 6th of April.
Status - use to filter the returns by their transmission status. Using the Not Accepted status will display all returns with a status where the return has not yet been accepted by the HMRC gateway service.
Approved – used to filter the returns by the approval status when applicable.
Return Type - used to filter the returns by the type, with the form name used to differentiate between the types.
Generated By - allows the filtering by the staff member that of who generated the returns shown on the screen.
Client Manager - allows the filtering by the Client Manager that is responsible for the return. The Client Manager is shown in the client details screen in the categories tab.
Client Partner - allows the filtering by the Client Partner that is responsible for the return. The Client Partner is shown in the client details screen in the categories tab. All filter settings except for the Year column are remembered after the transmit internet return screen is closed. To restore all columns back to their default filters, click Apply default filter settings at the bottom of the screen.