 |
 |
A general expense posting can be used to post to an expense category without using a timesheet.
General Expense screen can be accessed from:
Enter the Time Ledger.
Click Post WIP.
Click General Expense.
Enter the period that the expense is to be posted into (defaulted to current period).
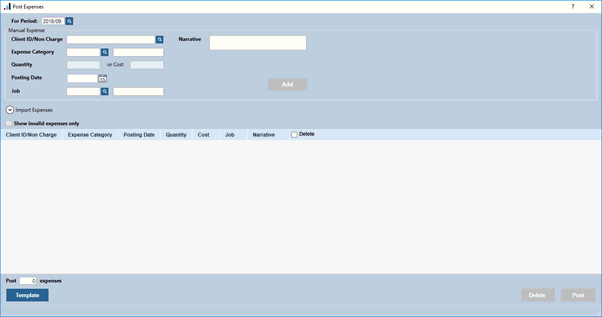
The Post General Expense to period screen displays:

When logging into General expenses screen, For Period will be populated with current period. If For Period is empty, then all other options on this screen will be disabled.

All other fields will be blank by default.

Client ID/Non-Charge – This is mandatory field. Type the client or non-charge activity identifier or select using the magnifying glass you would like to post time to. You can select multiple client or non-charge using magnifying glass.
When Client Browser is displayed this screen allow user to multi-select Client using shift key or selecting one client and dragging cursor to the last client to be selected.
Expense Category - This is mandatory field. Type the expense category, or select using the magnifying glass, to post an expense to.
Quantity or Cost - These are mandatory field. Expense category can be entered as a quantity or as a cost.
Expense category set up with a unit rate, for example mileage, can be set up with a unit rate of £0.52. Once this has been set up a quantity of this unit can be entered. For example, enter a quantity of '2' for mileage would create an expense of £1.04.
Expense categories can be set up to be entered onto the expense posting screen. Enter in the cost field the value of the expense to be posted.
Posting Date - These are mandatory field. Enter the date that the Time Ledger expense postings is to be made to (06/07/2002).
Job - These are mandatory field.
To post to a client job type the job type identifier, or select using
the magnifying glass, to post expense to.
If you have selected single Client / Non-Charge then only Job’s for that client will be displayed. But if you have selected multiple Client / Non Charge then all Job’s will be displayed.
Job Types are the first level of analysis within Time & Fees and can be used in conjunction with Work Types or independently.
Once Job Types have been set up onto the system they can be assigned to the client to become a client job type. Client job types can be registered manually when the client is created, or on-the-fly as you post to the client.
To create a client job type whilst posting:
Enter the job type identifier into the job type field provided. For example, Acc.
You will be notified that the client job does not yet exist for the selected client.
Confirm that the job type is to used for this client by clicking YES.
Job types created for annual or periodic intervals require additional information. For example, an annual job Acc/2002, or period job SLT/2002/1 to be entered.
To enable job types, go to the Practice management options and click Use job types. Job types are then available to be used in the time ledger. To used job types in the time ledger go to the Time Ledger Options and ensure that account at job level is selected.
Narrative - a Narrative can be typed to describe the type of work the individual is performing on behalf of the client.
Add – this will add Manual expenses
to the grid on this screen. This button will be enabled only when all
mandatory fields are populated.

CSV file: Selecting the magnifying glass will open Post Expenses – Select file window. A file location can be entered, or the location can be selected. Expenses from the selected CSV file will be auto populated in the grid on this screen.
Show invalid expenses – selecting this option will display only invalid expenses in the grid on this screen.

This grid will display the Manually added and Imported Expenses. Invalid fields in this grid will be marked as red box. You can update the invalid filed in the grid itself.

Post expenses – This will display number of posting present in the grid.

Delete – this will delete
the selected postings in the grid. This button will be enabled only when
one or more posting is selected to delete in the grid.
Post – this will post all valid expenses from the grid to the time ledger. This option will be enabled only if there are all valid Expenses in the grid.

Template – this will display the default csv template.
