 |
 |
Ensure that the scanner is plugged into the machine you are configuring the preset for.
Select the Scanning tab, click the Create a scanner preset option.
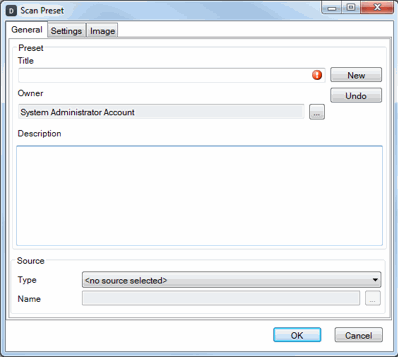
The following screen displays.
This screen allows you to create the desired Scanning Preset and customise the settings.
The General tab allows you to provide details to identify the scan preset and set the local scanner.
The Administrator is able to set a Title and Owner, provide a Description, and specify the Source Type (local scanner).
A title is required to help identify the preset when a user is scanning. The title should be descriptive as this will be seen by the user at the point of scanning.
An Owner must also be selected. An owner can be specified by clicking the … button and highlighting the owner from the Members screen displayed.
The Description field should give detail as to how the Scan Preset will be used.
In the Source section a source Type is required. Click the drop-down arrow and select Twain scanner.
IDM scanning presets only support Twain drivers.
The following screen displays.
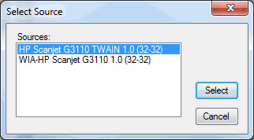
The following dialog displays.
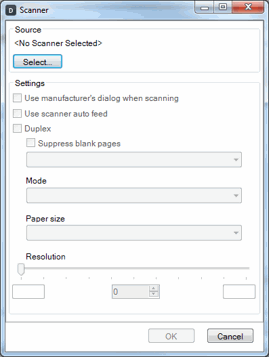
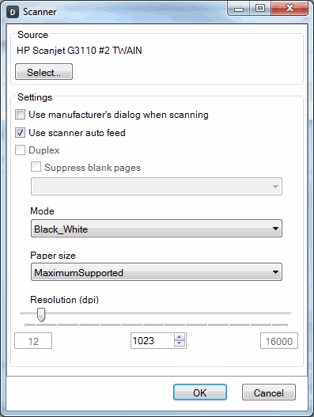
The Scanner screen displays with the select scanner entered in the Source section.
Further options relating to the chosen scanner will be displayed.
Use manufacturer’s dialog when scanning
When Scanning Present the manufacturer’s own scanning dialog box.
Use scanner auto feed
Use the automatic document feeder on the scanning device, rather than a flat bed.
Duplex
Turn on duplex scanning, that is, scan both sides of the document.
This option is only available for scanners which support duplex.
Suppress blank pages
This option is only available when Duplex scanning is enabled and allows blank pages to be suppressed (rejected) automatically during the scanning process.
From the menu you can choose to suppress pages which are ‘Pristine’ only, ‘Dirty’ or ‘Very Dirty’.
Mode
The Mode option allows you to choose the type of scan from ‘Black and White’, ‘Grey’ and ‘RGB Colour’.
Paper size
A specific paper size can be selected from the drop-down list (A4, A3 and so on) or the option Maximum Supported can be set.
Resolution
The resolution, measured in DPI can be set
by using the sliding scale or typing into the numeric field below this
setting. It can be set anywhere between the lowest DPI supported by the
scanner (for example, 75) or the highest supported setting (for example,
600). The recommended DPI setting is 200.
The options in this tab determine how the scanned document will be processed.
The first option allows you to define if the image created is to be a Single page or Multi page document. A single page scan will create a file document (or file) for each page scanned. A multipage scan will create a single document (or file) containing all scanned pages.
The Destination Intray option presents a drop m where all individual, Folder Intrays and Group Intrays are listed. This sets the default destination Intray when a user uses this preset.
The Batch options are not configurable.
The Type of file to store option allows the Administrator to select a file type for scanning (for example, .TIF, .PDF). To specify the file type, click the … button to the right of the Type of file to store field. A pop up menu will display where the File extension and Quality can be set.
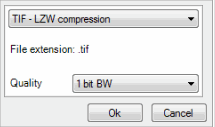
If the Type of file to store is left blank it will default to .tif File extension and 1 bit BW Quality.
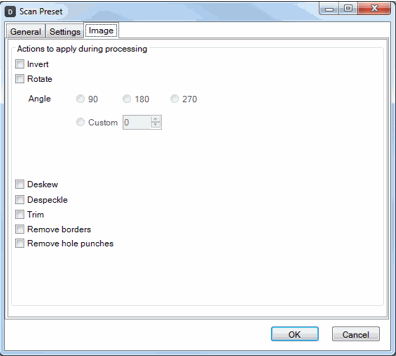
The options in this tab allows the Administrator to apply further actions
to the processing of the document.
The following actions are available:
Invert - the document will be inverted (such as a negative).
Rotate - the document will be rotated by the Angle specified.
Deskew - the image will be straightened automatically after scanning.
Despeckle - this option will clean the image and eradicate any grey blemishes from the body of the document.
Trim - trim will cut the scanned image to main body of the document removing unnecessary white space or borders.
Remove borders/Remove hole punches - borders and hole punch marks can be removed.
