 |
 |
This topic explains the process of setting up an OpenSpace account, viewing storage information, setting up a practice user, setting up folder structures and managing documents. This topic also looks at how to set up OpenSpace clients and link them to IRIS.
Creating and Activating your OpenSpace Account
Editing an Existing Practice User
Customising Staff Notifications
Adding Client Users to a Client
Creating Multiple Clients with the same Email
Linking OpenSpace Client Account to IRIS
Uploading from IRIS to your OpenSpace Client
This is only if your practice does not currently have an OpenSpace account.
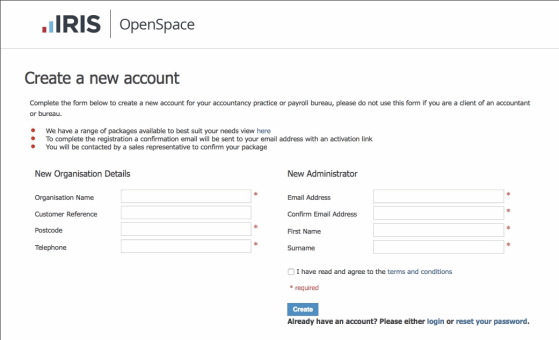
The following screen displays.
Organisation Name
Customer Reference
Postcode
Telephone
Ensure the terms and conditions option is selected.
Once details have been entered, click Create.
If the customer reference number
or postcode are found to already exist within the system, return to
the login screen and use forgotten password link to recover an existing
account.
If there's reason to think the OpenSpace account hasn't been set up
before, or the account holder is no longer with the company please
leave the customer reference field blank and continue as normal. This
can be added at a later date.

An email confirmation will be sent to the email address entered in Step 1.
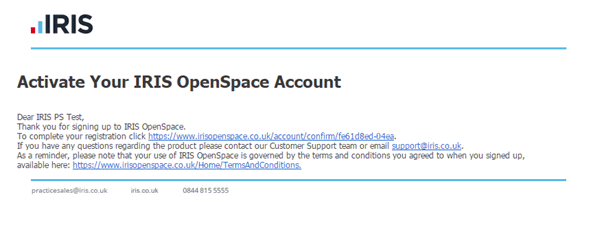
Clicking the link in the email will display the password screen.
Enter the new password, twice, and click Set Password.
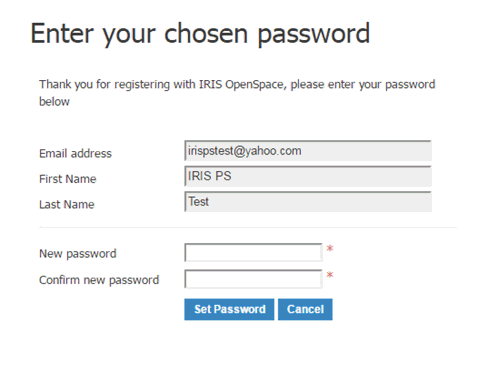
The user can now log into the OpenSpace account.
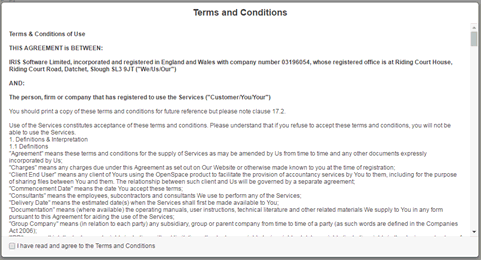
When first logging into OpenSpace, the Terms and Conditions screen displays. Read and then agree to the conditions by selecting the option at the bottom of the screen.
The T & C can be accessed within the application at any time should
they need to be read thoroughly at a later date.
The layout and functionality here starts with the three tabs along the top of the screen.
The home tab contains the practice dashboard, clients and the ability to upload a file to IRIS OpenSpace.
The first screen displayed is the Dashboard.
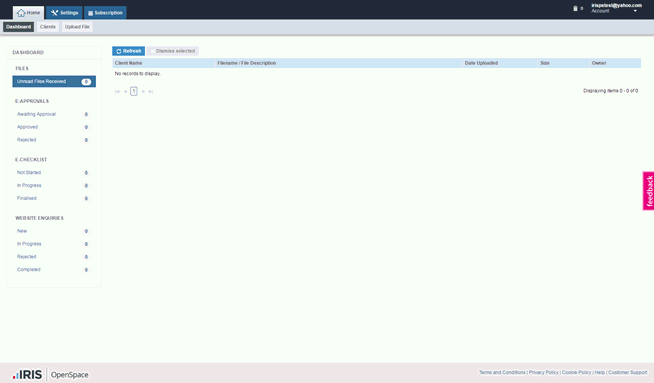
The dashboard gives a view of all unread files that have been received, documents that have been sent for and are awaiting electronic approval, those that have been approved and rejected.
It also contains all outstanding electronic checklists and will display any website enquiries that have been submitted, should they have an OpenSpace enquiry form linked to their website.
Within the main screen, they can then sort the files displayed by client name, file name and description, date uploaded, size and owner.
The clients screen gives the option to view all clients assigned. Functions available here are; export a full client list, add a new client from here or search for client information using the search bar.
Information can be edited for an existing client by selecting the checkbox to the left of the client name and clicking Edit Client in the top right-hand corner.
Clients can be sorted here by client ID, name, status, last login, total files and storage size being used.
When on the clients tab, the Upload File button will not appear. To access this, you will need to return to the dashboard tab
Clicking upload file will bring the user into the file upload mechanism.
Account setting are displayed in the top right-hand corner of the screen.
This allows the user to alter details, change their password or view the various policies and conditions held within the system.
The user can also log out from here.
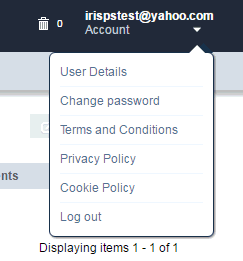
Click the dustbin to see a list of all recently deleted items.
The settings tab allows the client to customise all aspects of the OpenSpace system. The intricacies of this area will be covered in more detail later on, but the basic functionality available is as follows:

Users
From this tab new practice users can be created as well as the ability to import a list of users into the system. Existing staff member profiles can be edited here, including assigning staff members to clients and changing permissions.
Practice Details
Here practice information can be edited, including the administrator email address. The email address is used by IRIS to send any important alerts and announcements.
From here the default folder structure can be edited for each client. This will alter the files that each new client sees, depending upon how the practice wishes to organise its files.
Customisation
This tab contains all the functionality to enable branding and customisation of the OpenSpace portal. This section will be covered in further detail later.
Audit Log
The audit log contains details of every action within the system. This can be sorted by date, user, action, client and data.
eApproval Logs
e-approval logs tracks all documents that have been uploaded for electronic approval including the status of the document, who it has been approved by and when it was last interacted with.
eChecklist Logs
e-Checklist logs tracks all electronic tax e-checklists that have been uploaded to the client from IRIS.
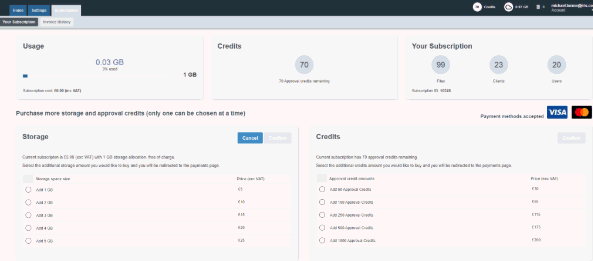
Your Subscription
This tab is where storage requirements are managed and where current usage can be viewed. The right-hand side of the page displays the total files, clients and users on the system.
Additional space and approval credits can also be purchase, to be used on OpenSpace account.
Alternatively, larger amounts can be purchased through account managers.
Invoice History
All historical invoices can be viewed and printed.
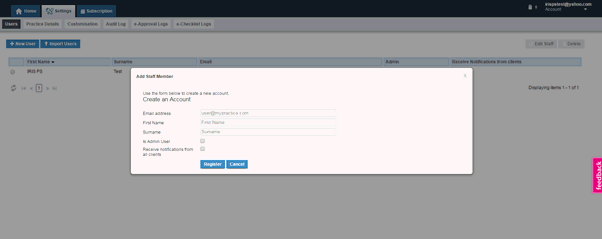
To create a new user within the practice:
Go to the Settings tab and click Users. Only Admin users can do this.
Then click New User.
Add a unique email address, first and surname.
Select Is Admin User if the user is to receive notifications from all clients.
To edit an existing user:
Select the user using the checkbox and select Edit User.
Edit the details entered for that user and customise the notifications that the user will receive if required.

Use the Import functionality to import a large number of practice users. When selected, the following message displays. A link in the message will download a sample file before attempting to upload a file into the system.
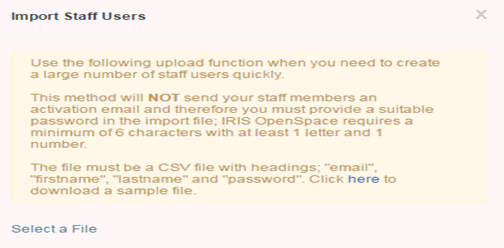
There are a number of options available to customise the notifications
that staff members receive.
They can:

A user can be assigned to a particular client by searching based upon
client ID. This means that the user then receives notifications based
upon that client’s activity only.

Login to OpenSpace as an Admin user.
Go to Settings | Practice Details to change for all clients.
The Uploaded From IRIS Practice Suite and Top Level folders can be renamed but not deleted. Any files uploaded through IRIS will automatically save to the folder Uploaded From IRIS Practice Suite.
This will help manage the files uploaded to clients into labelled folders.
The default/accountants folder structure can be personalised by adding,
removing and renaming folders.
Adding a Top Level folder - highlight the Top Level folder | New Folder | Name the folder | Update
Adding a Subfolder - highlight the folder you want to create the subfolder in, New Folder | Name the folder | Update
Deleting folders - select the box next to the folder | Delete
New non IRIS client - Create a New Client | select Use Accountant File Structure
New IRIS client - automatically created clients that are uploaded from IRIS will not have Use Accountant File Structure selected by default. To add, select Client | Edit Client | select Use Accountant File Structure | Update
A warning message displays indicating that any files in the Uploaded From IRIS Practice Suite folder will not be affected. All other folders will no longer be accessible.
To regain access to the folders, deselect Use Accountant File Structure | Update
To activate the Edit options, select the document/s that need editing by selecting the box next to them.
Notify - manual notify the client the file has been uploaded
Edit - edit the Name and Description, select the tick on the right to save changes
Copy To - copies the document to your chosen folder location
Move To - moves the document to your chosen folder location
Delete - send document to the Trash
If a file is accidentally delete, it can immediately be restor from the 'Trash' can.
Deleting - select the box next to the document you want to delete, Delete
Restoring - click the Trash icon located at the top of the page, Restore
A client can be automatically created by uploading a document from IRIS.
This is the recommended way to add a client.
A new client can also be created within the OpenSpace browser using the Client tab. From the Home screen select New Client.
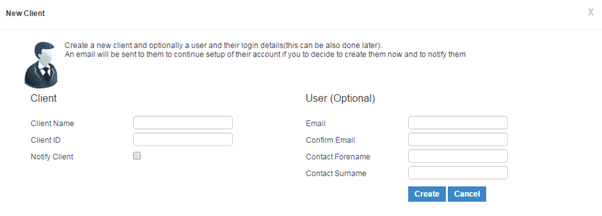
Using this method the client won't be linked in IRIS. See below to manually link. It is recommended that clients are created in IRIS, the first method, rather than directly in OpenSpace.
Enter a client name, client ID and choose whether or not the client is to be notified that their account has been created.
The option to add a user is now available. They will then be contacted to activate their account. If the email used is already in use, a warning message displays. The process can continue, however the customer must be aware that the client already has an OpenSpace account, in most cases with another accountant and must take this into account.
Once the new client has been created, they will receive an email to confirm their account and to create a password. The practice will then receive a notification of when this has occurred.
From the Home tab, click the Clients menu item and select the client you wish to add a user to.
Click Edit Client then click Add Client User. Enter the Email Address, Confirm Email, First Name and Surname then click Register when complete.
You are able to create clients and attach them to an email address you have already used for another client. When they login to their IRIS OpenSpace account they will be able to see multiple documents.
Client Statuses:
Not Registered - the client has been created automatically by uploaded file from IRIS Accountancy Suite, you will need to complete the user details.
Registration Sent - an activation email has been sent to the client. We are waiting for client user to activate their account and setup a password.
Inactive - the client user has activated their account, created a password but not logged in yet.
Active - the client has logged in.
If the client has been created manually, directly in OpenSpace, they will not show as linked in IRIS.
To link an OpenSpace client to IRIS:
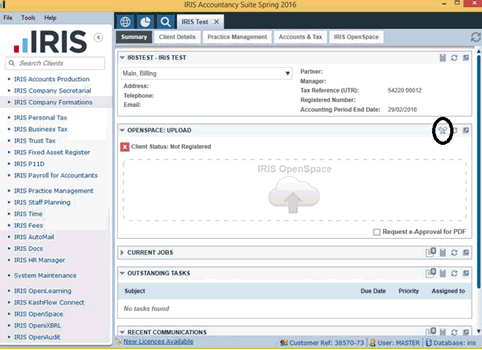
From the IRIS Portal menu click the magnifying glass.
Select the client to display.
Click the tools icon, (circled below).
A screen displays with the options to either link a client to IRIS or create a new client in OpenSpace.
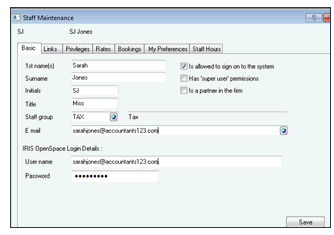
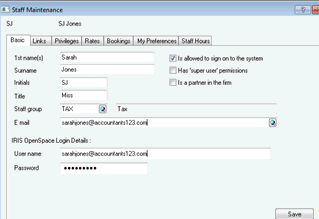
To upload a file to IRIS OpenSpace from IRIS, the OpenSpace Username and password MUST be saved within Staff Maintenance to 'your' IRIS login before starting.
If this is not typed correctly IRIS will not warn you, therefore please ensure this is typed correctly.
Log in to IRIS, System Maintenance | Staff | Staff Maintenance
Highlight your staff login from the list; View | Basic tab.
Enter IRIS OpenSpace Username and Password and click Save.
If uploading documents for an IRIS client, there is no need to create a New Client.
Uploading files from IRIS automatically creates the client in IRIS OpenSpace and saves it in the Uploaded from IRIS Practice Suite folder.
To do this:
Go to Accounts Production | Reports | select Report.
Select the PDF and/or Word processor and select Upload.
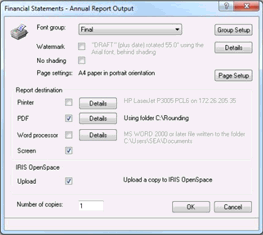
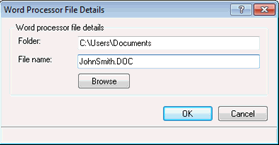
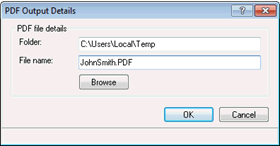
An output details dialog displays where the folder location and file
name, (PDF or Word document), can be changed. Word and PDF document can
be uploaded simultaneously.
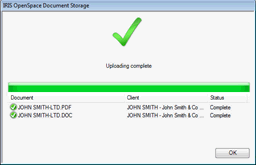
An Uploading complete dialog displays when the file has successfully uploaded to IRIS OpenSpace from IRIS.
Files can be uploaded wherever you see the Upload option:

Upload files from the Communications tab by selecting Upload:

Non-client specific reports from Time and Fees cannot be uploaded from IRIS.
Select a client, select report | Upload