 |
 |
|
|
The new column profile feature allows IRIS Docs administrators to assign predefined display profiles to users.
These profiles allow administrators to define exactly which metadata
items a particular set of users need to see, whilst removing those which
are not required.
Defining consistent column ordering, alongside the ability to auto size
column widths, means users are provided with a clear presentation of the
key information they need.
Feature Details
Column Profiles
Terminology
Column sets are a collection of column definitions for a particular data structure. The column sets are categorised into the following types:
Column definitions are the settings for each individual column (i.e.– User Created and System Document References).
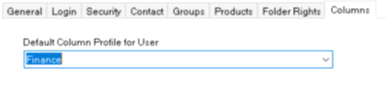
A user can have a specified column profile assigned to them or they can inherit the default column profile.
Users will have the default column profile assigned to them initially. In this scenario the column behaviour remains exactly the same as in previous versions.
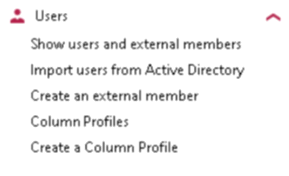
The list of available column profiles can be viewed from: Users | Column Profiles in the User section of the administration view.
One profile that will always been displayed is 'None’. This is the default column set, that is, the column set is generated automatically, which controlled the behaviour of column profiles in releases prior to 6.16.
This is not an editable column profile and cannot be changed in any way.
The assignment of a column profile is displayed in the ‘Show users and external members’ section where a new column indicates which profile is assigned to a user.
There is also a new menu tab named ‘Columns’ in the edit user details dialog screen, where administrators can view and change the profile assigned to that user.
Assignment of a profile to multiple users can be achieved by right-clicking the relevant profile and selecting ‘Assign to users'.
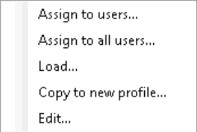
This will list all available users, even where they are already assigned to the profile.
The ‘Assign to all users...’ right-click option is used to quickly assign a profile to all users, for example where one profile is to be used throughout the company.
Existing column set configurations will be converted to a new format and the old configuration file copied to a file called <file>.soap.old.
If a user has a column profile assigned to them then that column profile may be downloaded when they log on.
The existing column set configuration will be replaced by that from the server when the user logs on if:
It is important to understand that there are differences in the behaviour of downloading a column profile where users have the ‘Move Columns’ privilege as opposed to those who do not.
When a user with the ‘Move Columns’ privilege is assigned a column profile by an administrator, the configuration will only be downloaded the first time they logon. These users are then able to customise the columns as they desire. The next time they logon, their customisations will not be overwritten. If the user subsequently chooses to select ‘Reset Columns’, this will revert the column configuration back to the setup of the column profile they have assigned. Any customisations will be lost.
A user who has the ‘Move column’ privilege can edit their own column layout at any time by right clicking and selecting the View | Columns menu option.
When viewing a workflow this menu option allows the workflow columns to be viewed and edited. When viewing normal documents this menu option allows the ‘Standard Document’ columns to be edited.
A user can reset their column configuration at any time by right clicking and selecting the View>Reset Columns menu option at any time.
Users with a profile assigned will be reset back the latest profile version from the server (losing any customisations).
Users without a profile assigned will be reset back to the default initial ‘out of the box’ profile configuration (much like when running IRIS Docs for the first time).
There are numerous ways to create a new column profile.
Administrators can select User | Create a Column Profile. This will create a new column profile based on the column configuration currently in memory. Individual column sets can be edited and clicking OK will display the save dialog screen. The new profile can then be saved under a new name or an existing profile overwritten.
Double-clicking an existing column profile in User | Column Profiles, allows editing of the columns, clicking OK will save the changes to the existing column profile selecting ‘Save as’ will create a new profile.
Right-clicking an existing profile in Users>Column Profiles and selecting ‘Copy to new profile’ will create a new profile based upon the selected one. Columns can then be edited and clicking OK will be displayed the Save As dialog.
The column profile titles and descriptions must be unique.
Double-click or right-click | Edit on a column profile to begin editing.
A column profile can be deleted by selecting the column profile and clicking Delete. A profile cannot be deleted if any users are assigned to it, a warning message box will be shown in this case.
An administrator can ‘preview how the columns will look by clicking Load on the right-click menu option. This will load the selected column profile into memory (you will need to click refresh on any current views to see the changes). The administrator can then revert to their existing settings by using the restore menu option.
These changes will be persisted if they close the client application without using the restore option.
If the administrator adds a column to a Standard Document then the column set will update automatically in the manner in which it has always done, adding the extra column to the end of the existing ones. The relevant column profile(s) would then need to be edited to make any ordering and display changes required.
A user without the ‘Move Column’ privilege will get the change from the updated column profile automatically. Users with the privilege will either have the new item added to the end of their current configuration where it can be reordered manually, or they will need to use the Reset Columns option to replace their current configuration. Replacing the current configuration will lose any customisations they have made.
Workflow column sets will not be updated until a workflow is viewed with the new column in it.
The ‘top to bottom’ list of document references translates to ‘left to right’ in the central document pane.

This allows the user to control whether the column is visible or not. Making a column ‘not visible’ will not affect the right-hand pane and therefore should not be used for security reasons. Some columns cannot be made ‘not visible’ such as the columns for Document Tracking. These will be checked on the column editing screen but cannot have their visibility changed.
Likewise, the ‘IsSystem’ property checkbox cannot be changed.
This sets the column to a desired width. To edit the default width, click twice in the column to enter edit mode. You must enter a positive number. This value is ignored if the AutoFit option is selected.
This is a new feature in the column sets options. This will force the column to the minimum width required to display either the data or the column title, up to a configurable global maximum width. All rows can be set to the same auto fit value by clicking on a checkbox with the <alt> key pressed.
The maximum width value can be configured in the System Properties dialog in the 'Column Profiles' tab.
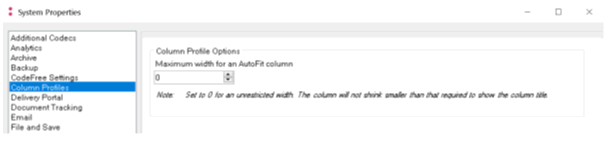
When setting the maximum width, a value of zero sets an unlimited column width. Setting a value of 1 or greater will be either the length of the column title or the specified value, whichever is greater.
Autofit columns cannot be set to a new width by editing or dragging the column headers.
This is a new option in the column sets and will force the column not to be visible if the content of that column would be empty.
It is the entire contents of the column that determines display, not just the visible portion. Autohide does not affect the display of the data in the right-hand panel.
All rows can be set to the same autohide value by clicking on a checkbox with the <alt> key pressed.
Any row can be moved up/down or to the start/end by selecting the row and clicking on the appropriate button.
There is currently no support for selecting and/or moving multiple rows.
By clicking the header with <ctrl> key held the column will be autofit - this is temporary though and will not be persisted.