 |
 |
This topic details the steps for limiting application permissions to specific mailboxes. This is useful when using either Exchange Web Services (EWS) or Microsoft Graph, as the default application permission will grant full access to all mailboxes within the Microsoft 365 tenancy.
To achieve this, the configuration must be done through PowerShell using the Exchange Online Module.
The following pages provide useful guidance:
Limiting application permissions to specific Exchange Online mailboxes
https://learn.microsoft.com/en-us/graph/auth-limit-mailbox-access?view=graph-rest-1.0
https://learn.microsoft.com/en-us/powershell/exchange/exchange-online-powershell-v2?view=exchange-ps
https://www.powershellgallery.com/packages/ExchangeOnlineManagement/3.0.0
Exchange Online Module installed for PowerShell.
Create an application within Azure Active Directory (AAD).
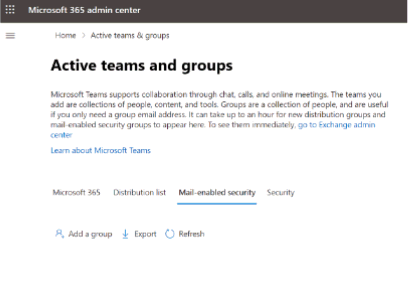
Create a Mail enabled security group and add required members.
Connect to Exchange Online with PowerShell.
Run a command to configure the ApplicationAccessPolicy for the application.
Test the ApplicationAccessPolicy.
Please see supporting documentation on how to create an application.
Once completed move to the next step.
Mail-enabled security groups are created through Microsoft 365 Admin Center.
It can take some time for the group to appear in the list.

Run PowerShell as an Administrator
This is an interactive login – it will prompt for password, followed by the secondary MFA layer if configured for the account.

If the above is a not suitable method for connecting to Exchange Online, please see the ‘Connect to Exchange Online PowerShell’ resource for further detailed options.
Once connected, the following message will be display:

To configure the access policy, we need the following information:
The application ID can be found in Azure Active directory under App Registrations.
Run the following command, replacing the arguments for AppId, PolicyScopeGroupId, and Description.
New-ApplicationAccessPolicy -AppId e7e4dbfc-046f-4074-9b3b-2ae8f144f59b - PolicyScopeGroupId EvenUsers@contoso.com -AccessRight RestrictAccess
Description - Restrict this app to members of mail-enabled security group.
Once run, it will output details of the policy created.
Changes to application access policies can take longer than 1 hour to take effect for Microsoft Graph REST API or EWS calls, even when Test-ApplicationAccessPolicy may show positive results.
Run the following command, replacing the Identity argument with a member that is in the mail-enabled security group.
Make sure the AppId is correct before testing:

The output of this command will indicate whether the app has access to member’s mailbox.
Alternatively, you can also test against a member that is not in the mail-enabled security group, which confirms that access has been restricted.
AccessCheckResult will either show ‘Granted’ or ‘Denied’ depending on the member tested.