 |
 |
|
|
There are several typical installation scenarios now achievable using
Azure SQL as the target database platform. This topic assumes previous
familiarity with both the Series 6 installation process and Azure SQL.
Where converting an existing installation to an Azure SQL database, the original installation MUST have been upgraded to at least version 6.18.59 BEFORE starting any database migration. The Azure SQL migration CANNOT be performed as part of the upgrade process itself.
In line with the 'Server Move' process if domain names, service accounts or the System Administrator Account details are changing, you may require the services of the Support Team to reapply security to the migrated database.
IRIS recommends that you take backups of all databases before performing either a version upgrade or database migration.
Please note, Invu do not support running an on-premises Series 6 installation
against an Azure SQL database due to the network latency this creates
between the services and the database. Therefore, the VM containing
the Series 6 installation MUST
also be hosted within the Azure infrastructure.
Invu recommends using the newest version of SSMS. In all scenarios
where an existing database is being migrated from a traditional SQL instance
to an Azure SQL instance, customers should be aware that we recommend
the database transfer is performed using SSMS and may take a substantial
amount of time to complete.
The Analytics (Reporting) database tables are incorporated into the
main Series 6 database from version 6.18.59 onwards, therefore there is
no requirement to migrate this database to Azure SQL.
During new installations of 6.18.59 or newer, the ECM service is now installed by default.
The ECM installer can no longer be run independently of the main installer
to install the ECM service into an existing deployment. If you need
to add the ECM service to an existing deployment, you MUST re-run the
main installer and add the ECM service during the advanced installation.
It is not currently possible to add the Business Layer to an existing installation once it has been configured to use Azure SQL. If the business layer is required, please ensure it is either installed as part of the initial new Azure SQL deployment, or where an existing deployment is being migrated to Azure SQL, the Business Layer is installed prior to the database migration.
Use the flowchart below to determine which scenario to follow, a particular set of installation circumstances may necessitate deviating from the examples below. If you have any queries regarding the process, please speak to the Support Team before progressing.
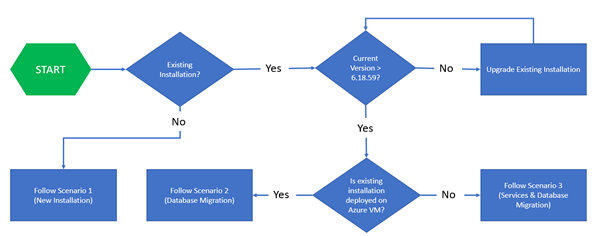
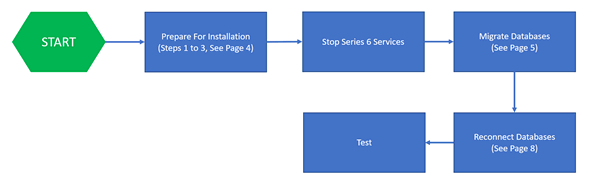
This scenario covers a fresh Series 6 installation targeting an Azure SQL database, which can be performed directly within the installer.

This scenario is typical where Series 6 is already running on an Azure VM utilising a traditional local SQL installation.
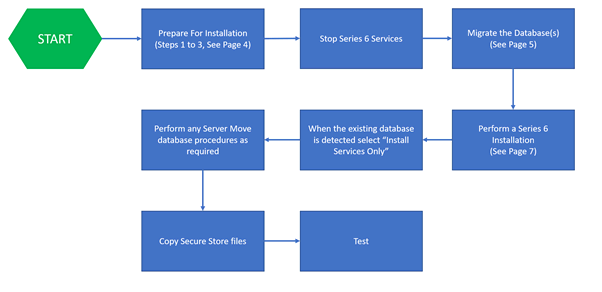
This scenario would be typical where an existing on-premises Series 6 installation is being moved to Azure as part of a “lift and shift” exercise and where a new Azure VM is being provisioned to host the Series 6 installation, as opposed to migrating an existing VM.
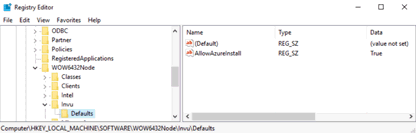
1 - Enable Beta Functionality
Whilst Azure SQL support is in Beta status, customers are required to enable this installer capability manually by creating the 'AllowAzureInstall' registry key below:
2 - Provision an Azure SQL Instance
Before proceeding further, please ensure that an Azure SQL Server has been provisioned and Endpoint address and the Azure SQL Server Administrator username and password are available.
Please refer to Microsoft documentation for guidance on provisioning Azure SQL Instances.
3 - Create Empty Databases
From the Azure SQL Portal, use the Create database option to provision a new database for the Series6 installation.
On the Basics tab of the new database wizard enter a Database name, by convention we recommend using the name 'series6' although this is not mandatory. You should also ensure that you provision a suitable level of compute and storage capacity.
Please note that once the database is provisioned Azure will bill for the resources allocated, if you are performing this on behalf on the Azure tenant you must ensure they agree to the costs before proceeding.
On the Additional Settings tab, you must set the Collation setting to Latin1_General_CI_AS.
After configuring any additional requirements, on the Review + Create tab validate the configuration and seek approval for the cost estimate if required.
Click Create, the database may take a few minutes to provision.
If you are intending to deploy workflow, please repeat the above steps to create a Workflow database, by convention we recommend naming it series6Workflow, but again this is not mandatory.
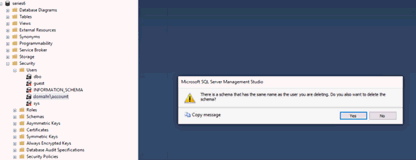
You must manually remove ALL existing SQL and Windows Domain Users from the Series6 and, if applicable, the series6Workflow database(s):
Using SSMS the existing database(s) are migrated from the local SQL instance to Azure SQL by right-clicking and selecting Deploy Database to Microsoft Azure SQL Database…:
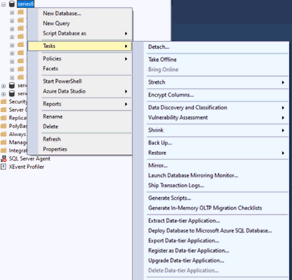
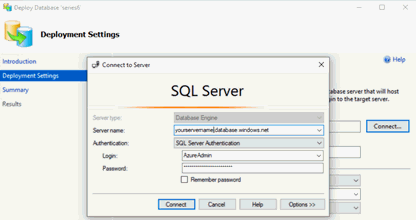
Follow the deploy database wizard ensuring you connect to the endpoint address of your Azure SQL Server:
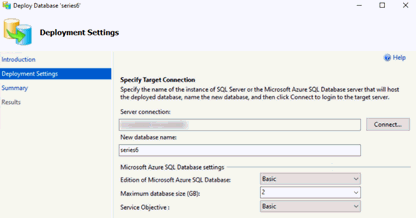
Provision a suitable storage and compute tier (please be aware that you will incur Azure costs at this point):
Complete the wizard and wait for the transfer to complete. Please note that the transfer process may take many hours to complete.
If the installation uses Workflow, the above should be repeated for the Workflow database.
Proceed with an installation of Series 6 version 6.18.59 or later. The installation follows the standard process until the Setup Data screen, where you need to select Use SQL Azure:
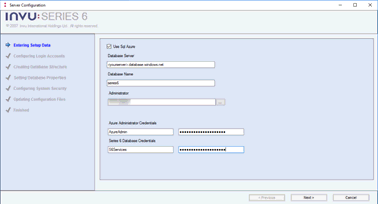
Configure the settings as follows:
Database Server - this is the Azure SQL Endpoint address obtained when setting up the Azure SQL Server.
Database Name – this must match exactly the Series6 database created as part of Preparing for an Installation/Migration (Step 3).
Azure Administrator Credentials – these are the Azure SQL Server administrator credentials set when the server was provisioned.
Series6 Database Credentials – this is a NEW set of credentials that will be automatically added to the Azure SQL database to allow the Series 6 services to connect.
Proceed with the rest of the installation as normal.
If installing the Workflow Service, the workflow database name will need to be configured, this must match exactly the name of the database configured in Preparing for an Installation/Migration (Step 3):

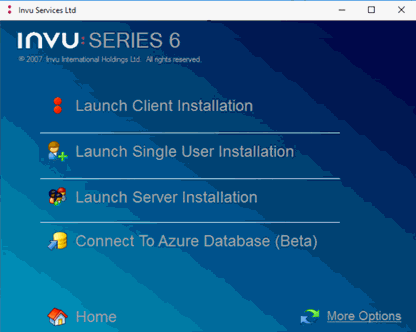
Run the installer and select the Advanced installation option. On the installer menu select Connect to Azure Database (Beta) to connect the existing Series6 installation to the newly migrated Azure SQL database(s):
Use the configuration screen to set the following values:
Database Server - this is the Azure SQL Endpoint address obtained when setting up the Azure SQL Server.
Azure Administrator Credentials – these are the Azure SQL Server administrator credentials set when the server was provisioned.
Series6 Database Credentials – this is a NEW set of credentials that will be automatically added to the Azure SQL database(s) to allow the Series 6 services to connect.
Azure Database Name – this must match exactly the Series6 database created in Preparing for an Installation/Migration (Step 3).
Azure Workflow Database Name – this must match exactly the Series6 Workflow database created in Preparing for an Installation/Migration (Step 3).
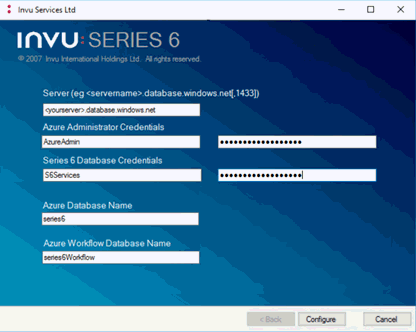
Select Configure and allow the installation process to complete. Once complete use of the system can resume. After testing, the original SQL instance can now be decommissioned.