 |
 |
|
|
Company Formations has two main functions which are:
Creating Memorandum and Articles of Association
Submitting Companies House incorporation forms (paper and electronic).
Click here to view the full system requirements.
FOLLOWING THE INSTRUCTIONS IN THIS GUIDE WILL PERMANENTLY USE A LICENCE.
Licences within Company Formations cannot be re-used. Once a company has been deemed as formed then the licence is locked and cannot be released.
The licence will be locked by doing any of the following:
Printing the Memorandum and Articles of Association
Printing Form IN01 (CA1985 - Form 10 and/or Form 12)
Selecting to Send IN01 electronically
Before using some of the features within Company Formations, accounts may need to be setup with Companies House and details entered within IRIS. See below for details where applications and/or additional configuration may be required.
Register with Companies House for electronic filing. To achieve this follow instructions available within Help | Help | Electronic Filing.
Once registered your account details must be entered into the IRIS database.
To enter the Presenter Authentication Code:
Go to Setup | Practice Options | Agents tab | C/H identifiers
Enter the Presenters ID, Authentication Code and Email address that is registered for sending and receiving Companies House emails.
A test efile can be sent to Companies House before submitting your first live incorporation to ensure your workstation can communicate directly with Companies House and that the account details entered are valid. This can be done in Setup | Practice Options | Agents tab | C/H identifiers and click Test E-File.
A printer called IRIS must be setup on each workstation using Company Formations to send the Memorandum and Articles of Association in a format required by Companies House. Setting up the additional printer driver will not interfere with your default printers.
On each workstation:
Go to Start | Settings | Control Panel | Printers and Faxes
Add new printer Xerox DocuPrint N3225 (Windows XP or 2003 only) or Xerox Phaser 5550B
Set to File (Print to File) and rename it to IRIS.
Forms are predominantly available using Adobe Acrobat Reader. For IRIS to effectively integrate with Adobe Acrobat Reader with another program, each workstation MUST have workstation setup generated. If setup.exe has not been run on each workstation using Company Formations then an IRIS PTP VB Scripting Host error may display when trying to print forms.
In the event of this message displaying when attempting to open a form:
Click Continue and Cancel or close to any other messages that display.
Close completely out of IRIS on this workstation only; it is also advisable to close all other applications as when running this program it may require a reboot of the computer.
Run setup.exe from the IRIS programs folder which can be determined as follows:
Double-click the IRIS icon, to bring up the Main Menu
Go to Help | About. The details tab shows exactly which drive and folder IRIS is held on; or
Right-mouse click on the IRIS icon, select Properties | Shortcut tab. The target shows the file that accesses the main menu. Example: g:\IRIS \setup.exe, the place to find the setup.exe file is g:\IRIS.
To run the setup, go to Start and in the Open field type, for example, g:\IRIS \setup.exe, which will then load the Install shield for updating this workstation. Follow the selections on each screen, the installation should only take a few seconds to fully complete.
Click the links below to jump to a particular
section:
Step 1 - Create the Client in IRIS
Step 2 - Add Directors and Secretaries
Step 3 - Create the formation event and register the business in Company Formations
Step 4 - Formation Wizard: Introduction: Step 1 - Involvements
Step 5 - Formation Wizard: Step 2 – Share Capital
Step 6 - Formation Wizard: Step 3 - Edit the Memorandum and Articles
Step 7 - Formation Wizard: Step 4 - Authentication Data and Witness Details
Step 8 - Formation Wizard: Step 5 – Contacts and Printing/E-Filing
From the menu bar select Client | New
Select Create a new client to be added to the IRIS database and click Next.
Enter the name, address and business type of the business that is to be formed.
The only business types that can be incorporated within Company Formations are Limited Companies - Limited by shares
Click Check Name to check the name has not already been registered at Companies House using the Companies House website.
Do not enter the date of incorporation as this will be confirmed by Companies House once the incorporation certificate is received.
Click Next.

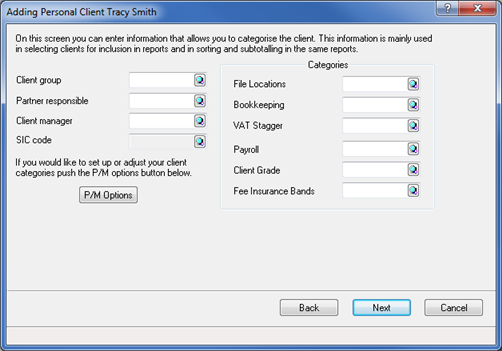
Enter the relevant Client
group, Partner
responsible, Client
manager, SIC
code if appropriate and click
Next.
All basic information is displayed for review. If there are changes
that need to be made to the information click Back.
If there are no amendments to make click Finish
to add the basic details to the database.
Any field within the client setup can be changed at a later stage by selecting Client | View.

The following question displays.
Click Yes to set up the directors and secretaries.

On the Client Involvements screen select the Directors tab and click New.
The Link option is only available where Payroll for Accounts is installed.
From the 1 October 2009, directors
must provide Companies House with both their usual residential address,
and for each directorship they hold, a service address.
The service address will be on the public record and will be public
information but the residential address will be protected information.
This address can be the same as the residential address, or the registered
office address, or an alternative address.
If the From date is left blank, IRIS will assume the director is appointed on the date of the incorporation.
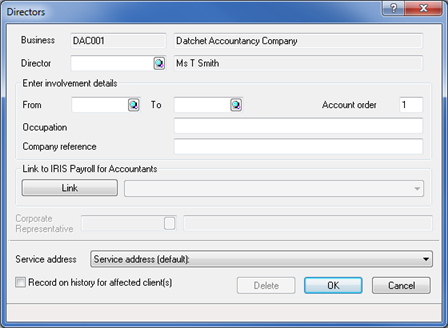
Repeat this process for additional directors to be added.
On the Secretary tab click New and follow the steps above to add a client and complete all details as relevant.
Click OK to associate
the secretary with this business.

Click Close to the client involvement screen.
Corporate Appointments must have a corporate representative selected (that is, one of their director's or secretaries) if being formed electronically. The personal authentication data is required for appointing people and businesses which must be entered in Edit | Personal Authentication Data. Corporate appointments use the personal details of the corporate representative in place of a signature.
On closing the Client Involvements screen the following question displays.
Click Yes.
Enter the date of the formation for example, today’s date which is used as default. If a licence is present for Company Formations, Launch Formation Wizard on exit defaults to ticked and affects the screens that follow.
Click OK, then Register.

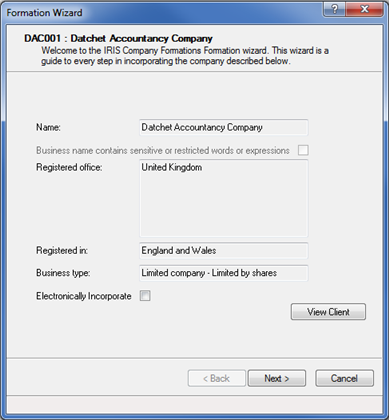
Following registering the company for use within Company Formations the Formation Wizard screen displays confirming some of the details just set up.
Click Next.
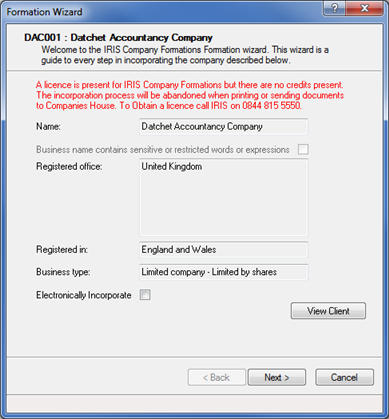
Where a insufficient credits are present a warning in red text displays on the screen. To obtain a licence Contact IRIS on 0844 815 5550.
If any information that is required to form the company has not been entered, warnings dispaly on this screen and the Next option will be greyed out until the missing information is entered.
Step 1 – Involvements screen lists all the directors and secretaries entered for the company and warning messages display at the bottom specifying any mandatory information that is missing. The details can be corrected by selecting Involvements. If there are no errors click Next.
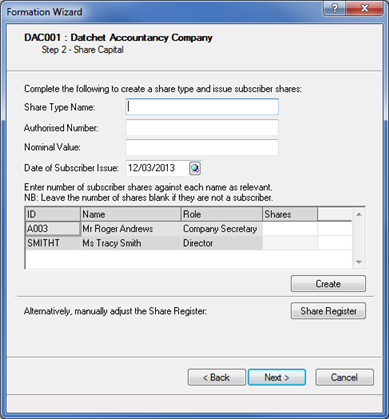
This screen has quick entry fields for companies with one share type being allocated to the directors and/or secretaries.
For quick entry complete the Share Type Name, Authorised Number, Nominal Value and Date of Subscriber Issue to create the Share Type.
Enter the number of shares being received by each individual in the Shares column in the grid. Click Create to populate the Share Register with this information and successfully proceed forming the company.
Click Next once completed.
The subscriber event and transactions
only relate to entities where a number of shares is specified within
the Shares column.
For alternative situations select Share
Register and enter the share types, events and transactions
separately. See product Help | Help
| Quick Guides | Share Register for guidance on using the share
register.
If there is more than one class of capital entered within the share
register on incorporation, the incorporation will be permitted and
sent to Companies House and the application shall assume the class
of capital to be 'Ordinary'.
Having entered the share capital the default Memorandum and Articles of Association can be altered.
the Memorandum and Articles default to using the IRIS default wording (which is multiple objects and short form articles). If additional templates have been setup or altered they need to be applied within this screen by selecting Apply Default Values, select the template and click OK.
the date the Memorandum
and Articles of association are agreed by the subscribers defaults
to the date of the company formed event used in section 3. Select
Agreement Date to alter or
enter the date if incomplete.
Templates can be added and altered within Setup | Memorandum and Articles of Association Defaults.
If specific manual amendments are required external to this Formation Wizard go to Edit | Memorandum and Articles for the data screen structure to appear. There is a separate screen for each clause and each article with plenty of additional article screens for adding any additional text for the client.
The order that the articles appear on the report can be altered by highlighting the relevant screen/folder and using SHIFT and UP or DOWN arrow or right-click on the screen/folder and selecting Move Node Down/Move Node Up.
By post
Witness information is needed before sending the documents to :Companies House.
If a Witness has not already been entered:
This information is included on the paper formed version of Memorandum and Articles of Association.
Electronically
Authentication information that may be needed before sending the documents to Companies House electronically is:
Company Authentication Code (optional)
Click Edit in the Company Authentication Code section and enter the 6 digit code and click OK.
This code can be requested from Companies House or defined by you before forming the company.
If a code is entered this will be registered by Companies House as the code to use for future filings. If the code is left blank the acceptance response will include an allocated Company Authentication Code.
Personal Authentication Data
Authentication data is required for all directors, secretaries and subscribers of the company. The grid displays entities where authentication data is missing.
To enter the information:
Click Edit and Personal Authentication Data. Any of the entities displayed in red required authentication data to be entered.
Highlight a director/secretary/shareholder and click View.
Three pieces of authentication data are needed OR an authentication code. If a code is entered this will be used on the incorporation in preference to the three pieces of authentication data. Click Save.
Once all related parties have been updated click Close.
Click Next to proceed with the formation wizard.
This step covers contact information and sending the Company to Companies House. To identify who to direct any queries to regarding the incorporation enter Queries Addressed to your firm by clicking Edit.
The default option is the accountants address with no named contact. The available printing/e-filing options depend on whether the company is being formed electronically or by post.
By post
Click on Incorporate and Print Forma to print the form IN01.
Also click Mem and Arts and ensure Paper Version is selected as this will include space for signatures and witness information. Click Finish.
Finally, obtain necessary signatures on these documents and then post to Companies House.
Electronically
To electronically file the company:
Select incorporate then select the Electronically Incorporated option.
Click Print to print form IN01.
Click Mems and Arts and tick Electronic Version box then click OK:


Options available are:
In respect of the Memorandum and Articles, there is the option of using the wording contained within Edit | Memorandum and Articles or an existing document. The default will be the IRIS version but if the external document is chosen the path must be specified by selecting the Incorporate and clicking on the magnifying glass next to Use external document to specify the location of the document.
Include Supporting Data select only if the name requested is of a sensitive nature and supporting evidence is required to incorporate the company. See Companies House Guidance Booklet on Company Names GBF2 (https://www.companieshouse.gov.uk/about/gbhtml/gbf2.shtml). To attach any documentation to the email submitted to Companies House, select the magnifying glass at the end of the field to browse to the document and select it.
Check names to search the Companies House website for availability of the chosen company name.
This document should not be filed with the registrar, it is merely a user-friendly representative of the details IRIS PTP will include within the efile submitted to Companies House.
The next message displays; “Printing the document will permanently use an Company Formations License. Do you wish to proceed?” Click Yes to lock a licence for this client and proceed with electronically forming the company. Click No to abandon the formation and the locking of a licence.
Only 1 licence will be locked per client.
Next screen to display is a message from Companies House confirming the application has been sent successfully to Companies House.
After the company information has been sent to Companies House to be reviewed and incorporated IRIS periodically requests a status update for all submissions outstanding with Companies House. The acceptances received from Companies House will contain the following information which be automatically saved in IRIS:
the date of incorporation
the company registered number
a pdf attachment being the incorporation certificate; and
the company authentication code for future electronic filing for the new company