 |
 |
|
|
From the menu bar select Client | New
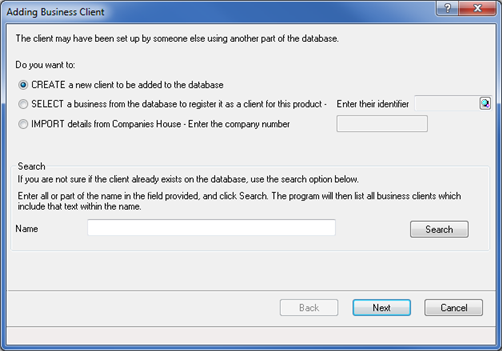
Select Create a new client to be added to the IRIS database option.
Click Next.
The New Client screen displays:
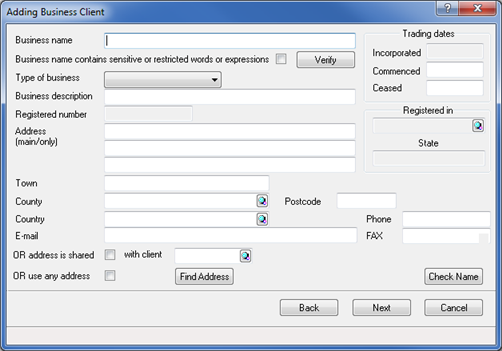
Complete the Business Name, Type of Business (select Sole Trader or Partnership) and Commenced fields in addition to any other relevant field.
Click Next.
The following screen displays:
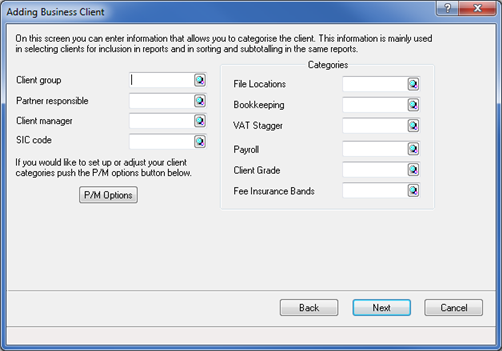
The above screen can be used to categorise clients according to Partners, Managers, and so on. This does not need to contain any data.
Click Next.
The following screen displays:
7. Review the data entered on the above screen
8. Select Finish to proceed
9. Or Back to amend the details www.iris.co.uk/practice
Page 5 of 30
Setting up Trades/Partnerships in
IRIS
The screen will appear as follows:
10. Enter a Client identifier reference for the client (maximum of 10 characters)
11. Select OK
The AutoMail – Letter Options screen will appear as follows:
12. Select OK to generate a letter
13. Or select Cancel if a letter is not required
Note: The AutoMail - Letter Options screen will appear only if there is an existing Automail Licensewww.iris.co.uk/practice
Page 6 of 30
Setting up Trades/Partnerships in
IRIS
Setting up Involvements
Note: If Cancel is selected in step 13 the Client Involvements screen will appear as follows
1. Select the Partners tab (or Proprietor tab in the case of a sole trader)
2. Select New.iris.co.uk/practice
Page 7 of 30
Setting up Trades/Partnerships in
IRIS
The Partners screen will appear as follows:
3. Select the magnifying glass within the Partner field www.iris.co.uk/practice
Page 8 of 30
Setting up Trades/Partnerships in
IRIS
The Client Browser screen will appear as follows:
4. Select New to add an involvement if not shown on the list
5. Or choose Select to add an existing involvement www.iris.co.uk/practice
Page 9 of 30
Setting up Trades/Partnerships in
IRIS
If step 4 is selected, The Adding Personal Client screen will appear as follows
6. Select Nextwww.iris.co.uk/practice
Page 10 of 30
Setting up Trades/Partnerships in
IRIS
The Adding Personal Client screen will appear as follows:
7. Complete the relevant fields
8. Select Nextwww.iris.co.uk/practice
Page 11 of 30
Setting up Trades/Partnerships in
IRIS
The Adding Personal Client screen will appear as follows:
9. Select Nextwww.iris.co.uk/practice
Page 12 of 30
Setting up Trades/Partnerships in
IRIS
The Adding Personal Client screen will appear as follows
10. Review the data entered on the above screen
11. Select Finish to proceed
12. Or Back to amend the details www.iris.co.uk/practice
Page 13 of 30
Setting up Trades/Partnerships in
IRIS
The New Client screen will appear as follows:
13. Enter a Client identifier reference for the client (maximum of 10 characters)
14. Select OK
The New Client screen will appear as follows:
15. Select OKwww.iris.co.uk/practice
Page 14 of 30
Setting up Trades/Partnerships in
IRIS
The AutoMail – Letter Options screen will appear as follows:
16. Select OK to generate a letter
17. Or select Cancel if a letter is not required www.iris.co.uk/practice
Page 15 of 30
Setting up Trades/Partnerships in
IRIS
If Cancel is selected in step 17 the Personal Client Maintenance screen will appear as follows:
NOTE: The above screen gives a summary of the details entered
18. Review the details
19. Select Save
20. Select Close
NOTE: Any required amendments can be made by selecting the relevant tab www.iris.co.uk/practice
Page 16 of 30
Setting up Trades/Partnerships in
IRIS
The Client Browser screen will appear as follows:
21. Highlight the relevant involvement and choose the Select option www.iris.co.uk/practice
Page 17 of 30
Setting up Trades/Partnerships in
IRIS
The Partners screen will appear as follows
22. Enter the dates (if required) within the From and To fields
23. Enter the account order number within the A/C Order field
24. Select OKwww.iris.co.uk/practice
Page 18 of 30
Setting up Trades/Partnerships in
IRIS
The Client Involvements screen will appear as follows:
25. Select Close
26. Or select New to add more partners
27. Or select View to make any necessary amendments www.iris.co.uk/practice
Page 19 of 30
Setting up Trades/Partnerships in
IRIS
Setting up Partners’ Profit Shares
The Net Profit Share Dates screen will appear as follows:
1. Highlight the relevant line
2. Select Shares
The Net Profit Share Dates screen will appear as follows:
3. Enter the Date that the partners’ profit shares will be effective from
4. Or leave the field blank if it is from the start of the business
5. Select OKwww.iris.co.uk/practice
Page 20 of 30
Setting up Trades/Partnerships in
IRIS
The New Partner Share screen will appear as follows:
6. Within the SHARE section select the relevant radio button to specify the partner’s profit share
7. Tick Joint Capital Account if a joint capital account exists
8. Select the magnifying glass and select the joint partner if Joint Capital Account has been ticked
9. Select the relevant options within the section Split of Joint Net Profit Share to split the profit
between the joint partners
10. Select OK
NOTE: A joint partnership can only be setup when the joint partner has been allocated an order
number of zero.
NOTE: If more than one partner exists, the above steps 1-5 need to be repeated for each partner www.iris.co.uk/practice
Page 21 of 30
Setting up Trades/Partnerships in
IRIS
The Net Profit Share Dates screen will appear as follows:
11. Review the details and verify that the status reads All Shares Set
12. Select Close
NOTE: All the lines on the above window must read All Shares Set www.iris.co.uk/practice
Page 22 of 30
Setting up Trades/Partnerships in
IRIS
Setting up a Posting File
1. From the Menu bar select Posting | New
The Accounts Charts screen will appear as follows:
2. Select EPST (or EPSF for Farm clients)
3. Select OKwww.iris.co.uk/practice
Page 23 of 30
Setting up Trades/Partnerships in
IRIS
The New Posting Entry screen will appear as follows:
4. Enter a description for the posting file in the Description field
5. Select the currency from the Currency field
6. Select the magnifying glass from the Account Period End Date field www.iris.co.uk/practice
Page 24 of 30
Setting up Trades/Partnerships in
IRIS
The Insert Accounting Period screen will appear as follows:
7. Enter the end date for the period
8. Select OKwww.iris.co.uk/practice
Page 25 of 30
Setting up Trades/Partnerships in
IRIS
The Please choose an Accounting Period screen will appear as follows:
9. Highlight the relevant date
10. Select OKwww.iris.co.uk/practice
Page 26 of 30
Setting up Trades/Partnerships in
IRIS
The New posting Entry screen will appear as follows
11. Select the magnifying glass from the Previous Account Period End Date field
The No Previous Period End Date screen will appear as follows
12. Select Trade Date if IRIS is to remember and make reference to the trading date which would have
been entered while initially setting up the client
13. Or select Enter Datewww.iris.co.uk/practice
Page 27 of 30
Setting up Trades/Partnerships in
IRIS
The Please Choose and Accounting Period screen will appear as follows :( if Enter Date has been
selected)
14. Select Addwww.iris.co.uk/practice
Page 28 of 30
Setting up Trades/Partnerships in
IRIS
The Insert Accounting Period screen will appear as follows:
15. Enter the previous year end or a day before the start date if it is the first year of trading
16. Select OK
The Please Choose an Accounting Period screen will appear as follows: www.iris.co.uk/practice
Page 29 of 30
Setting up Trades/Partnerships in
IRIS
17. Select the relevant date
18. Select OK
The New Posting Entry screen will appear as follows:
19. Review the details
20. Select OKwww.iris.co.uk/practice
Page 30 of 30
Setting up Trades/Partnerships in
IRIS
The Specify Posting Batch screen will appear as follows:
21. Select Cancel
22. Or select OK to run the opening balances, if postings have previously been made