 |
 |
|
|
An Annual Period End Date can NOT be directly changed to an Interim Period End Date. A new date needs to be created as ‘Interim’ and re-assigned to the posting entry before the Annual date is deleted. This quick guide will explain how.
First take an Extract of the client
via Client | Extract
Complete the following steps:
Select Edit | Account Period End Dates
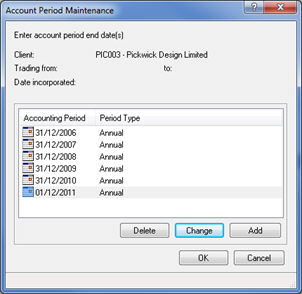
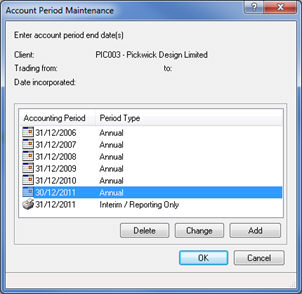
The following screen displays.
Select
the Annual Period (to be changed to Interim) and click Change.

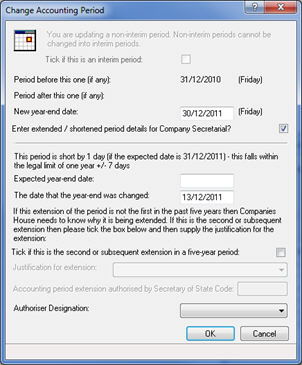
The following screen displays.
Change the date within the New year-end date field by one day for example, 31/12/ changed to 30/12/ and click OK.

The reason for changing the Annual date to 30/12/ERROR: Variable (Last_Year) is undefined. is because IRIS will not allow both an Annual AND Interim Period with the same date to be created at the same time. This period can be deleted later.
If the following screen displays de-select
the Enter extended / shortened period
details for Company Secretarial box and click OK.
The following screen displays.
Click Add
(to add a new date).
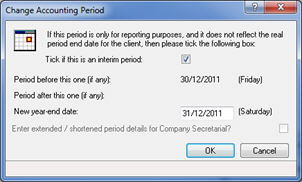
The following screen displays.
Select Tick if this is an interim
period and enter the required period end date in the New-year-end date field, for example.
31/12/
and click OK.
The Account Period Maintenance screen will display again; click Cancel.
Select Posting | Post File Maintenance | Entries.
Click to highlight the posting entry related to the Interim Period and click Change.
Click the magnifying glass next to
the Account period end date
field and click Yes.
On the Please Choose an Accounting Period screen, select the Interim date, for example. 31/12/ -Interim/Reporting Only and click OK.
Click OK, Cancel, Close.
To confirm, the date to be selected will be shown as Interim / Reporting Only.

Finally the unwanted Annual Period now needs to be deleted.
Select Edit | Account Period End Dates.
Select the Annual Period, for example
31/12/
and click Delete.
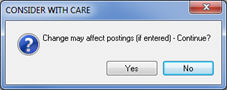
Multiple screens will display to confirm deletion. To continue
with deleting the Account Period click Yes,
Delete, Yes, Close to the proceeding screens.
If at any point the delete process is to be stopped click No or Cancel when prompted.